Long-EZ back home!

Today all the components that will someday make up Long-EZ N916WP arrived back home!

Delivery Truck
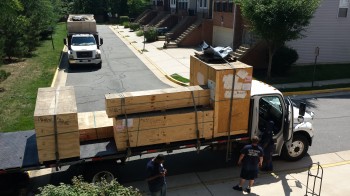
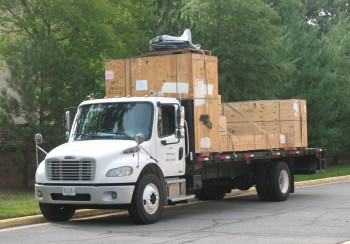
The project was crated into 3 big boxes, with the wings being the largest of course.  The large crate at the very front of the truck bed is regular household stuff and the large crate at the very back of the truck bed is my motorcycle.

Delivery Truck

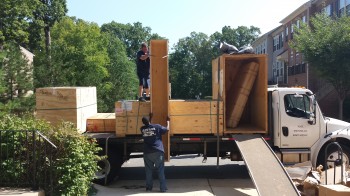
After many hours of unloading my household goods from the other truck, we were finally finished so they pulled this truck into position.

Hello old friend!Again, the wings are in the long, low flat crate located closest to camera (Left side of truck).

Big boxes!
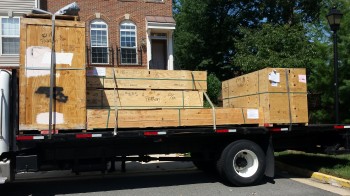
The large lower box next to the wings’ crate is the fuselage, and the long smaller crate on top of the fuselage is the CS Spar and the canard.

Lets do this!

Once the large household goods crate at the front of the truck was unloaded, we were able to start unloading the plane assemblies.  The first thing that came out of the crate was the CS spar.  I don’t know how much experience you’ve had with movers, but I was very adamant about them being slow and careful with these parts, which in the end they were.

CS Spar

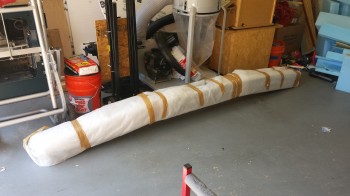
I was a little unnerved for a bit since the only thing in the long crate atop the fuselage was the CS spar!  I had watched them put both the CS spar and the canard in the top crate when it was packed up in Germany.  Unfortunately, I would have to wait until AFTER the fuselage was unloaded to ensure the canard was in the wings crate, which is the only place it would fit!

CS Spar and canard crate

While they removed the empty CS spar crate from the truck I quickly unwrapped the CS spar to check it over and make sure there was no damage, which there wasn’t.

Looking good!

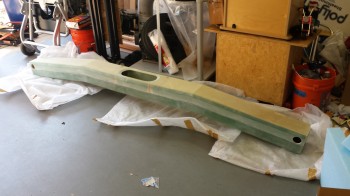
I let out a huge sigh of relief when we cracked open the wings’ crate and I saw the canard laying on top of the wings!  However, I wasn’t overly happy with them moving the canard out of its original crate, where it was in a leading edge-down orientation, to simply laying it on top of the wings.  As a point of note, I had originally stated the requirement that the wings crate be built to hold the wings vertically, but although they said they understood my requirement, they still built it so that the wings laid horizontally, as you see in the pics.

Plane parts

No worries . . . at least everything made it back to the States in one piece and undamaged!  Welcome home Long-EZ 916WP!


Keeping it hot!

I can’t really finish the shelves or the glass cabinet until I get the epoxy hotbox knocked out.

Epoxy hotbox

Once the back wall was in place, I started on the bottom shelf.  Now the hotbox will be insulated all the way around, with both 1″ Styrofoam and aluminum covered foam used in building houses.

I installed edges for the bottom shelf “tray” to sit on:

Epoxy HotboxEpoxy hotbox

Now, the pain involved with building the hotbox is that it takes a fair amount of time to cut the Styrofoam insulation pieces.  Luckily I had retrieved the hotwire cutter that I built back in early 2011 from storage at my buddy Marco’s shop.  This made the insulation cutting a lot quicker and cleaner!

Below are 2 pieces of 1″ foam inserted into bottom shelf area and sitting upon the shelf tray built above:Epoxy hotboxAfter installing the bottom shelf-top, I then had to refine my measurements for the epoxy jug storage on the bottom shelf and the quart & bottle containers of hardener on the top shelf to place the middle shelf.

Epoxy hotboxEpoxy hotbox

The epoxy you see here is MGS 335 that I had left with my buddy Marco to use if he wanted.  Being busy on his build and machining projects, he never really used it, so I’ll play around with it on some non-aircraft/non-structural projects.

I then insulated the back and side walls, and installed the light bulb heating elements.

Epoxy hotbox

Epoxy hotbox

Finally, I finished insulating the top of the hotbox as I did the bottom shelf, and will use the actual top shelf sheeting to cover the upper 2″ foam insulation pieces.

Epoxy hotbox


Workshop prep – shelves

Here’s a picture of my garage workshop in a fairly clean state (read: empty!)

New Workshop!

After getting the workbench knocked out, I started in on building some decent shelves along the right side wall in the forward (closest to the garage door) corner.  Since I posted the pic above out of sequence, you can actually see the front corner of the shelving structure in the right side of the pic, just above the hood (or bonnet for some you!) of the truck.

Here’s the beginnings of the shelf project:

ShelvesShelvesShelves

The narrow shelf structure that makes up the left side is a notch I’m making that will allow for a cabinet that will be used for storing the fiberglass rolls.  Of course the front door of the cabinet will rotate out & down for use as a glass cutting table.

Shelves

As you can see in the pics I retrieved my neon green welder back from the clutches of my now TIG-welding crazed buddy Marco (if you haven’t seen his new TIG welder, check it out on his Long-EZ building site).  I also bought a cart (on sale!) at Harbor Freight to put the welder on and keep things nice ‘n spiffy.

ShelvesThe opening at the narrow side/left end of the shelves is where I’ll place my insulated epoxy/resin hotbox.  Below you can see the back wall of the hotbox.

Epoxy hotbox

If you look closely on the middle shelf, you can see the 3 light bulb fixtures that I pulled off of the ceiling.  These will be re-purposed as “heating elements” for the epoxy and glass storage cabinets.


Back in Virginia!

So I’m back in my old house in Virginia.  Actually a different house than where I started the Long-EZ project back in 2011.  Since I won’t be getting my household goods or my plane parts for another couple of weeks, I figured I would get the garage shop prepped as much as possible to minimize the scrambling when all my stuff arrives.

My first order of business was to take out the 3 small incandescent bulb light fixtures and replace them with fluorescent light bars.  Also, I figured out where I was going to place my workbench.  Below you can see the workbench location, and the new light bars at the top of the pic.

Work space

I then started in building the workbench . . .

Work Bench

. . . then my neighbors stopped by to let me know that I was doing it all wrong!  Luckily they straightened me out, remeasured a bunch of boards for me, and I was back on track!  (There Dad and my good friend Dave lent me his old Craftsman circular saw to use until I get my tools delivered to me with my household stuff.  Since I don’t have any of my own tools, I’ll use that saw and a cheap 12v I picked up at Home Depot to build the workbench and shelves before my stuff arrives . . . Thanks Dave!)

Little Helpers

Workbench

Workbench

With the frame done I had to wait a couple of days because of the pesky rain (ahh, DC…) before I could cut the top shelf sections.

Workbench

With a few hours reprieve from the rain, I was finally able to cut the top shelf and peg board and get this workbench in the bag.