
First off, I know I’m spending a number hours more per day than I had planned on this canopy… however, I both want to clean up what I consider a big SNAFU on my turtleback and get the canopy acceptably configured for transport.
Defining the turtleback issue:
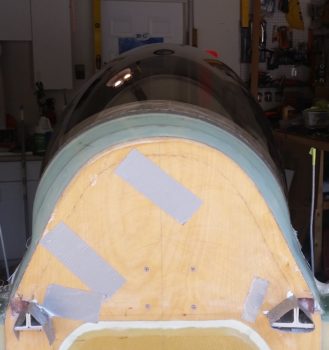
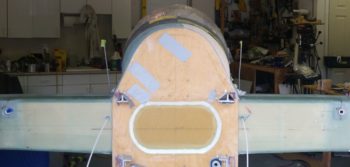
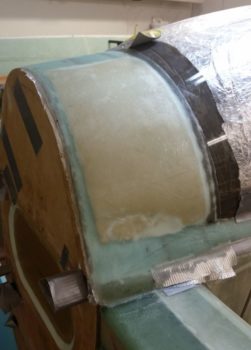
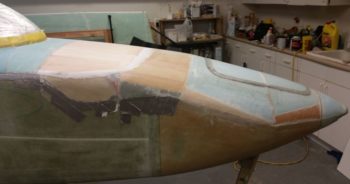
In the pic below, note the 9 O’Clock bulge and the 1-2 O’clock deflation. I think I unknowingly did this by forcing the canopy bottom corners both over to the right before placing the turtleback foam in place. Actually, I did notice it, but I thought it was a very slight, minute shape shift. It just wasn’t obvious nor clear that it would become so obvious and prominent after shaping and glassing the turtleback.
I wanted you to see the pic below, with the turtleback unmarked and in its current “natural” state.
The turtleback shape mitigation plan:
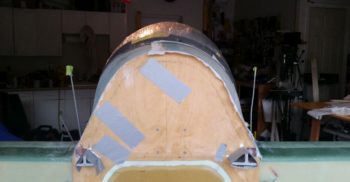
Here is my analysis of how to minimize the misshapen turtleback, and as you can see in the pic below I’ve marked it up to explain my mitigation plan.
First off, let me reiterate and be clear that my plan is to MITIGATE this off-balanced issue as best possible. I have NO illusions of completely eliminating it. The only true fix would be to rip off the canopy and redo the whole thing, with my entire focus then being how to mitigate this configuration debacle on the aft end vs (again) eliminating it. And of course risking the chance of screwing up the very nice outcome of the front 90% of the canopy!
Problem #1 is the bulge on the left side, denoted in the pic below with the red oval and the white star being the apex of the bulge. Note how below the star the canopy is vertical to almost coming back inboard. Contrast this with the other side (right) where it has a comparatively gentle sloping curve, much more constant in nature. To be clear, the aft canopy edge drove the shape of the turtleback so the only thing further outboard than that canopy bulge on the right is the 3 plies of BID holding it in place.
The REASON this shapeshifting occurred was most likely my maniacal –and probably misplaced/misguided– adherence to keeping the center canopy elevation even with the upper engine cowling extended contour angle (denoted by the green arrow and line). If I had adjusted the canopy and let the elevation of the top go where it wanted to naturally, I think I’d still be dealing with this configuration oddity, but just in a less severe form.
Yet another issue, that will actually help in the attempted remedy of this SNAFU, is that for some mysterious reason –despite many repeated measurements– the fore/aft vertical canopy line of the turtleback glass overlaying the aft edge of the canopy is 0.35″ aft on the right side than it is on the left… which I’ve denoted with the blue line. This obviously means the left is more pronounced when looking at the turtleback from CL aft as in this pic because its termination line is 0.35″ forward than the right side. Making the bulge even more pronounced!
My plan is a 2 step plan. First is to fill in the area marked by the yellow dashed line with 1/4″ foam and shape it. Focusing on trying to manufacture a right side apex (purple line) opposite the left one. I will also very aggressively sand the left side along the apex line to knock that down as much as possible. Even 0.020″ will make a difference.
Part of the deflation between the 12 O’clock and 3 O’Clock positions is that on the left side my sanded depression for the 3″ UNI tape was close to spot on and it was even with the other foam surface, whereas on the right I went just a hair deeper and the UNI tape is not proud nor even, and is ever so slightly sunken… but not enough to affect the glass transition with the overlying BID. It just adds to the depressed/flat/deflated look on that right side.
Now, I say a 2 step plan due to the fact that I feel I can/should deal with the turtleback to canopy angle issue later, after I get the upper cowling in place. However, IMO I need to see if this remedy for the right side will work effectively BEFORE I pull the canopy off to shape and glass the interior surfaces. If it just doesn’t work, I may go further in my corrective actions.
One final thought on the remedy to my unsightly creation, which actually isn’t really a remedy but rather of byproduct of the shape and configuration of my plane’s major components. The bulkiness, size and shape of the canopy does a good job of hiding this issue from the front. It will most likely be more noticeable with the airplane in the grazing position because it naturally takes more of the canopy’s sheer size –that serves to block the turtleback from view– out of play. The other saving grace for my surreptitious cover up here is that the cylinder humps on each side of the upper cowling serve to block the view of the lower half/third of each turtleback side when viewing it from the back side of the plane (determined by my holding the cowling in place and assessing the aft view with cowling in place).
Clearly what I’ve shown here in these 2 pics is NOT visible (to my knowledge) in any of the pics I’ve taken at other angles. Since you can’t be on separate sides of the airplane at the same time, I think if I add mass to the right side and mitigate the off balance between the two sides it would be really hard to get a really good view of this abomination at any other angle other than straight forward or aft of the plane.
Finally, I’m not trying to hide bad workmanship and be done with it. Clearly there are no structural issues at play here and it’s my belief that any airflow imbalance will be minimal. But for the sake of getting this thing in the air, and also to not waste any more time, materials, or money, I want the best mitigation possible and point out the view-blocking components as a point of note. No builder wants a glaring, non-structural issue being the focal point that eyes are drawn to on their creation as it sits on the ramp!

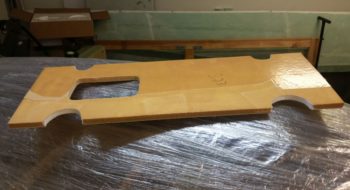
So I started today by trimming the overhanging cured glass from around the firewall.
Here’s a side shot of the overhanging glass over the firewall’s aft edge.
Here we have the glass trimmed away that was hanging over the firewall and also the 1/4″ thick Divinycell foam that I micro’d to the right side turtleback.
I then did an initial round of sanding on the added foam, as well as cleaned up some micro runs.
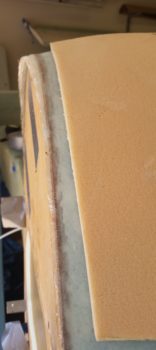
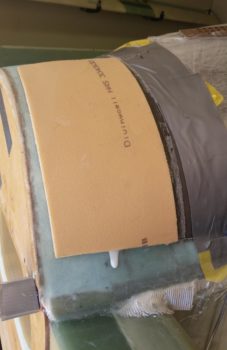
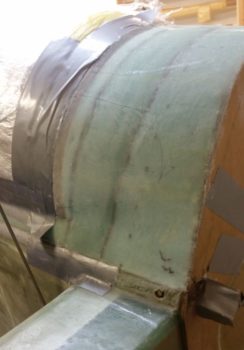
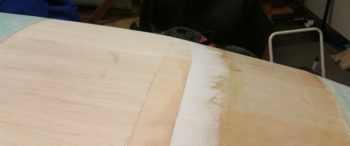
Here’s the 1/4″ thick added foam piece sanded and shaped down close to its final shape before glassing.

Here you can see that, although still not perfect, the addition of the foam has taken the shape & aft view of the turtleback from “Ooh, gross!” to “Hmm, it’s not horrible…”
I then micro’d the foam and glassed it with 2 plies of BID. I used an extra ply to allow me to really hit it hard with a sanding block if need be when it comes time to finish the surface for paint… with the micro finish allowing me to further fine tune the turtleback’s shape and symmetry as well.
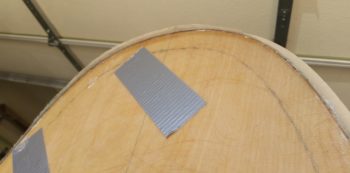
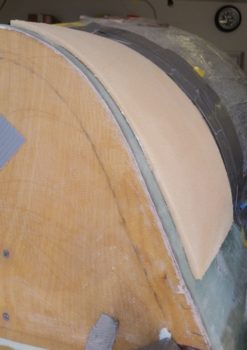
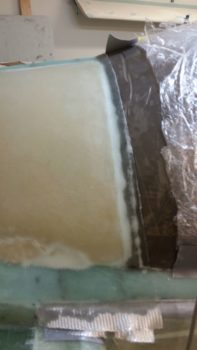
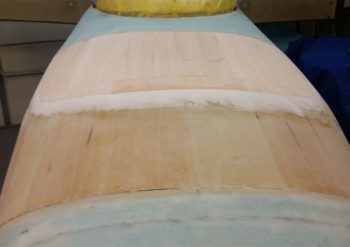
Here’s a shot of the shaped & glassed foam added to the right side of the turtleback
This pic shows the newly positioned line of the canopy to turtleback intersection.
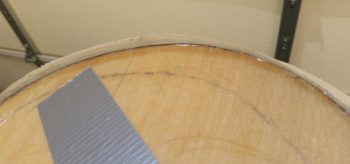
Before I got busy sanding and shaping the added turtleback foam, I Fein saw cut the aft edges of the canopy at the longerons. Here’s the left side, but I forgot to grab a shot of it on the right side before I reglassed the added foam piece.
I also took a few minutes to dig out the foam in the mouse holes on one of the 3 strake ribs that I left out of the last haul to NC. I’ll try to knock these out as I go about my other build tasks so they’re ready when it comes time to build the strakes in the next 2-3 months.
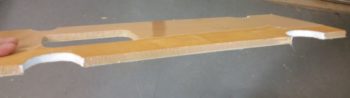
I also took a little bit of time to take the long sanding board and really finalize the shape of both the flocro transition for the added Balsa wood strips on the aft nose cover, as well as the intersection of the “old” nose sidewalls and the new foam I just recently added to make up the forward nose sidewalls.
[I have some slight “shoulders” on the nose sides right where I added in the new PVC foam when creating the top nose structure. I sanded these for a bit but I think I have to accept the fact that since I left my original nose sidewalls a bit high and with a vertical surface, that the nose then somewhat sharply transitions into the top curve… this makes for a somewhat abrupt change at the nose sides from curved (top) to vertical (side). So although curved, it’s not as smooth as I would want. A minor issue, as I think it has zero affect on nose structure strength or aerodynamics, and I suspect not highly noticeable when the nose is finished to paint.]
Here are some closer up shots of the flocro transitions between the edge of the added Balsa wood and the front/side areas of the aft nose cover. To be clear, the height of the front edge of the balsa wood was about 1/32″ when I applied this flocro, so there is not a ton of added flocro added here.
Tomorrow I plan on actually cutting the turtleback to separate the aft canopy frame and then remove the canopy from the fuselage to begin canopy internal shaping & glassing.