
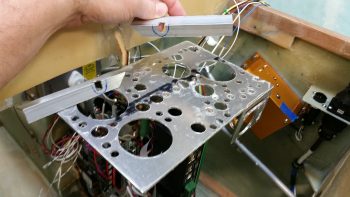
Yup, today was a light build day! Today I drilled a notch in each of the two 1″ parts mounting overhangs that will reside on the bottom front edge of the Triparagon cross shelf. Since I kept the shelf as small in dimensions as possible, space is tight all around. Thus, the mounting screws at the 4 corners of the GRT GADAHRS box are located very near the cross shelf’s front and aft edge. At the front side, the GADAHRS mounting screws on each side actually project through the cross shelf plate into the corners of the front parts mount overhangs, at the corner of the angled extrusions no less.
To create a notch to allow for the GADAHRS 2 front mounting screws, I simply clamped the parts mounting overhangs together and then used a larger 21/64″ drill bit to create the notch on each extrusion. When I finished, the notch was deep enough on the vertical arm, but not the horizontal arm. To remedy this I just remounted & reclamped them together with the horizontal extrusion arms positioned vertically together in the clamped assembly, then redrilled. Voila! Good notches with space for the GADAHRS front mounting screws.
 I mixed up the order again slightly on my building task timeline due to my pics. Before I drilled the notch in the parts mounting overhangs, I actually started out by going to town on Triparagon cross shelf and drilling a bunch of 5/8″ and 3/8″ lightening holes, as you can see below. I feel like I should post a shot of the theater masks showing both funny & sad faces, because that’s exactly what this is… a bit of a lesson in futility it seems like! I drilled all those holes only to have the cross shelf weigh in at 0.53 lbs. Thus, a total weight loss of only 0.04 pounds! Wow! I still have a few more spots where I’ll drill some holes, but I realized after this round of drilling lightening holes that my total target weight of 1 pound for the entire Triparagon assembly is probably not going to be met. I will of course strive to make it as light as possible, but I think it will most likely have a final weigh-in of 1.2-1.3 lbs. Still much lighter than when I started out, considering the Triparagon vertical plate alone started out at just under 1.4 lbs!
I then spent a good 20 minutes measuring, assessing, checking, visualizing, test fitting, analyzing, mocking up & designing my final plan for the diagonal 1/2″ x 1/2″ angled aluminum supports that will be secured to the Triparagon vertical plate about 1/3 of the way down in line with the front edge of the Triparagon cross shelf. The left & right diagonal supports will connect to the front edge of the cross shelf by being attached to the outer most edge of the parts mounting overhangs.
I will also have one diagonal support on the aft side that traverses from the inboard edge of the PQD bracket to the about midpoint on the aft edge of the Triparagon vertical plate. Clearly this is a total of 3 diagonal supports to keep the cross shelf secure specifically to provide a stable mounting surface for the GRT GADAHRS. I suspect that once all the wiring bundles are in place and attached to the PQD connectors, and all the other bunch of wiring bundles around the Triparagon, that those will greatly assist in securing the cross shelf from any adverse movement as well. If not, I’ll be prepared to run another cross shelf support from anywhere in the avionics bay to ensure the cross shelf is stable for the GADAHRS.
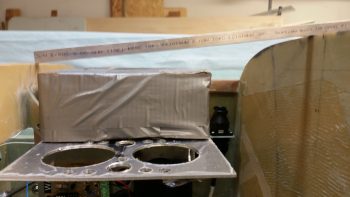
The last thing I did before taking off for the majority of the day/evening was to take my 1/2″ x 1/2″ angled support strut extrusion and use it to double check that the space gap between the top of the GADAHRS box (the tallest component on the cross shelf) and the nose structure between the instrument panel and F28 was good. It’ll be a little tight after some foam & glass goes in there, but the spacing looks fine.
Later this evening, after I returned home, I took a large piece of paper and sketched out actual sized positioning for my switches and their panel positions. With space so tight behind the panel (again, actually forward of the panel) I was specifically attempting to figure out where to put my Dynon intercom box. It seems small, and it is fairly petite in height and width. But add on the wiring harness D-Sub connector to the back side of this thing and now your talking over 6″ deep! And that’s not even really accounting for the radius of the wiring bends that need to make a turn to go somewhere! I came up with 3 spots that will actually, physically work and then assessed them on my panel sketch:
- Center top of the panel
- Left top console immediately forward of the throttle (my throttle quadrant will sit back some from the panel unlike the plan’s position)
- Right top console against the sidewall just aft of the stick opening (I did a full range of motion check with the stick and flight controls and there’s plenty of space since I had to kick the controls inboard 3/4″ to allow use of the Cozy Girrrls control parts)
I did pros & cons for all 3 positions, and quickly nixed the top center panel mounting idea. With an input jack for music, and the way the wiring would flow (read: get in the way) on the back side of the panel, this location just won’t work for me.
I will say that one issue I never really understood with Long-EZ’s until riding in my buddy Marco’s Long-EZ is that with the seat bulkheads designed/constructed the way they are, you cannot mount switches or items aft of where you can reach since your elbows cannot move aft at all… since the physical seat back (aka “wall”) prevents it! If you do, you have to mount the switch or device in a spot where you can reach over with the opposite hand to manipulate it. This is exactly what I need to test out tomorrow, since I prefer the intercom face to be mounted on my right console just aft of the control stick/opening, tucked away against the fuselage sidewall. But the question that needs to be answered is: CAN I REACH IT?!
Tomorrow will continue to be all things electrical for now. I’m on a roll and I really want to knock out as much of this electrical stuff **pre-nose closing** while I can. Just to reiterate, once I finish my current infatuation with the electrical system, I’ll be back building on the wheel pants!