
Well, as I was looking up some info on the GRT Avionics site yesterday I ran across their home page banner on their integration and use of a Heads Up Display (HUD). I remember quite a while back my buddy Brian Ashton up in Alaska discussing how he had picked up a HUD unit for his GRT avionics suite. We had a few brief discussions on GRT’s HUD system (the backbone component is actually from Hudly) and I really never gave it much thought after that.
Still being in my self-enforced downtime due to my back and hip (which are getting better at a snail’s pace), I took the time to really dive into this unknown world of GRT HUD technology. Well, as you can see from the pics below, the integrated HUD along with the GRT avionics does a really good job of displaying a ton of key flight data.
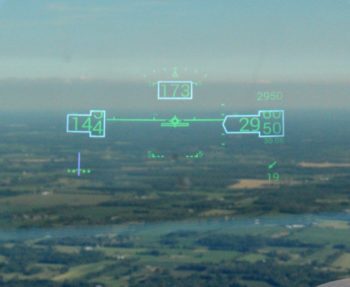
These pics were taken by GRT’s Greg Toman in his RV6 during a bright day. During Greg’s subsequent discussion on this HUD system he noted that after takeoff on his first flight with the HUD installed, he realized after landing that he had not looked inside the cockpit for primary flight data once during the entire flight. In short, it was just way too EZ to reference the HUD for this flight data info, which then allowed him to concurrently keep his eyes looking outside for traffic.
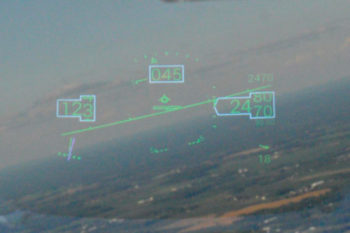
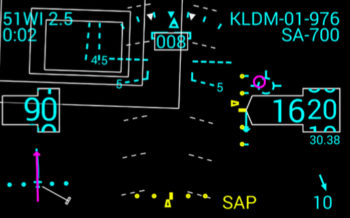
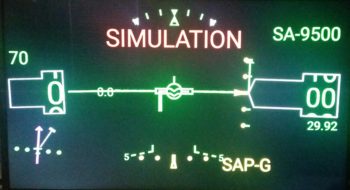
Moreover, GRT’s integrated HUD provides a ton more information than just basic flight data. In the depiction below, in addition to airspeed, altitude, heading, attitude, altimeter, turn coordinator and wind speed/direction, it also provides
- HSI (lower left)
- Waypoint info (upper left): WPT, distance, ETA
- GRT’s Highway-In-The-Sky (HITS) boxes
- Armed GRT Synthetic Approach (SAP) [4.5° descent angle, also shown during ILS]
- Runway depiction (near center of inner HITS box)
- Flight Director & Flight Path Marker (magenta circle & target symbol above ALT box)
- Vertical & lateral approach “needles” (yellow hash marks)
- Runway info/data (upper right): KLDM, Rwy 01, currently 976 feet above runway
- Selected altitude (upper right) “SA-700”
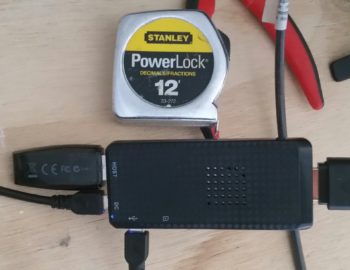
Call me impressed (or a sucker… ha!) but after a 45 minute phone call with Greg at GRT, I was convinced enough to at least give this HUD technology a try. I ordered a small Android Compute Stick [a mini computer somewhat like the Raspberry Pi, but quite often used for processing video signals] that serves as the BlueTooth interface between the GRT EFIS components and the HUD system.
Fast forward to today, where I received the Android Compute Stick and immediately started to get the GRT Remote App loaded onto it (which required an HDMI-cabled monitor, thus allowing me to use my recent space-saving purchase of a Smart TV!). In the end, I was able to cobble together just enough bits n’ pieces to make this happen. As you can see below, for the pic of the Android Compute Stick I added the ubiquitous decimal tape measure into the shot for size determination.
I then set-up the various HUD parameters for what will be my specific HUD configuration.
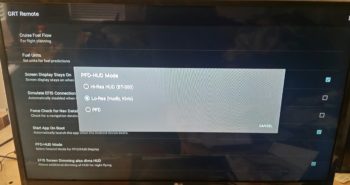
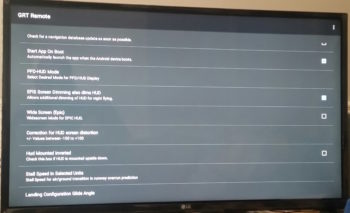
One nice feature of the GRT Remote App is that it lets you check how the HUD display will look as you change out the various configuration settings in the app menu.
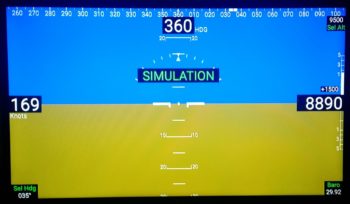
Finally, I do plan on having a small Android screen on a RAM ball mount for GIB situational awareness, so just as an FYI this PFD below is how flight data info will be presented to the GIB.
I don’t plan on actually purchasing the HUD equipment until next year some time, but I did want to get a jump on things for planning purposes HUD-wise. Thus, I’ve already designated the HUD’s power connection points in my current electrical system configuration.