
Today was one of those mundane, must-do build days. I spent literally over 3 hours getting a bunch of wire labels that I had printed out heat shrunk to wires on both the mocked up panel and the cockpit heating system wires. Part of this time was spent confirming my wiring connections in the schematics, and verifying the pinouts as a precursor to below.
I then spent well over an hour verifying and updating my connector pinout diagrams. I know, I know (believe me!) … not the fun updates to read about on a airplane building website, but as I’ve said many times before: Oh, so necessary for future knowledge, troubleshooting at upgrades.
I then spent another 45 minutes soldering in a 300 ohm resistor and diode, one each, to the last two GNS480 LED annunciator lights. Let’s mark that task complete!
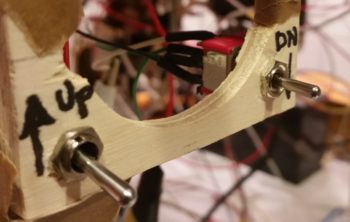
I then spent another good hour locating & installing 2 test switches OFF-(ON) that provided me with the momentary ON function I needed to emulate the 5-position castle switch that will control the remote UP-Down (and display) functions of the GNS480’s User Comm Frequency List. After digging through my spare inventory of switches, I found 2 switches that fit the bill and designated one for UP and one for DOWN.
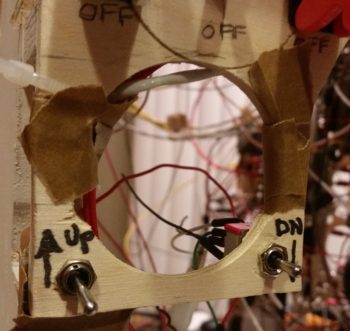
I drilled the 1/4″ holes into the bottom of the panel at each lower corner of where the pilot air/heat vent will go [again, these are simply mocked-up switches installed here to test the GNS480 User Comm Frequency List capabilities. The final actual control function will be provided by the 5-position castle switch mounted on the throttle handle, not in the locations shown]. As you can see by the tape, the amount of pressure required to drill these 2 mounting holes snapped off this bottom piece of the panel that had simply been glued into place after I moved the air vent lower. No worries, the tape held well enough for me to actuate these switches.
I then researched and verified a number of box configurations on the EFIS, GPS and autopilot. As a point of note, a lot of my latest panel configurations have been in a collaborative effort with Marco, since not only is he using 2 GRT EFISs, but he also has the GNS480 and an onboard GPSS/GPSV capable autopilot (GRT). Since Marco just converted his autopilot roll servo from the Trio EZ Pilot servo to the GRT servo, he took the opportunity to test fly it today. Thus, a long in-depth discussion ensued afterwards (a “hot-wash” if you will) on autopilot functioning and approach sequencing, etc.
It was in this discussion that Marco, who has 2 GRT Minis (-APs vs my -X) highlighted a specific issue that he has with his Minis, and that I had summarily noticed but didn’t recognize as an issue: the GRT Minis currently will NOT view an External Flight Plan that is loaded/executed on the GNS480 (at least as we both have our respective Minis programmed).
So after a fair amount of digging in the manuals, I fired up the panel in an attempt to figure out the External flight plan viewing issues on my Mini-X. Lo and behold, Marco was right. I could view the External flight plan off the GNS480 on the HXr, but not on the Mini-X. Of course, if I copied the external GNS480 flight plan into the HXr as the new Internal Flight Plan, then I could see and manipulate it from the Mini-X. This is an issue mainly as my planned role for the Mini-X is to be a fully functioning (sans vertical AP servo control) backup EFIS in case I ever lose the HXr. If I can’t see the external flight plan that is loaded in the GNS480, I would be in quite the pickle during an IFR flight in VMC, especially if a fully-coupled instrument approach was required.
Another significant issue I discovered is that through all my (latest) “initial” research in using my GRT-based glass panel, I learned that the Trio autopilot source select switch should be on “EFIS” vs “GPS” during normal flight ops. Only if I lose the EFIS would I then go “VFR-direct” from autopilot to GNS480 GPS for ARINC and GPS flight control data input. Upon learning all this, I had since switched the autopilot source select switch to “EFIS” as the default setting.
Thus, in my last video I was remiss in identifying the reason for the “NO GPS” message on the Trio autopilot’s screen as being caused by the GNS480 being in simulator mode. However, my explanation was flawed since the GRT EFIS GPS, not the GNS480, is the primary GPS source for the Trio autopilot’s GPS input when the autopilot source select switch is in the “EFIS” position. [Trust me, all this stuff gets confusing since, when the GNS480 is online, the GRT EFIS uses the GNS480’s ARINC data to provide guidance to the autopilot… it’s a very convoluted mishmash of signals and I will probably never understand it fully]. I will say that when wiring up the Autopilot source select switch, Trio warns specifically that the source signals must never be mixed: GPS = all GNS480 source signals and EFIS = all EFIS source signals.
One final note. Having been dealing a lot lately with the GNS480 annunciator lights’ open collector circuits, which are powered on the upstream side of the lights and then switched to ground inside the GNS480 if the light condition (GPS, NAV, SUSP, etc.) is active, I summarily hooked up the User Comm Frequency List function switches the same way. Oops! These go exactly the reverse in that their feed needs to start at ground, with the 12V+ coming from the GNS480. So one quick relocation of my alligator clip wire from the E-Bus to the ground bus and I had them up & working lickety-split!
Tomorrow I have a number of phone calls and research in store for me to resolve these issues that I discovered today. Again, most likely not a big deal, and exactly why I wanted to mock up my panel outside of the airplane so I could resolve all these issues while my panel is sitting on the bench.