
Today I took a hard look at my engine preservation steps. I’m not exactly sure what’s going on with my engine dehydrator. It’s definitely doing something because the “dilithium” crystals (desiccant) are turning pink, but the humidity sensor on my out air line keeps showing an internal relative humidity only about 5% less than ambient in the shop. An example for clarity, say the shop RH is 37%, than the air out of engine will be around 32-34%. Maybe the 40 gal fish tank air pump I’m using is not big enough and I need more air getting pushed through? Or the fact that this engine has gaping holes (albeit taped up) in it since it’s not all put together? Not sure.
I did rewicker the dry air to enter the engine via the oil filler neck and out the crankcase vent vs. the other way around. Also, I disconnected the out line that was going back into the air pump and instead of a closed system I’m trying a simple dry air in and then wetter air out to shop air. I’ll assess if this has any impact on reducing the internal moisture in the engine.
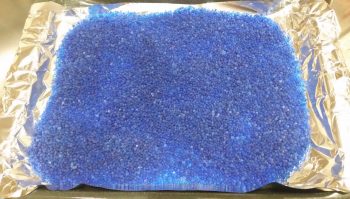
I then tried my hand at baking all the pink desiccant I had collected in a small plastic tub. I put it all on aluminum foil on a baking pan, fired up the oven to 240° F and cooked them for about 1.5 hours.
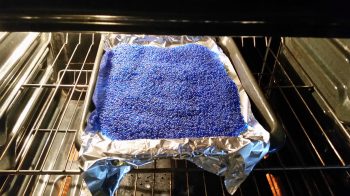
As you can see (although I guess a before pic would have been a good idea eh?) this baking thing really works and turns the quite pink desiccant crystals back to blue. It’s hard to capture the brilliant blue with a camera, but it’s a drastic difference. Pretty cool.
Although I have no doubt that my desiccant efforts is vastly helping keeping my engine internals dry-er, it doesn’t negate the fact that I need to get this engine pickled… and soon! Thus, weather be damned I’m going back into the shop! (currently in the 30’s and it’s supposed to snow 2 days this week….Ugh! )
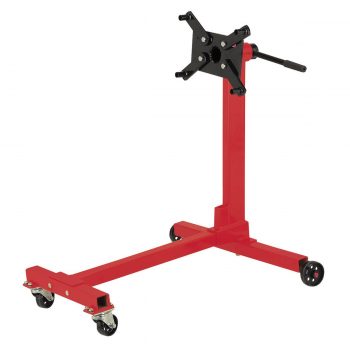
I had 2 major issues regarding engine preservation that until this afternoon were unresolvable: 1) I need to be able to cycle through each cylinder to TDC and BDC for spraying preservation oil into the cylinders. Clearly I can’t do this with the engine dangling by a chain on a hoist. 2) I need to be able to rotate the entire engine upside down to bath the cam in oil/preservation juice. To solve both these issues –and be able to have the engine on-hand but stored in a smaller form factor– I bought an engine stand from Harbor Freight that will allow me to mount the engine to the stand so that I can handle the 2 issues that I mention above.
This means next steps are to finish (ASAP!) the glassing in the lower engine mount extrusions, get the engine mount bolted in place and then use the engine mount to mount the engine to the stand. This will allow me to then do all the steps I need to for proper engine storage. Also, it will allow me to get the engine out of the shop and into my pool hall/rec room/storage so it’s in an a climate controlled area with much less shop dust floating around.
I’ll then finish off mounting the firewall in prep for the canopy build.
I started this phase of the build by going down to a coffee joint and reviewing all my engine extrusion mounting tasks. I then took a look at some fellow builders’ sites who have finished installing their engine mount extrusions (Dave Berenholtz, Mike Beasley, and Ary Glantz). I then reviewed the actual build plans.
In real world time, I’ll probably start off with mounting a couple of hell hole items, then finalize my plan and start glassing in the lower extrusions NLT Thursday.