
Today was yet another busy day just getting a bunch of tasks done to get this bird in the air ASAP.
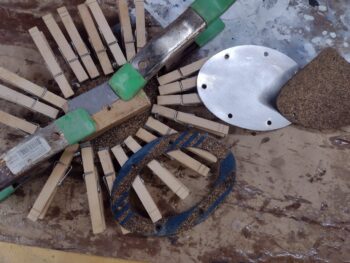
I started off by removing the tape from the just painted, labeled and clear-coated keys (pic 1). I then separated them into pairs, added the labeled gas keys and put them on their respective rings: one primary set of keys with the red tag, and one backup set of keys (pic 2). Keys are done… pressing forward!


My next task (later below) was actually shooting clearcoat on the rollbar… for clarity I grouped that together later on.
I did a good bit of painting and RTV/Permatex #2 work today because the next few days will be VERY cold… below freezing.
I taped up, mounted and degreased the CS spar bolt hole opening covers and the left rudder gust lock before shooting them with sealer first, then a couple of coats of white paint. Not perfect at all, but will do the job. Note that with the excess white paint in the cup, I taped and touched up a couple of the left vortilons to finish the touchups required on those.


Today was the day to knock out the installation of the Holley Hydramats in the GIB thigh support sump tanks.
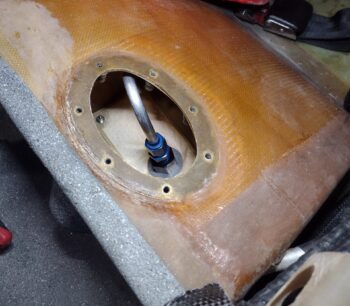
I started by cutting new full sized gaskets for the underside of each cover. Versus the old oval “ring” style, I’ll note that a full gasket eliminates a possible exit point at the upper inside seam of the oval gasket. After cleaning the underside of the cover with Acetone, I slathered Permatex #2 on both the gasket and the cover and clamped them together. The bare cover and gasket to the right is the right side cover waiting to have its gasket attached.
I cleaned out each sump tank with Acetone, let it dry and then vacuumed it to get as much dust and debris out as possible. I then installed the left tank Holley Hydramat.
And then the right tank Hydramat.

See what I call the “Madonna Bra” looking thing on the front wall of each thigh support sump tank? I grabbed this shot to show this . . .
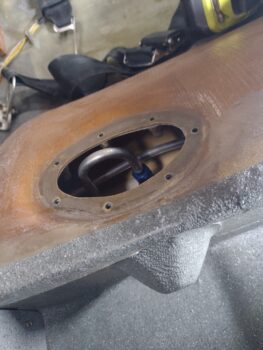
And then the inside of the sump tank. That’s a low level fuel sensor that will ring off if the fuel ever drops below that level inside the sump tank.

Here we have both Holley Hydramats installed inside their respective left and right sump tanks, and the covers and gaskets secured in place, with all the excess Permatex #2 that I slathered on the edges removed and cleaned up.

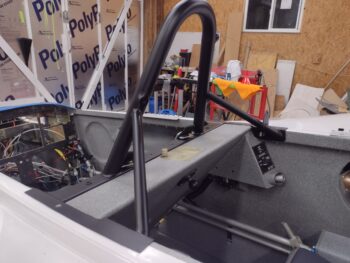
Again, here we have my FIRST task of the day, but I forgot to grab a pic of the roll bar until much later, with other components in the shot. Easier to just report on it here.
First, here is the 2K matte clearcoat that I dropped a pretty little penny on this morning at NAPA.

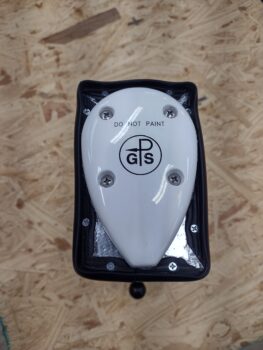
It did a great job in giving the roll bar a nice black sheen, but not too shiny as to blind the GIB when the sun hits it. Note the white painted stuff you saw earlier, but also to the left is the pilot headrest with shot bags on top of the white painted “radome” that covers the GNS-480 GPS puck . . .

Which I installed with new, longer stainless steel screws that I also picked up on my quick shopping run this AM. I actually did the initial drilling and screw-setting on the perimeter seal last night, but today I trimmed it so that the GPS puck was not on the seal edge, but firmly mounted and touching the ground plane.
The final install of the seal, which is a ⊥ shape turned sideways (90°), has RTV on both the top interface and along the side edges of the headrest.
I then RTV’d the top side of the rubber seam and popped the radome into place. After cleaning up the excess RTV, I weighed the radome down with shot bags and tightly taped around the seal perimeter (shown in pic above). Tomorrow, after cure, I’ll of course remove the tape and shot bags.
I checked the tech sheet on my matte clear coat and it states that it dries extremely fast. With that info I proceeded to mount the upper seatbelts and then install the roll bar. In hindsight, I’m wishing I would have waited 24 hours since I had a few spots that showed the paint/clearcoat was still a bit too soft.

Regardless, the roll bar with the upper seatbelts attached is installed (pic 1).
Now, before I installed the roll bar I actually installed the GIB armrests and then did the “final” install of the GIB seat cushions… meaning I pulled the wax paper off the Velcro strips and no kidding set them in place and then sat on them for about 15 minutes to set the Velcro adhesives as best possible (pic 2).


One last shot of the final install of the roll bar.
Yep, slowly moving out on this beast to get ‘er in the air!