
Chapter 26 — Upholstery
31 October 2019 — Well, yesterday I spent a fair amount of the day emailing back and forth with Dave and Lisa from Oregon Aero seats to work out all the info I needed to provide them to enable them to cut the front and rear seat cores for my Long-EZ.
As I mentioned in a previous post, I’m so far behind schedule that I’m not going to play around with trying to save a penny or a dime here and there by constructing my own seat cores.
What finalized my decision?
Well, I just went up to the DC area to pick up the last of some stuff I had stored at some friends’ house. On the way back I stopped off for the night at Marco and Gina’s (I haven’t seen both in a while, so it was a great –albeit brief– visit! I mean, between Gina’s phenomenal cooking and taking a hop in Marco’s awesome Long-EZ, it was a definitely a nice break!).
One thing that I asked Marco to do was to coordinate with Chris Cleaver to see if he was available to show me his newly upholstered seats. Moreover, I wanted to get a “butt test” in to try them out since he had a local guy do them for considerably less than Oregon Aero would cost. I have to say, they were beautiful seats on the upholstery side, but —FOR ME— the butt test left a lot to be desired. I really like the way the Oregon Aero seats feel over the one I tried in Chris’s bird.
So on the way home Monday I gave Oregon Aero a call to get the ball rolling.
The next day (yesterday) I started working some pic mods to show Oregon Aero my seat dimensions for both the front and rear seats.
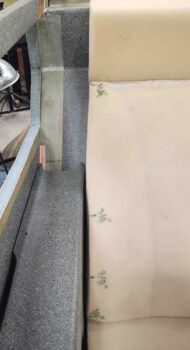
Here I’ve repurposed one of the pics Dave from Oregon Aero sent me to show the various widths of my front seat.
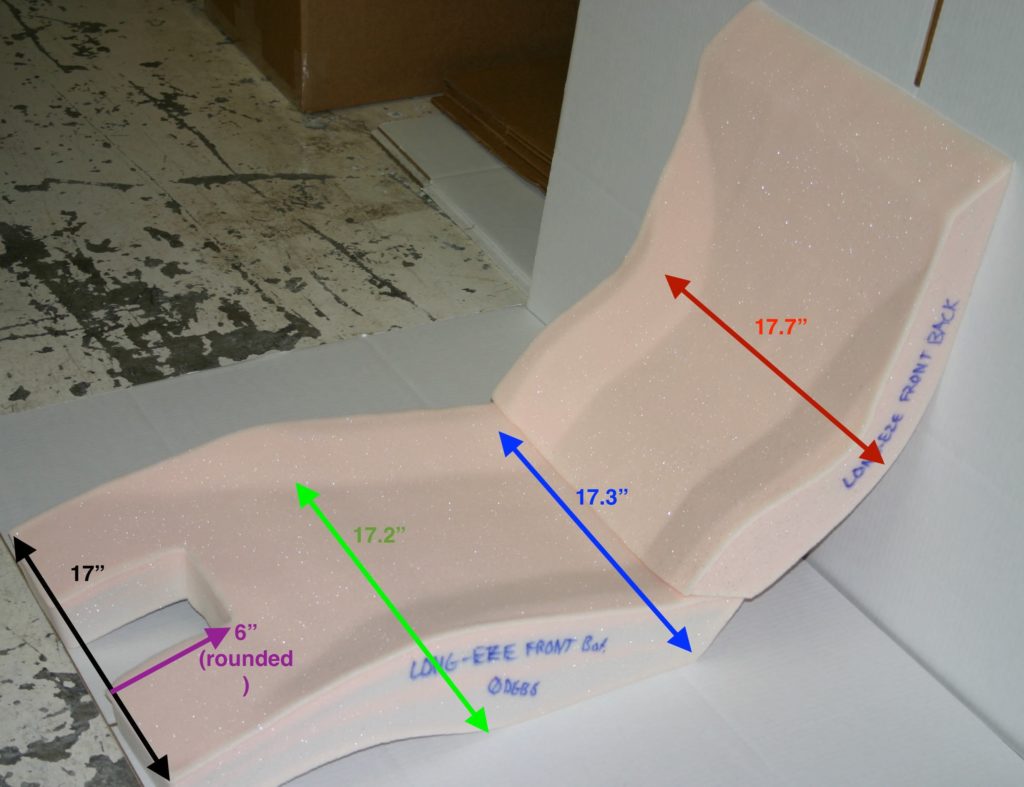
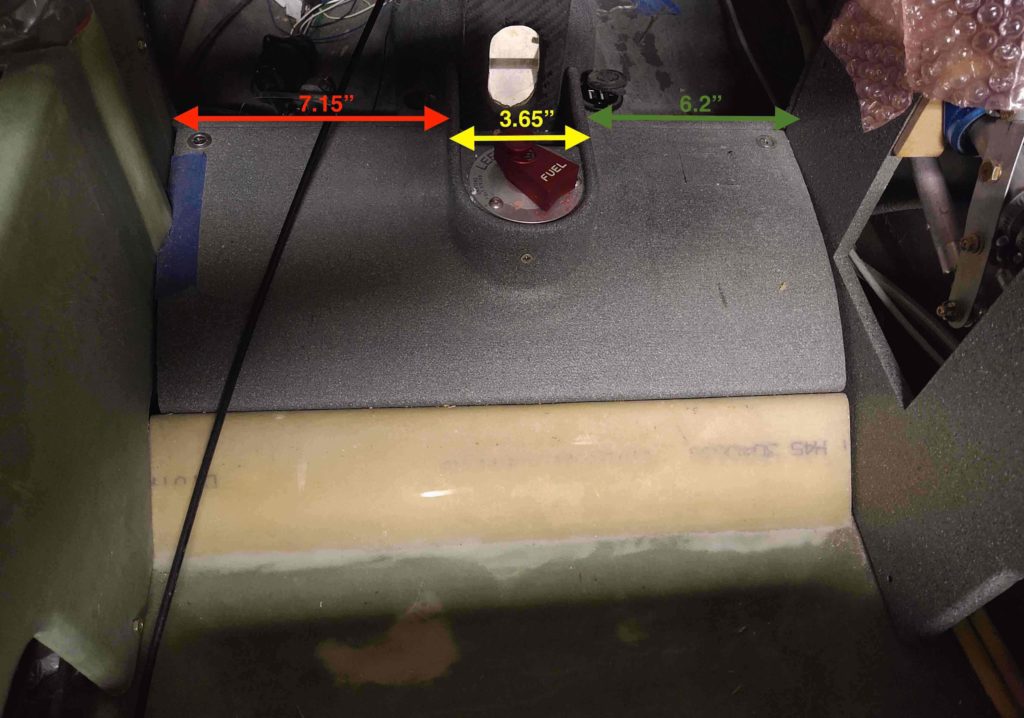
I then snapped this shot to show the different widths at the forward area of the front seat.
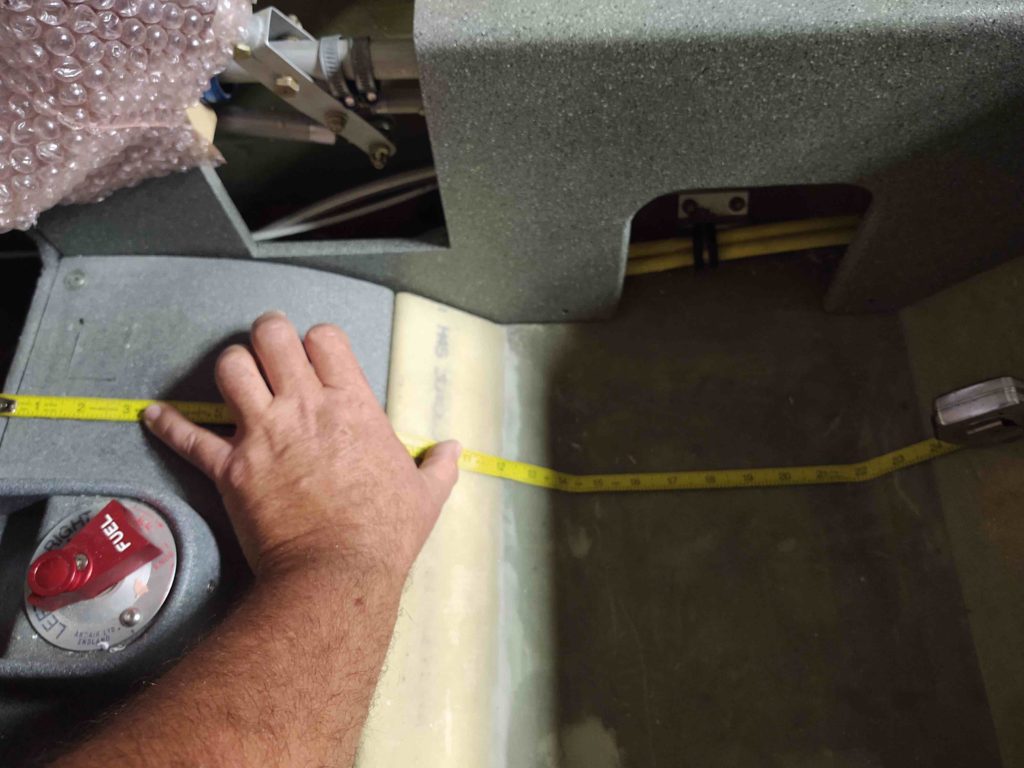
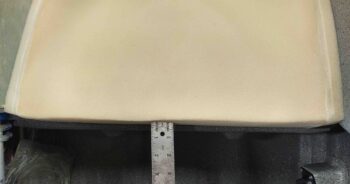
Then came the front-to-back measurements for the front seat. Below is the thigh support and seat pan areas.
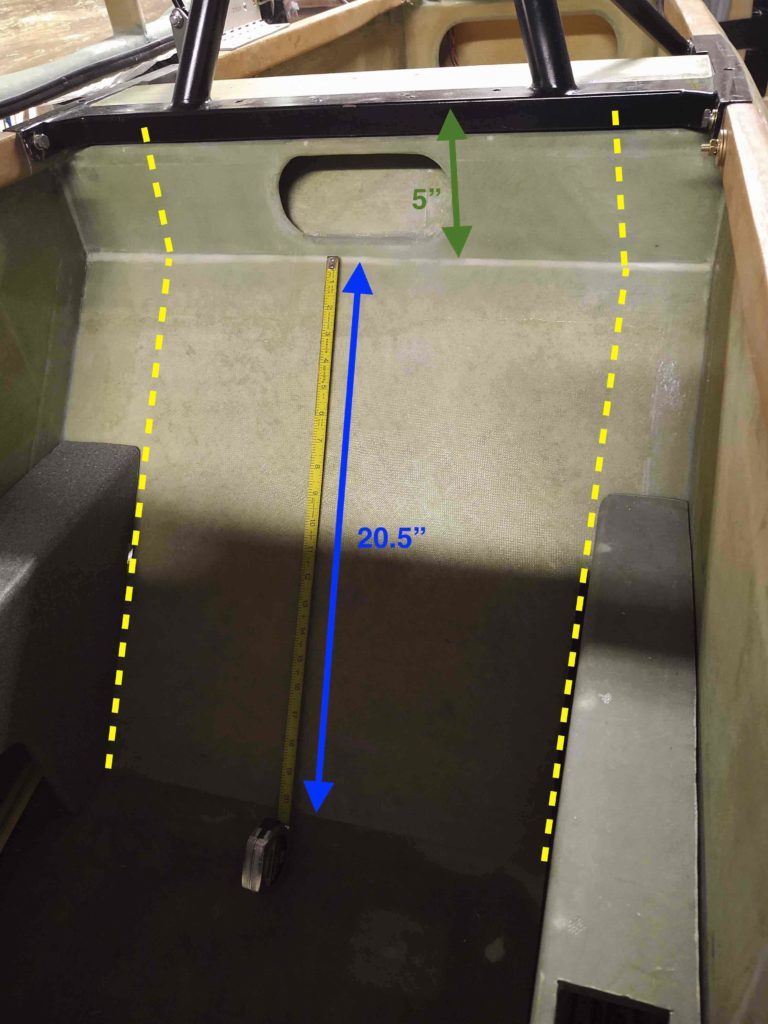
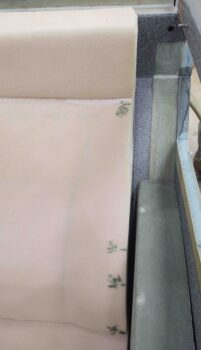
Below is the front seat back dimensions, which I tweaked a bit in my verbal description to Oregon Aero.
Here we have a gee wiz shot of the top front seat back height.
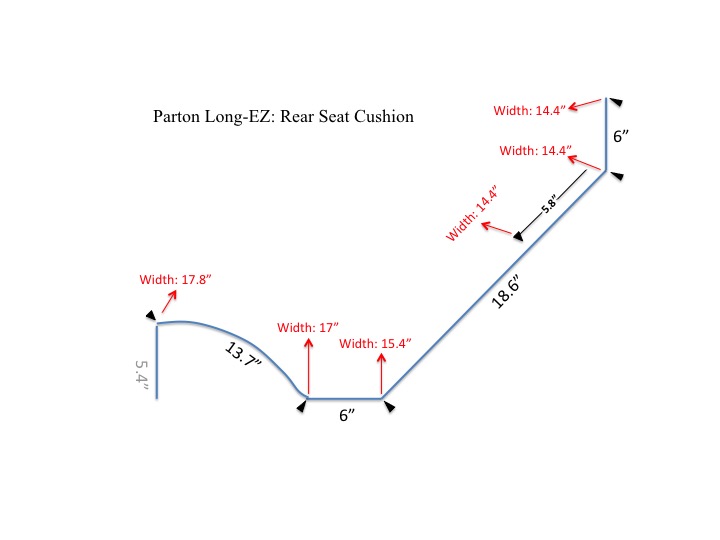
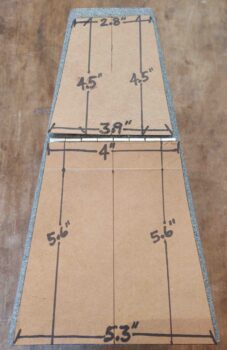
For the rear seat I just did a side-view line drawing that depicted both the profile dimensions and the widths.
Getting all the dimensions and formatting them to ensure Oregon Aero had the correct data really took up most of the day, but I’m glad I got it out of the way and have them now hard at work making up my seat foam cores!
After pulling the trigger today I should have the cores in hand between mid-to-late December. Yet another reason I wanted to get the ball rolling now since I figured it would take a few months to get the cores, test them, tweak any changes and send them back for mods and upholstery.
In addition, I’m having them make me up the armrests and the headrests.
•••
14 November 2019 — I noticed an email this afternoon from Alice at Oregon Aero seats. She is working on my seat cores and asked me for the dimensions of the headrest pads.
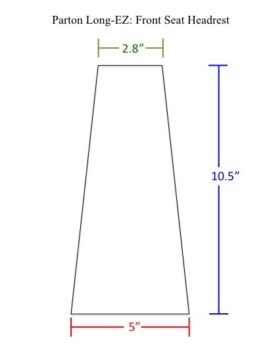
I was under the assumption that those were going to come later, and honestly was up in the air over what I was going to do about my front seat headrest. Nonetheless, I took a good half hour break from tearing down the temp walls in the workshop to gin up some PowerPoint pics to convey my desired headrest pad dimensions to the Oregon Aero folks.
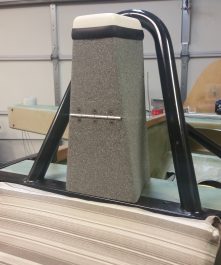
Since my front seat headrest is also a small lockable storage compartment [Hey, take as much & as many as you can get on these airplanes!] that hinges forward, I wasn’t sure if I should have a headrest pad just on the top portion of the headrest? Or perhaps split the pad at the hinge and make the top segment removable while the bottom stayed in place?
Regardless, I wasn’t going to run them through the mill on my mental shenanigans, so I simply provided the dimensions for the entire face of the front headrest. We can dial in the fine print details later and this will give use a good baseline jumping off point.
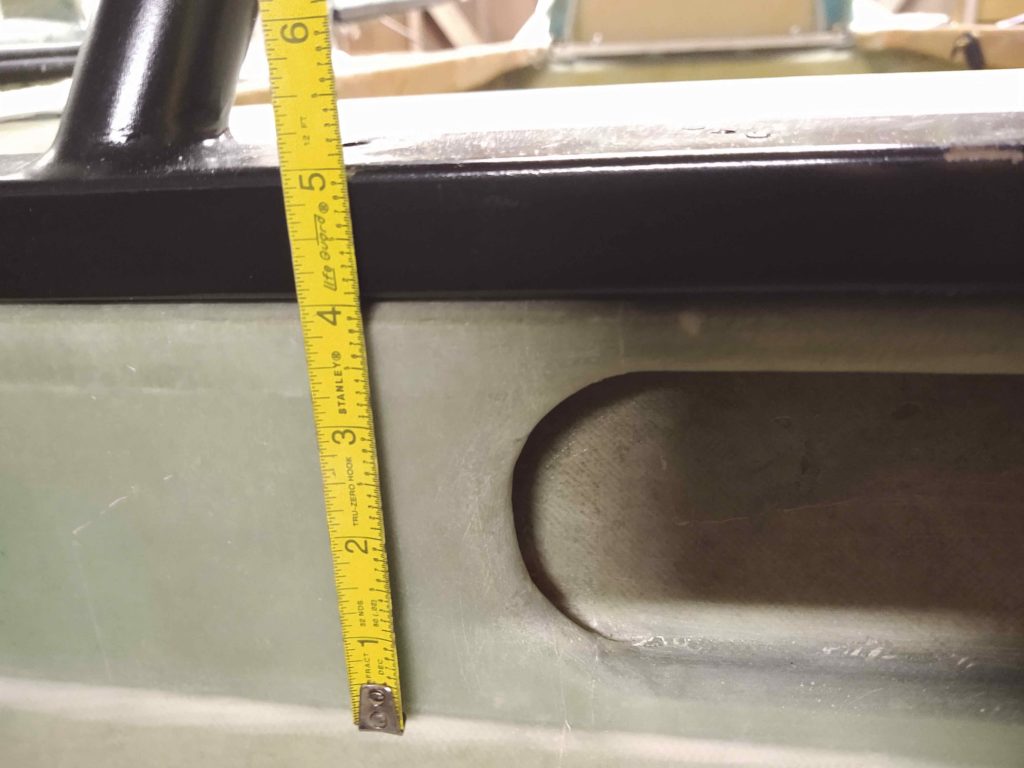
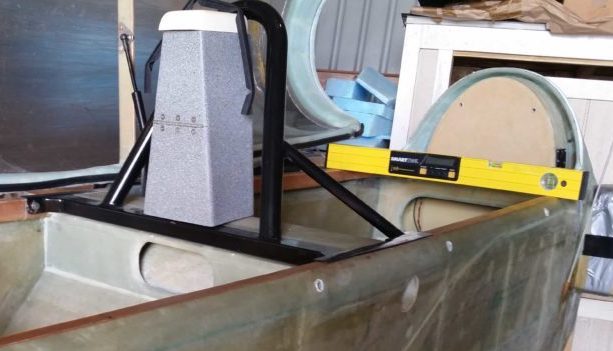
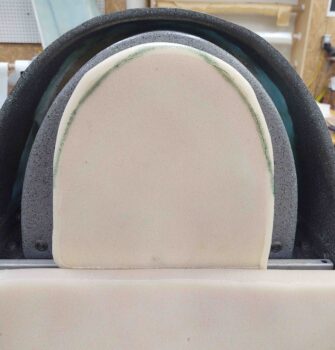
For the rear seat headrest I wanted a nice sized pad for the GIB, but I don’t want to have to remove the headrest pad to get access to the 4 CAMLOCs that hold the headrest front cover plate over all the electro-whizzie goodies inside the headrest compartment. I stole this simple access idea from Wayne Blackler as I noted his rear seat headrest housing hardware was accessible without removing the headrest pad.
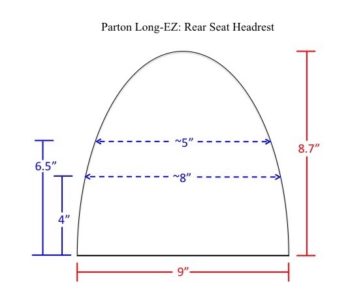
Thus, comparing the shape above might seem a bit narrower than one would think would cover the entire rear seat headrest plate because as I explained above, it simply doesn’t. Pardon the level in front of the rear seat headrest plate, but believe me when I note that there’s a CAMLOC in each lower respective corner, of which the above headrest pad will be attached with its outer edges just inside of to again keep all the CAMLOCs uncovered.
Maybe a bit TMI for simple headrests, but remember, half the battle for me in building this thing is documenting what the heck I did so I can go back and remind myself why, when and how I did what!
•••
25 November 2019 — As I’ve stated before, I may not currently be physically building my airplane, but I’m certainly in the game mentally and I’m really good at BUYING STUFF! ha
Well, today is certainly a milestone day. By taking a few measurements and shamelessly writing a check, I’ve wiped out half of Chapter 26 – Upholstery. And certainly the bigger half: the cushion fit, as my Oregon Aero seat cores arrived today!
Actually, not just the seat cores, but the headrest and the armrest cushions as well… the whole kit.
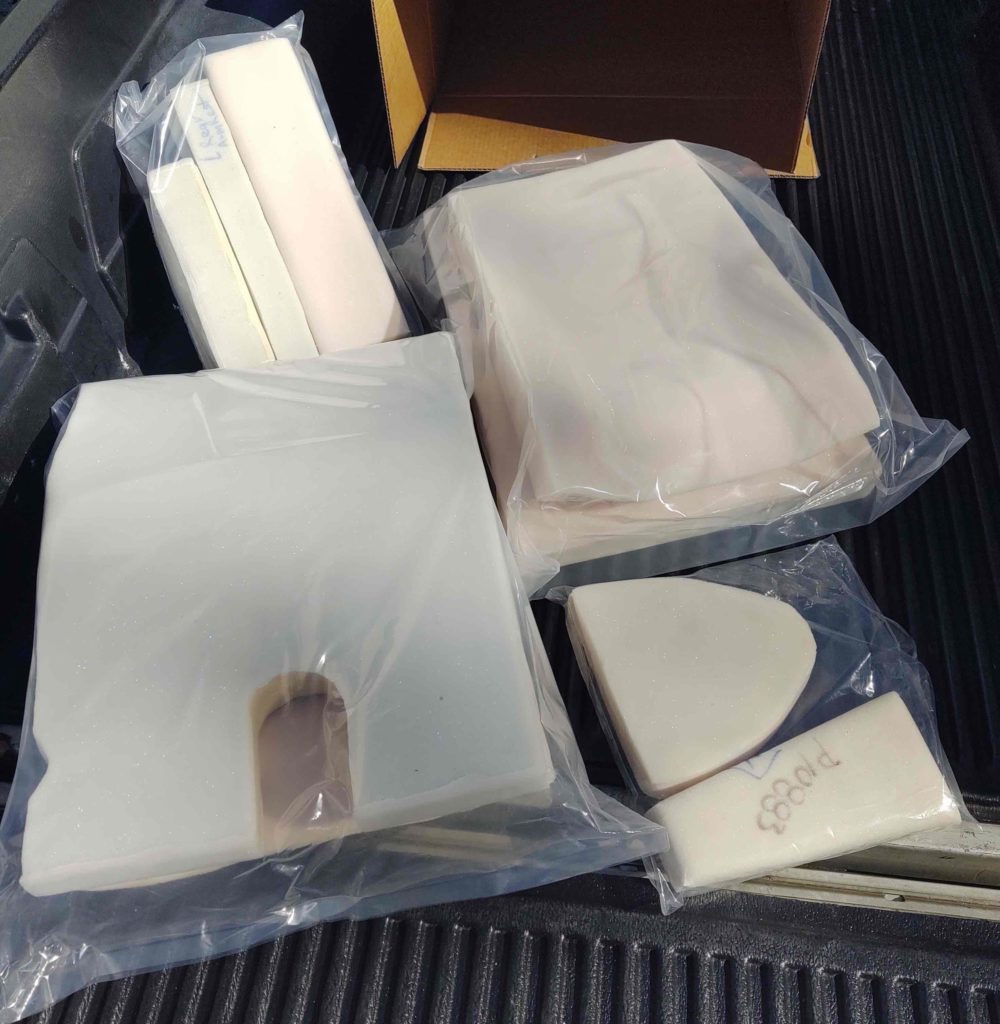
I was in the middle of working on the air compressor closet when the seat cores arrived, and this was just too exciting not to take a break and see how these babies fit!
I found 3-4 minor tweaks that need to be made (which is the point of this test fit phase) but I am overwhelmingly tickled pink with these seat cushions and accessories.
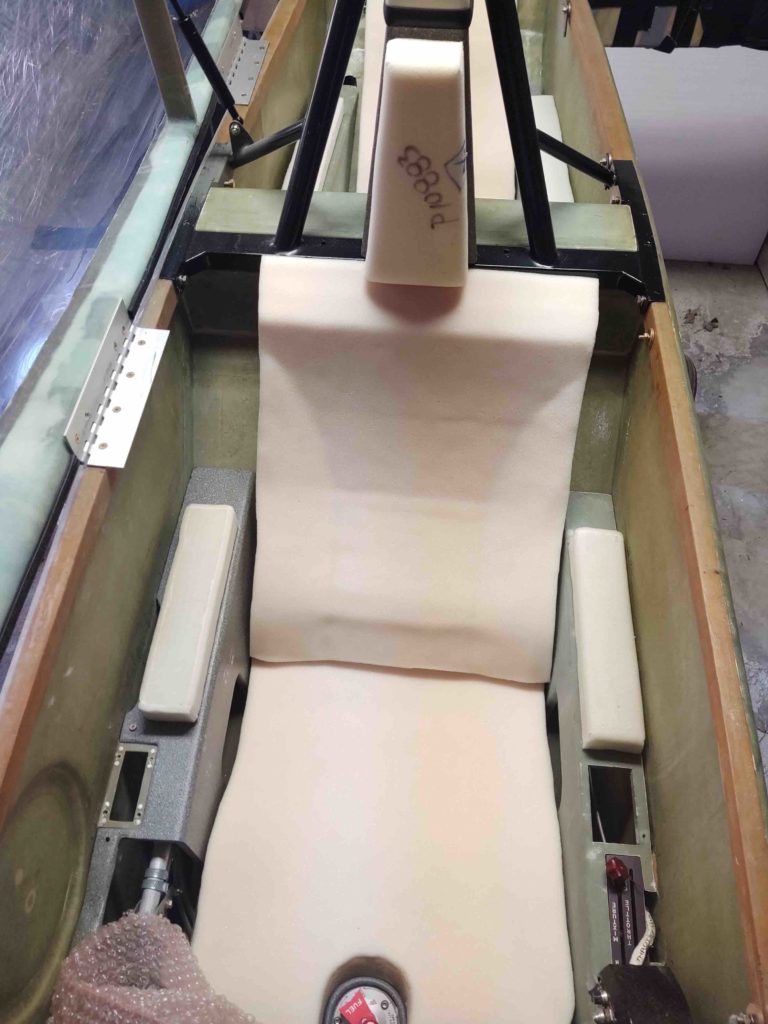
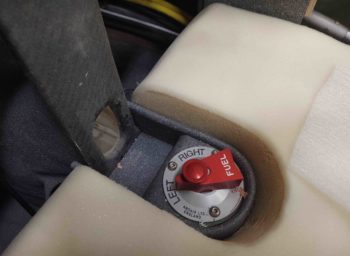
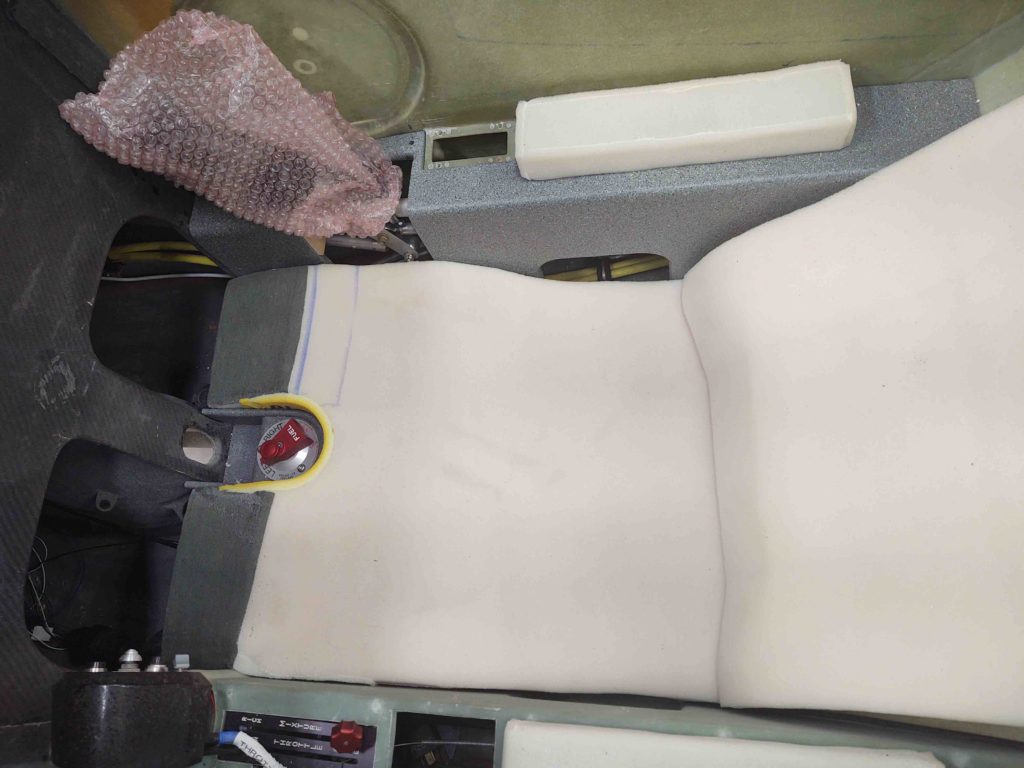
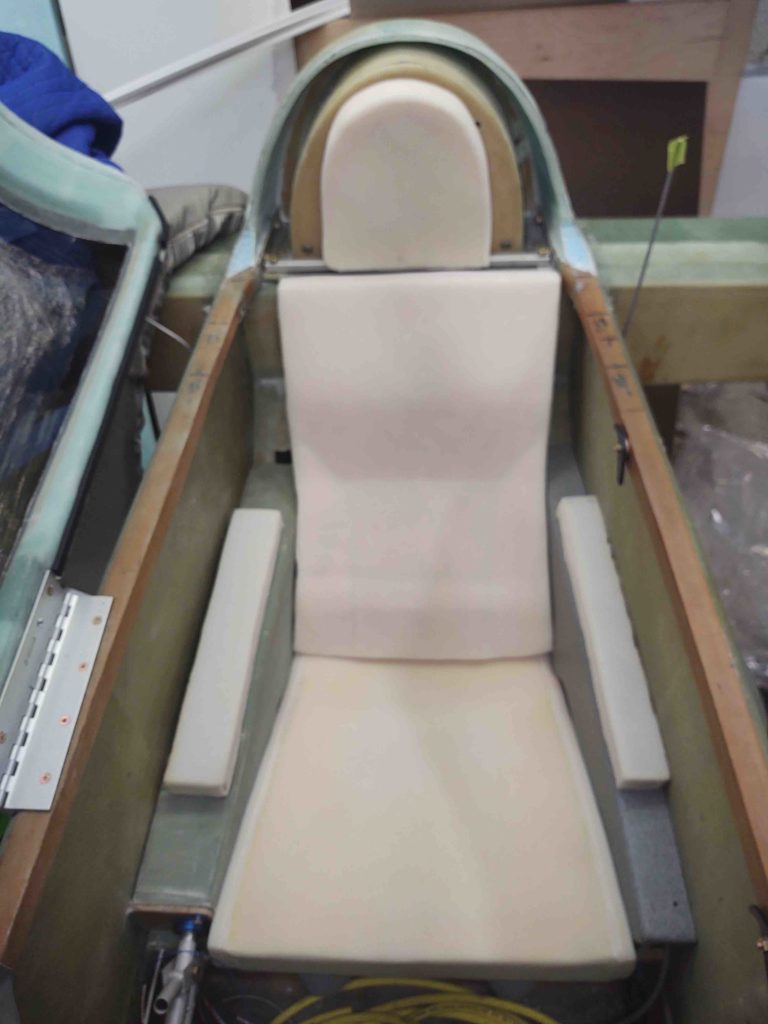
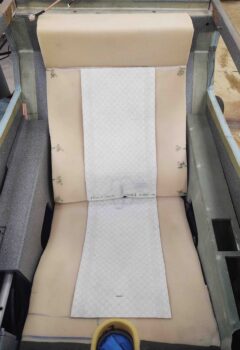
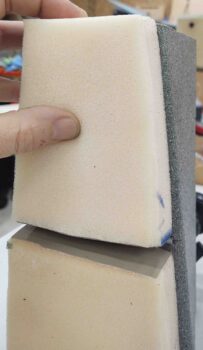
Here’s the front pilot seat . . .
I would like Oregon Aero to make the cut out around the fuel valve a little more vertical so that it hugs the aft curved wall of the fuel valve a little closer. Again, nothing major… at least anything that if it didn’t get tweaked it would affect seat cushion fit or comfort in any way. Just a stylistic preference.
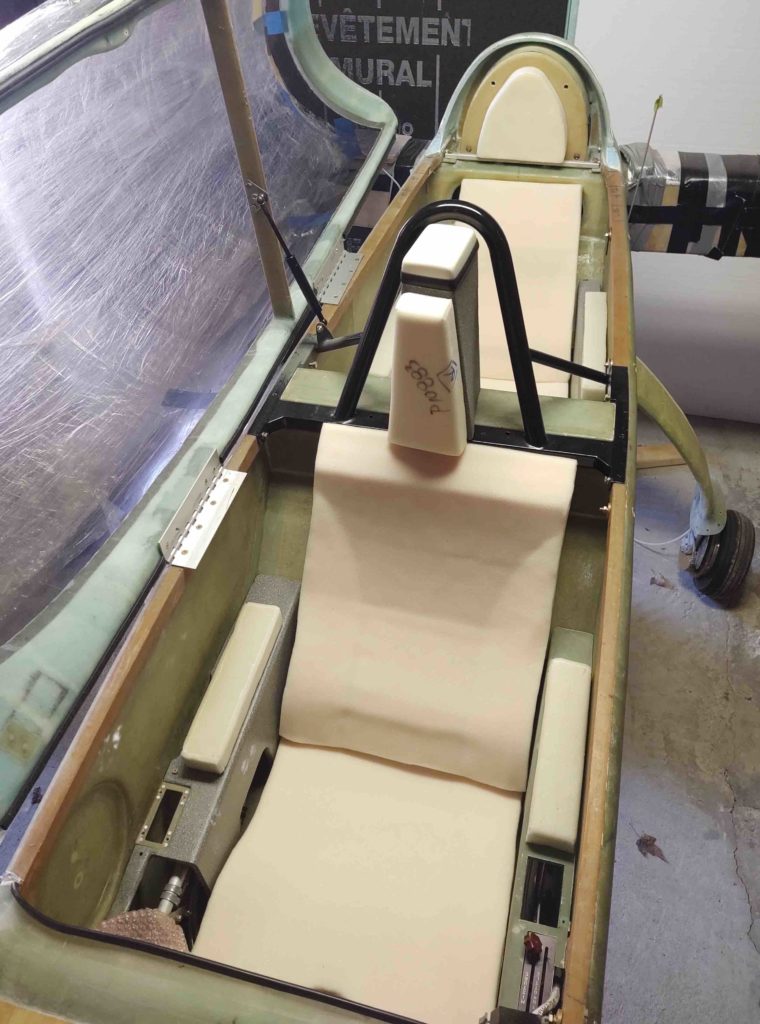
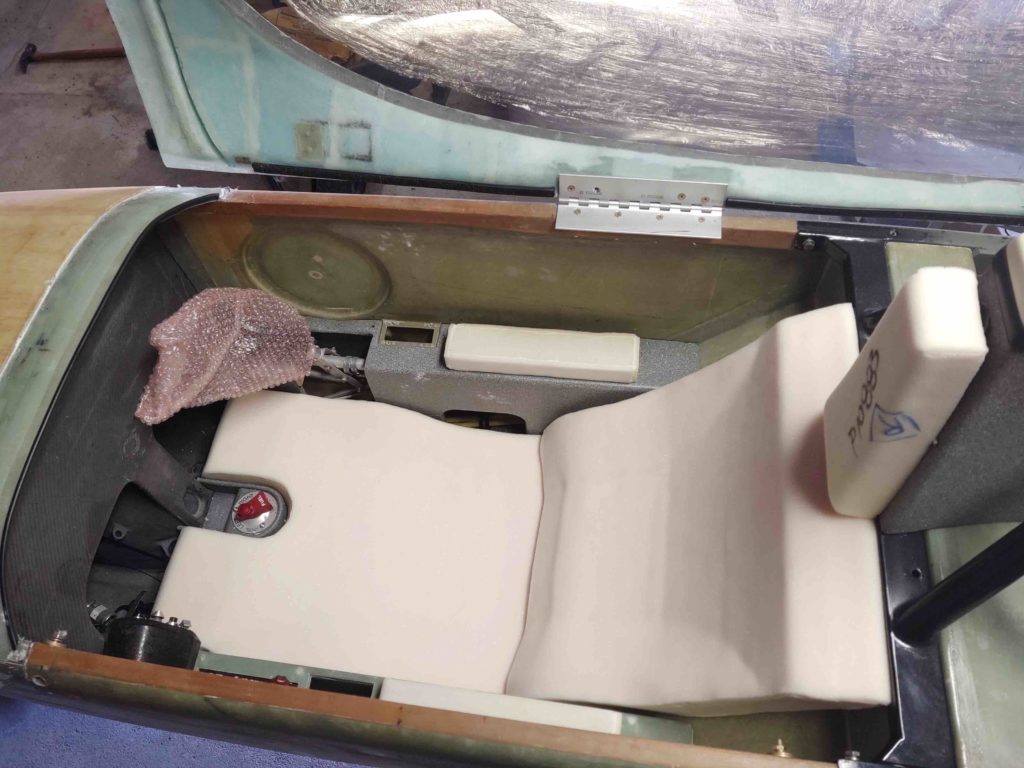
And the GIB seat.
I gave Oregon Aero measurements at different heights for the GIB headrest, so it came out a bit more “angled” than I prefer, so I’ll have them round it out it into a smoother curve all the way around.

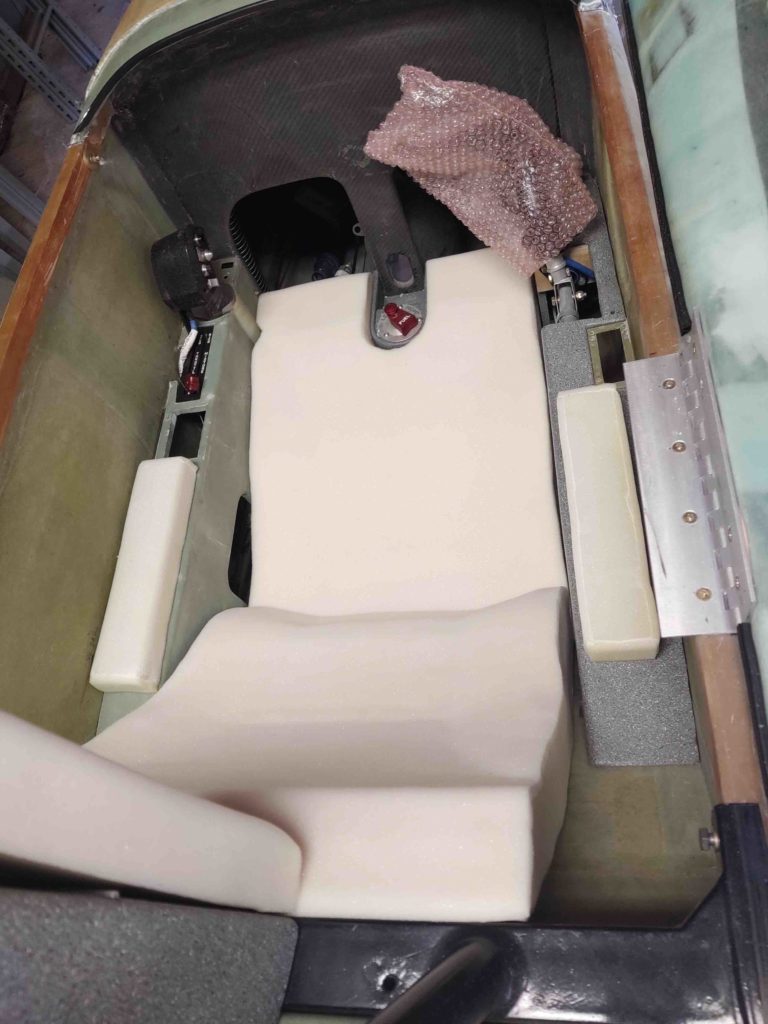
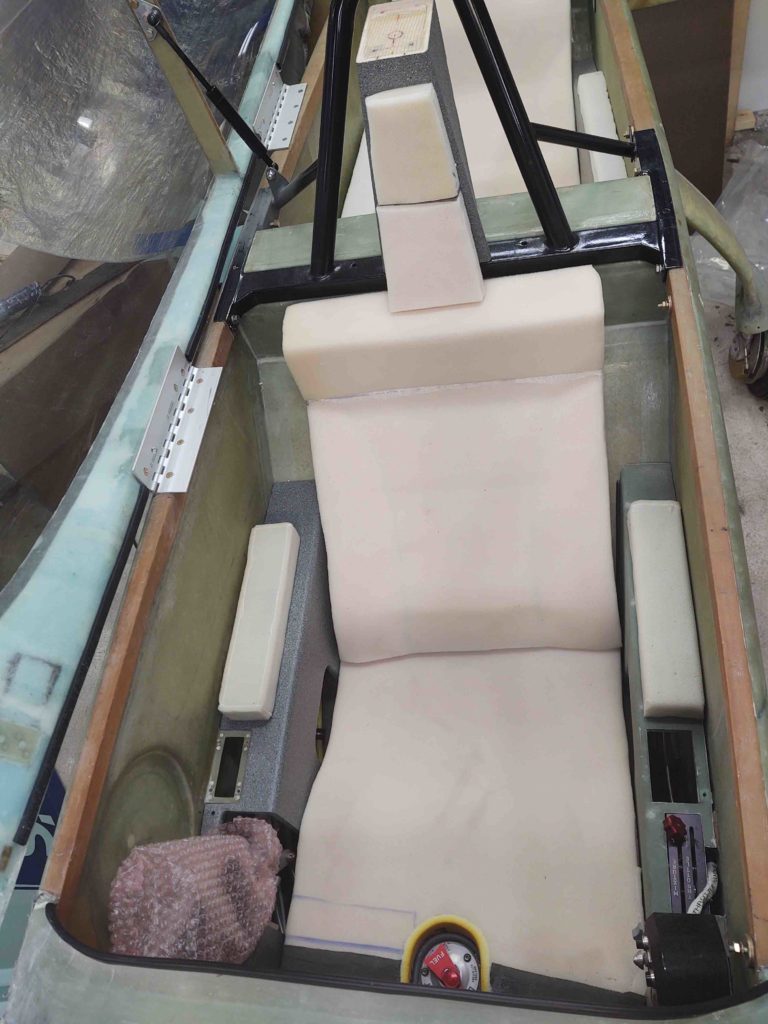
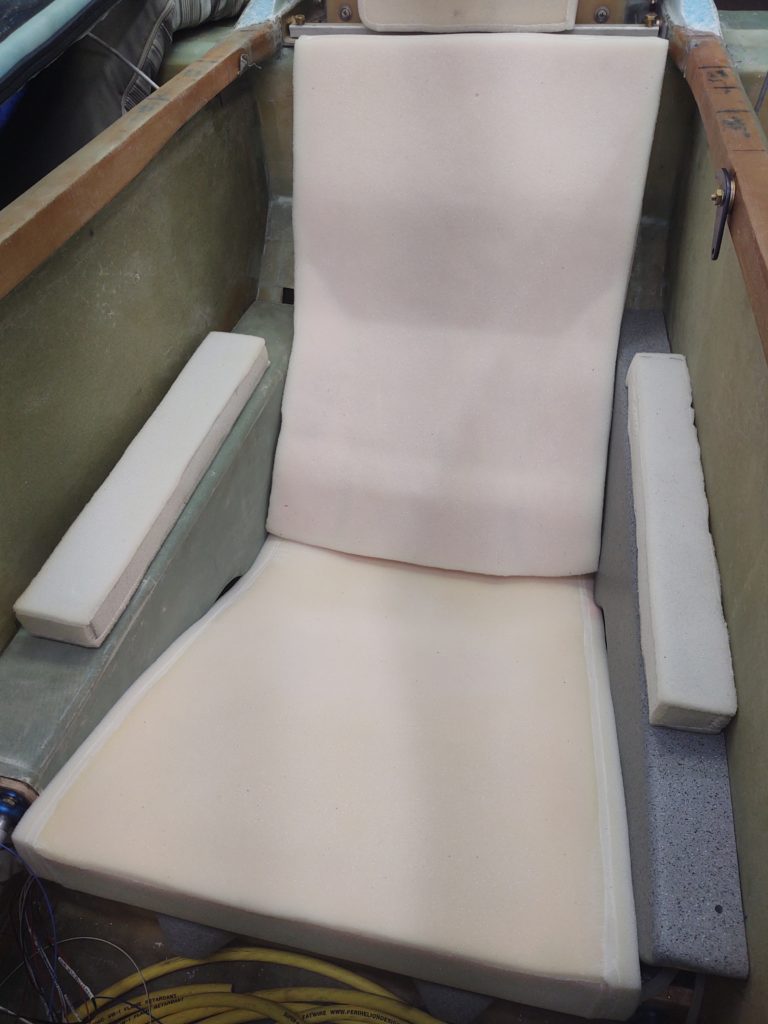
Below is the front seat again.
The big tweak that is significant in my book —that I’ve had a lot of feedback on from current EZ pilots— and a requirement that they missed my instructions on, is to taper the front of the thigh supports on the leading edges of the lower seat pad. If these pads are thick near the bottom of the panel leg holes, then it really messes with your ability to extricate yourself from the airplane gracefully as the heel of your shoe will catch that thick seat pad.
An over-the-shoulder view of the front seat pads. Again, I’m super happy with these seat cores… and honestly, it feels great to see the build moving forward again.
The next step on the seats is take a good 30-60 minutes to simply sit in the seat while making airplane noises, check the view out the canopy of course, and triple check the feel of the seat cushions. Then I’ll send the cores back with my list of demands <grin>, my color choices for the upholstery covering, and (let’s not forget!) my electric seat warmer pads. They will finish all that up back at Oregon Aero and once done, I’ll virtually be finished with Chapter 26 [a little velcro will need to be added about the cabin of course].
•••
3 December 2019 — Stacey was here visiting from Greensboro over the Thanksgiving holiday, and while she was here I definitely wanted to have her try out the Oregon Aero back seat cores. If I had been thinking I would have grabbed some selfies of both of us in the bird, me in front and her in the back seat, but alas I wasn’t.
Stacey –being a professional photographer– was thinking and she grabbed some pics of me messing about with the plane. Here I am at the start of our seat testing venture opening up the canopy . . .
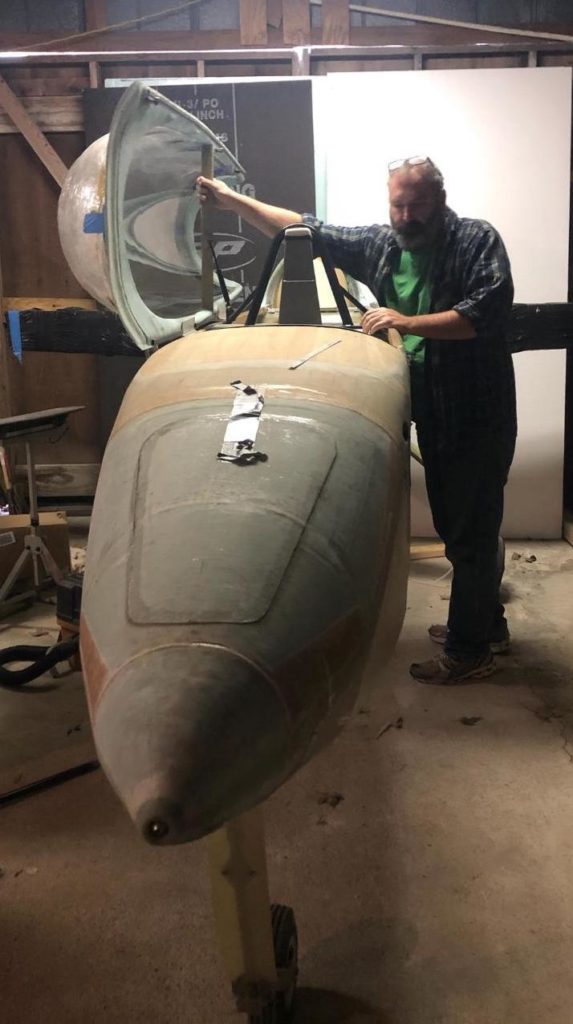
And then apparently thinking of all the shop tasks I have to do before I get back to building… only reason I can think of for looking so annoyed. Ha!

And below I was enjoying how nice the seat cores feel!
On a serious, note: I’m 5’11” . . . or maybe just a hair under that now. The law of unintended consequences reared its head as I was testing out the GIB seat cores. I realized that with the thigh support sumps built in, there’s only so far down you can go before you hit that hard stop.
You see, in the original Long-EZ you were sitting on a simple sloped seat… kind of like a banana shape. If you were taller you could merely scooch your behind lower/forward, bend your knees a bit more and get your head lower into the canopy. Again, with a “hard stop” literally keeping your butt from sliding lower into the airplane, it makes for a height restriction at just about my height (not planned btw). Sitting normally I have about an inch or two to spare above my head with the canopy closed.
So, at my height sitting on the thigh support has me in a more upright position than in a normal (stock) Long-EZ. This naturally puts my shoulders higher and thus more in between the longerons vs. underneath the longerons. You can still game the system in my back seat by scooching your behind further forward ON TOP of the thigh support, but this leaves an open air gap under your lower back. Ironically, I think I may need to have a small lumber pad to put in place for my taller pax!

•••
24 March 2020 — Today I actually did something airplane build related. Yep! Something that has been on my list of things to do for quite a while (along with a few hundred other build tasks, eh?!) … function testing the Oregon Aero seat cores.
Ok, so today was all about the front pilot seat. I plan on doing another stint in the back seat within the next day or two.
Clearly I have a bit of time left on this build. Moreover, with the current state of the world and the Corona virus situation I figure I can wait a few weeks or so before shipping my cores back to Oregon Aero for tweaking and then another subsequent test fit.
In my mind, seat core configuration boils down to comfort, fit and style… really in that order as far as importance goes. I’ll get to style way down the road with color choices and seat material, whereas today’s assessment was definitely focused on comfort and fit.
First off, I know Oregon Aero deals with a lot of orders, and the process of tweaking one’s cores by sending them back for redo’s clearly helps ensure getting what you want at the end of the process. So this isn’t to dog them out, but they did miss one of my initial requirements to taper the front of the pilot seat core down to pretty much a sharp point.
Why?
Feedback from all my EZ-flying buddies, who ALL highlight the whole “heel-catching” syndrome if the pad is too thick at the front of the seat. Sure enough, when I egressed my cockpit today after spending well over 1.5 hours in the seat, the heel of my shoe caught the pad on the way out and flipped it over backwards [I’ve actually been pondering having it made so that one side flips back to then allow for me to plant one heel on the then bared thigh support . . .]. Thus, front seat edge reconfig is definitely on the to-tweak list.
I will say that the seat is definitely very comfortable. I’d also say there’s a significant difference between just sitting in one spot with no movement and no piloting actions (distracted brain usage) vs the real thing. I did notice that all that time sitting in one spot I could feel it my hips a bit, so I’ll play around with maybe putting a thin pad in just the flat section of the seat pan to see if that configuration helps a bit on the long term sitting position.
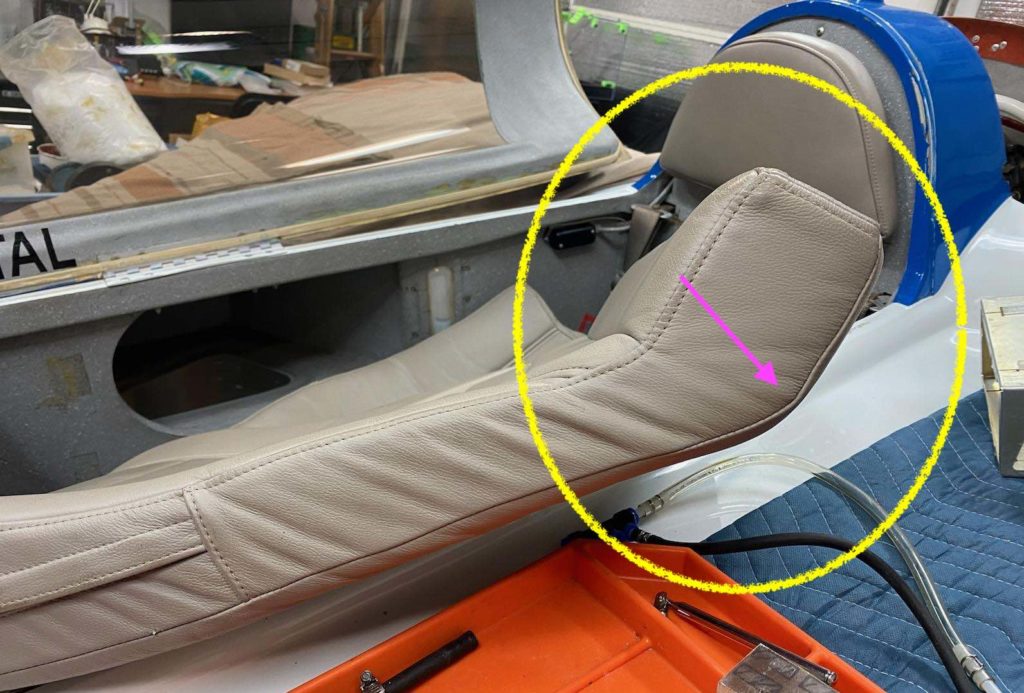
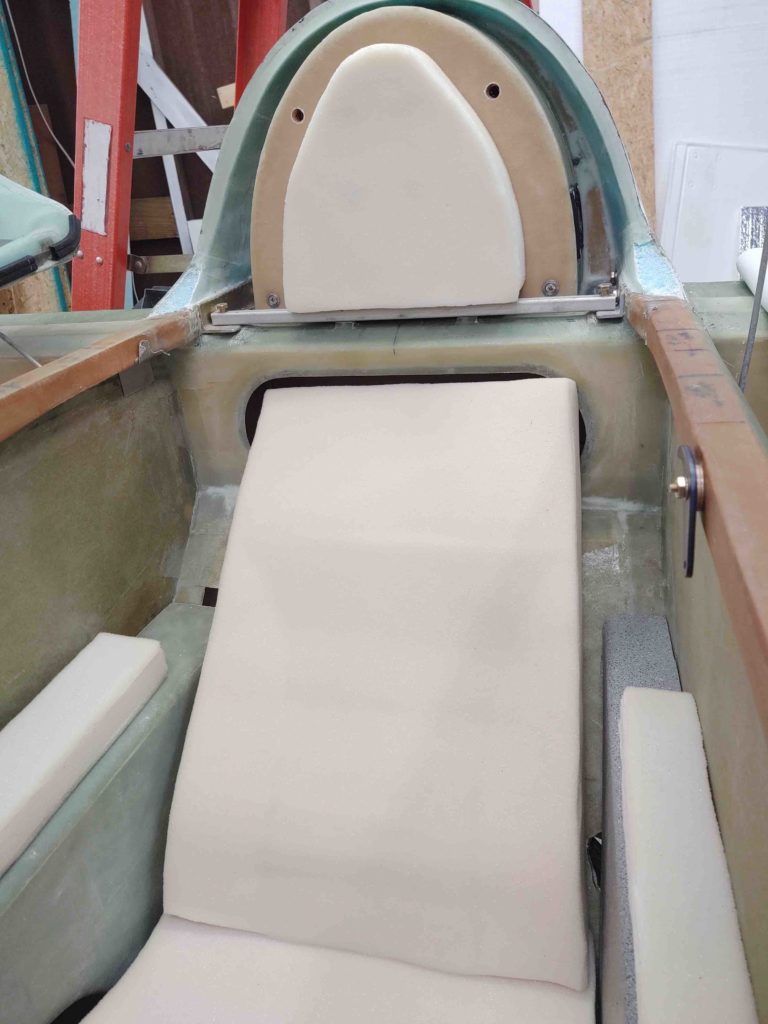
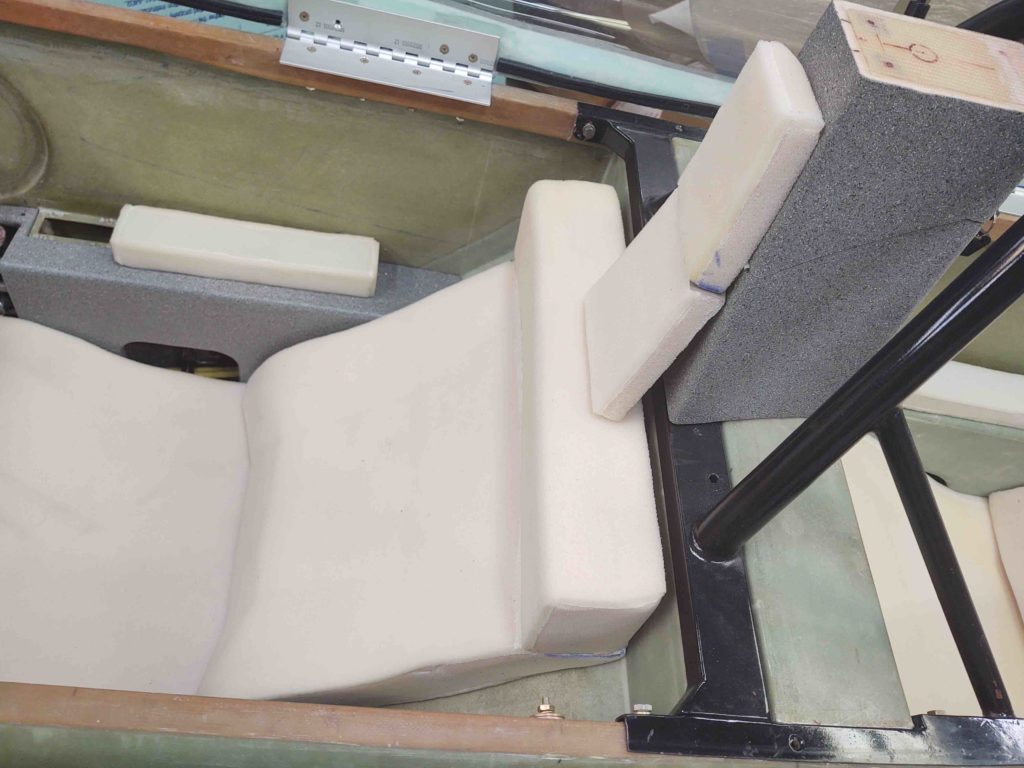
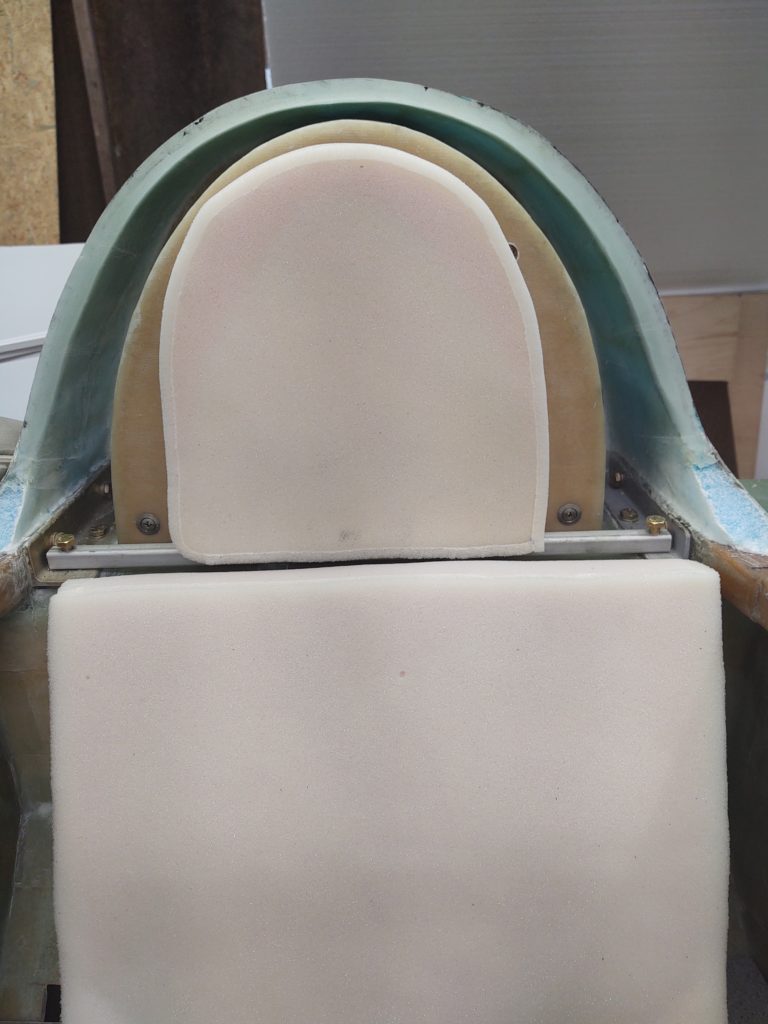
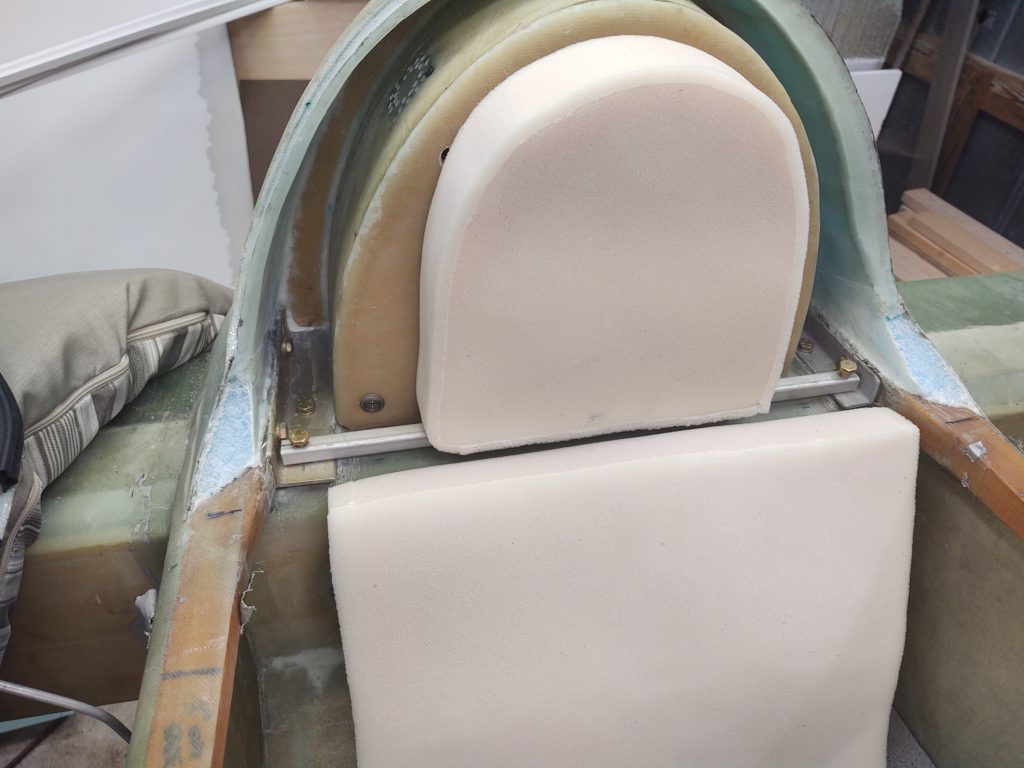
Another issue I have for both the front and back seat, is that the seat core back is essentially just simply a flat piece of foam, at least as configured here. But both the front and back seats have a vertical component to them as shown here with the front seat back….
and the CS Spar making up the top vertical section for the GIB.

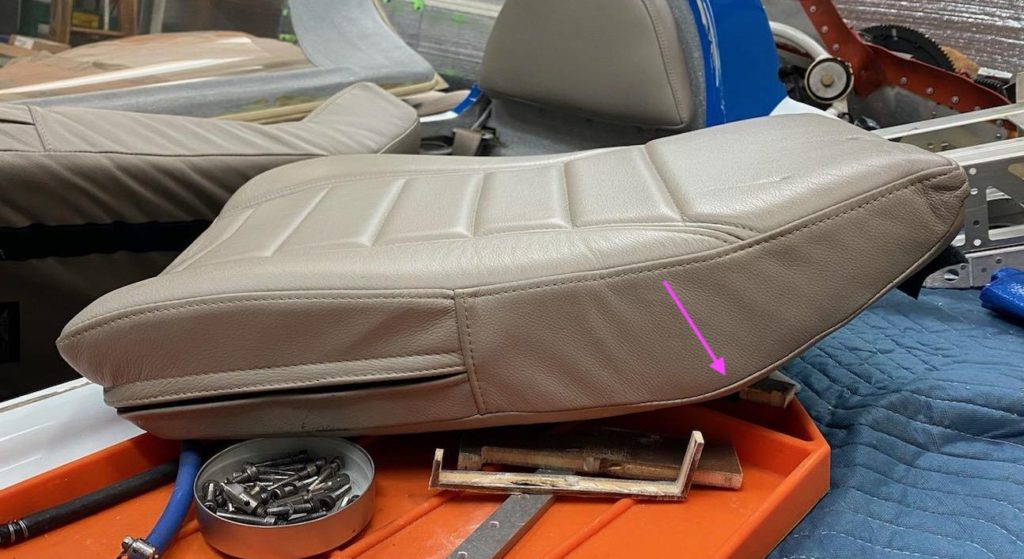
In comparison, here’s a shot of Marco’s front seat pad, and at the top you can clearly see a dogleg.
Marco also snapped a shot of his back seat core for me, showing it too has a dogleg designed into it… unlike my seat cores (currently!).
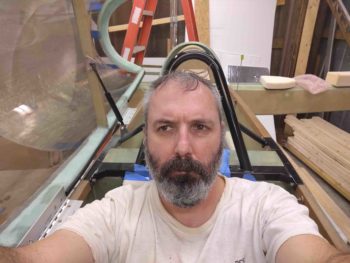
Since I was stuck in one spot for a while, I figured I’d grab a selfie of my crusty mug for my blog to show the FAA that I’m the guy actually building this darn thing.
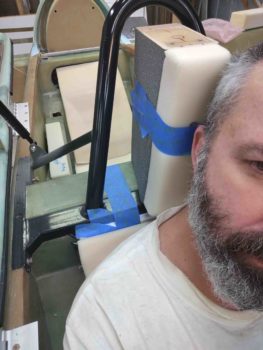
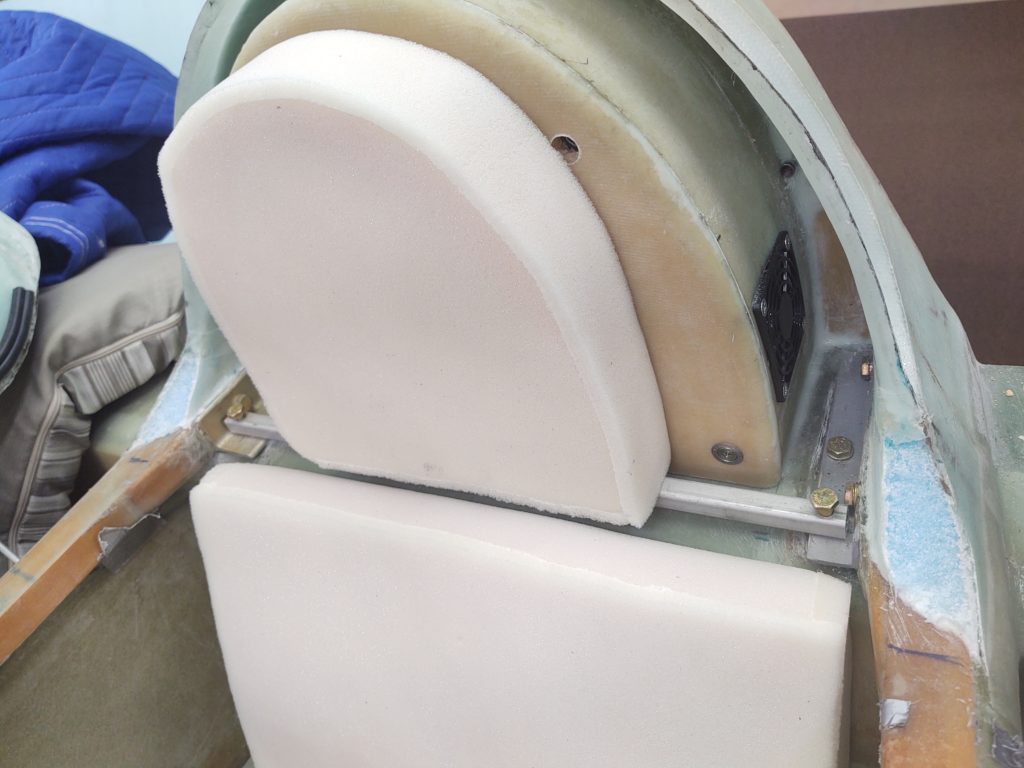
Also a shot of the headrest. It too will need some tweaking since, although nice and comfy, it is a bit too ever-present and needs to be reduced in thickness by about half.
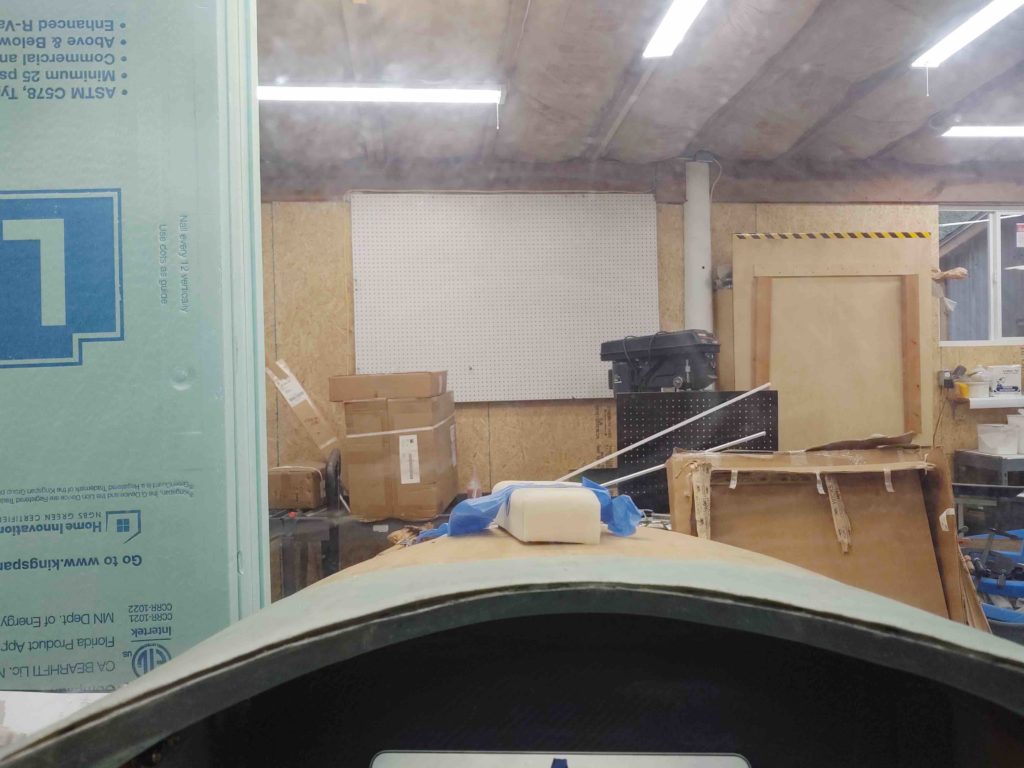
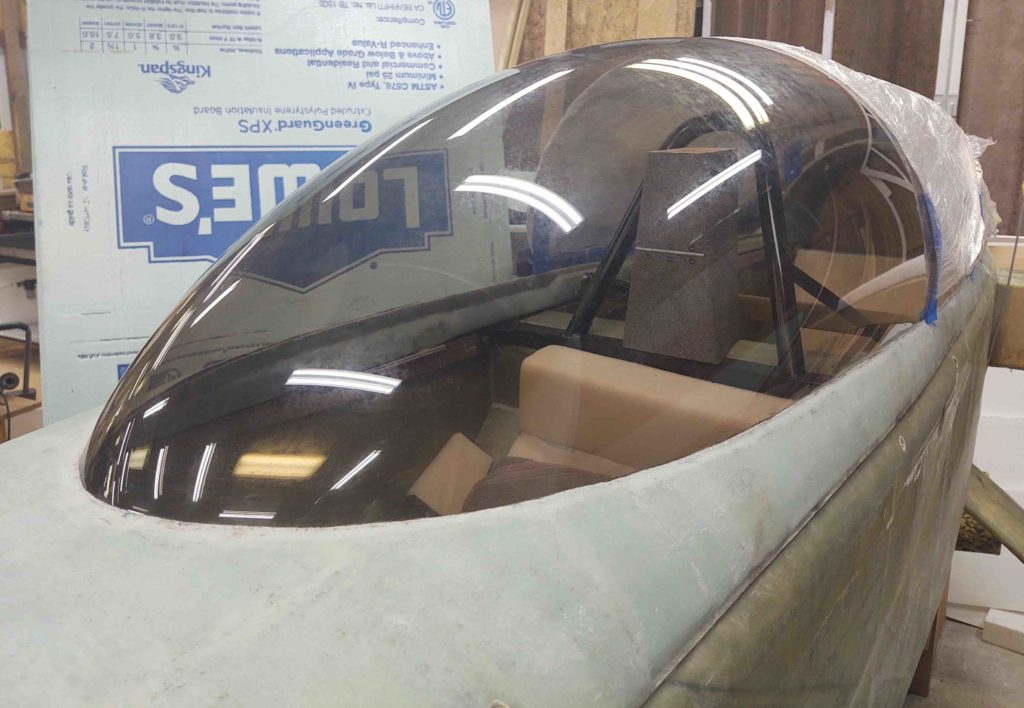
Another shot of your’s truly with the canopy closed. I will say (again) with that oversized canopy that I don’t get any sense of being cramped or claustrophobic at all.
I did get a fair amount of computer work done (on the last blog post too) and took notes on some of my seat and cockpit configurations.
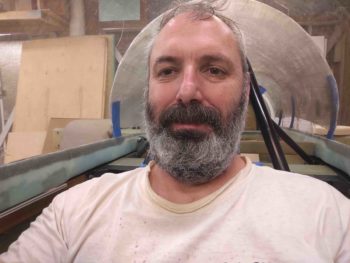
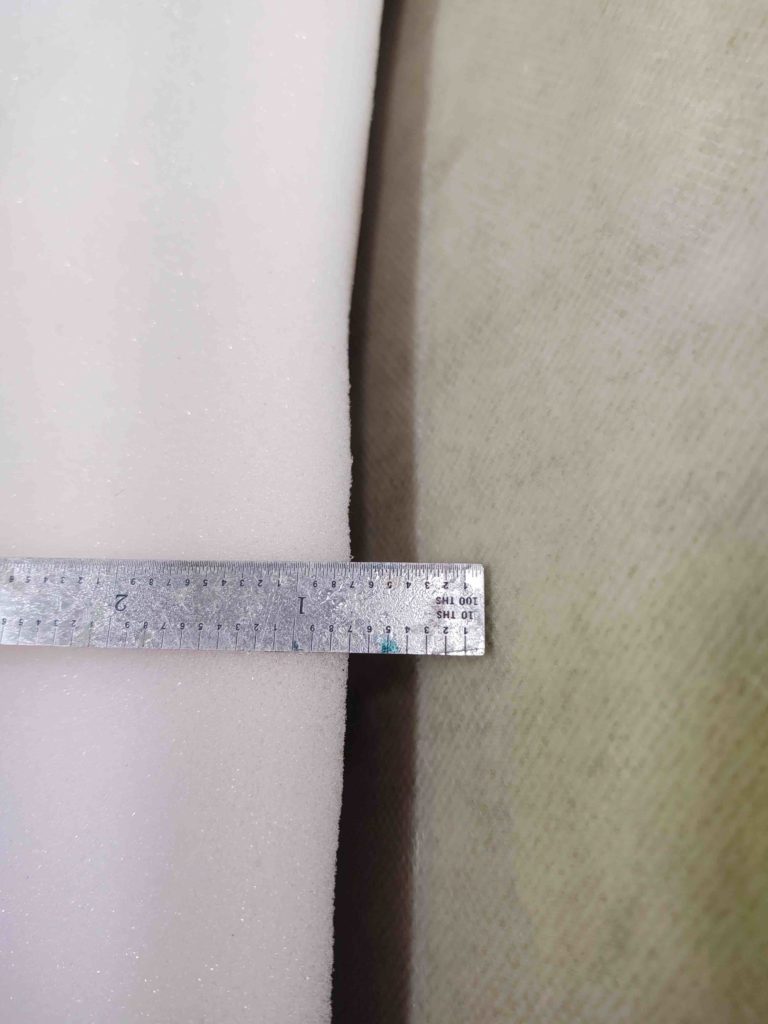
The pic below is after I ripped off the headrest pad to see how the front seat sitting felt without it. It was then I realized that it needed to trimmed down by about half in thickness (1.8″ to 0.9″ thick).
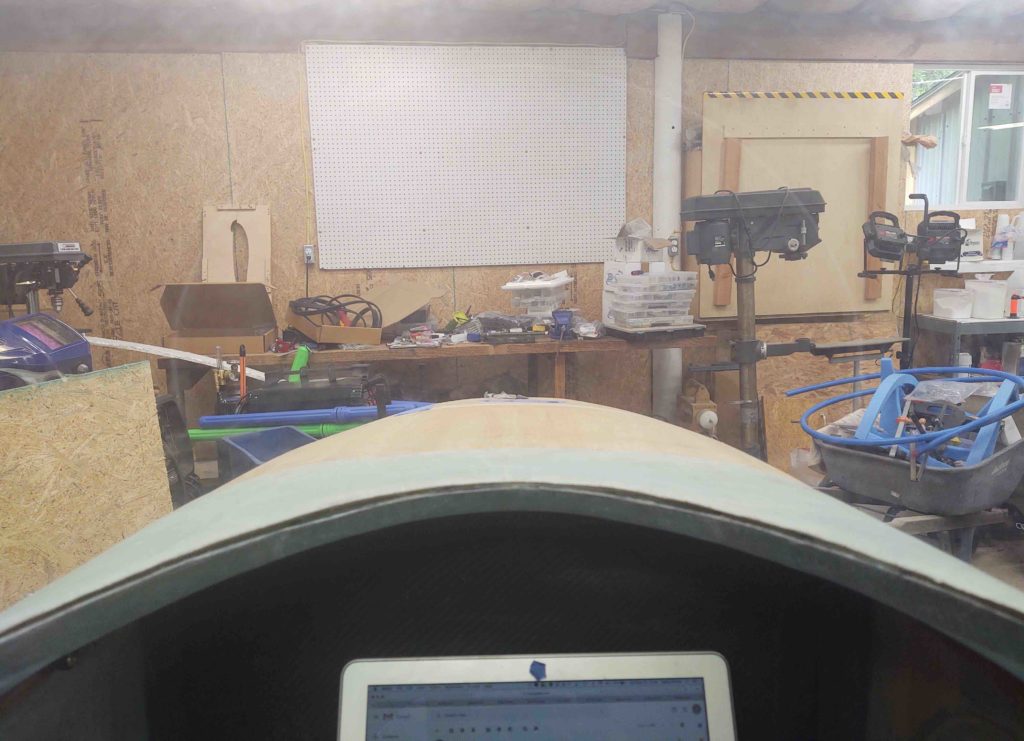
I was also querying Marco via text on his seat configurations, visibility, etc. So this shot below is at my eye level and pretty close to exactly what I see out of the front of the canopy with the current seat core as it is.
On the inside I can see about the bottom 2/3rds of the longerons where they dive into the panel on each side. With a lowering of my head or a slight tilt, I can easily see the entire top of the panel all the way around.
Here’s a shot of the back seat, which I know I took when I first got the cores. To be honest I’ll sit in it a bit just to check it out again, but until another 2″ gets added to the top of seat back core I don’t consider anything a valid fit test. As you can see, the top of the seat core simply falls into the oval storage opening in the CS Spar.
One last note on the back seat cores that I’m going to check with Oregon Aero on is the required width of the cores. The front seat seams fairly snug with a bit of wiggle room for the final upholstery. However, the back seat cores seem to have a good 5/8″ gap on each side of the bottom pad, and even more for the top pad.
•••
3 April 2020 — Today I finally got a major milestone knocked out on the airplane build: Phase I of the front and back seat core fitting.
After finally spending a good amount of time –1.5+ hours to be exact– test-fitting the seat core fitting and comfort, I then annotated all my notes into an email and sent it off to the good folks at Oregon Aero. Then 2 different ~1 hour long phone calls ensued to discuss the particulars of my seat configurations and the tweaks required to modify the cores to meet my requirements.
From the last discussion I was given some homework: some measurements to take… specially to enable the Oregon Aero seat gurus to add vertical sections to both my front and back seat cores so that they follow the contour of their respective front and back seat structures.
Even more specifically, the data Oregon Aero really needed was the measurement from the bottom seat core aft edge to the angle at the top of the seat bulkhead, again both for the front and back seat.
This task for the backseat was simple and straightforward, taking only a minute or two at most.
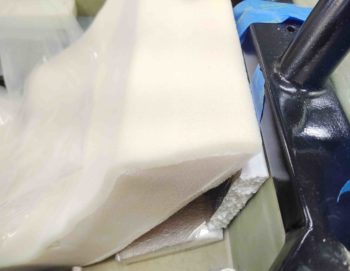
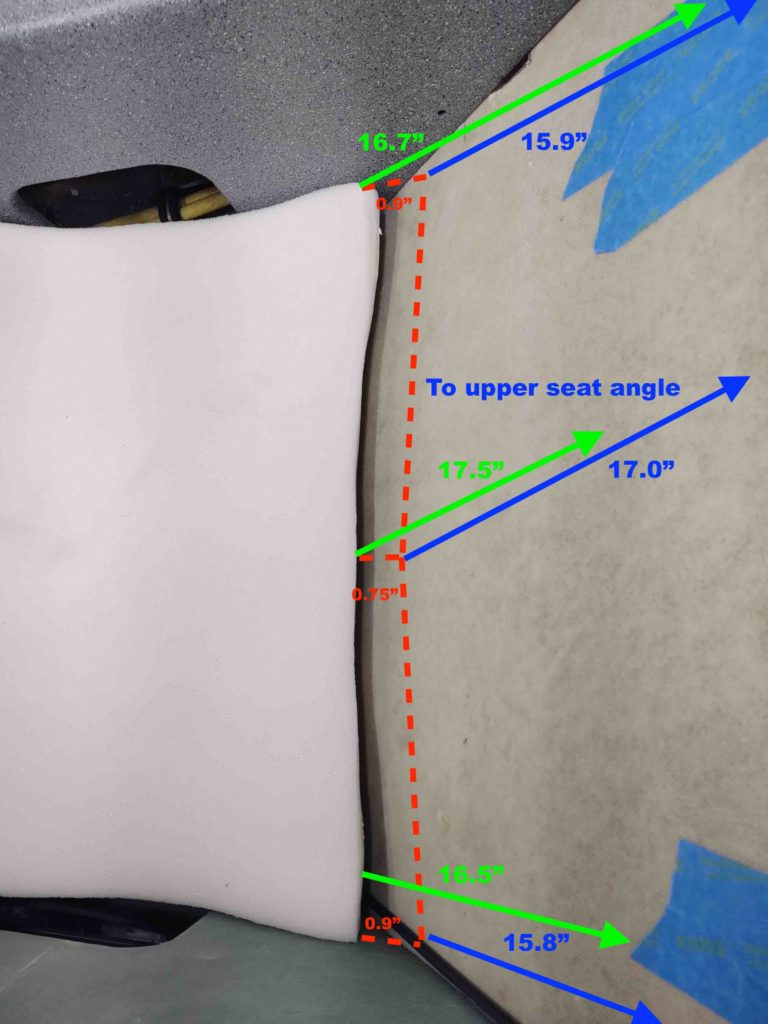
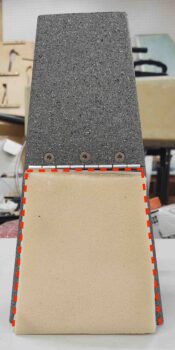
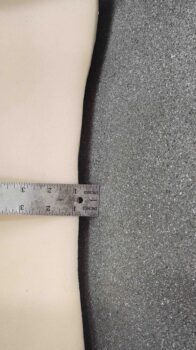
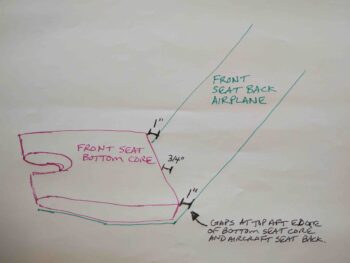
However, there was wrinkle that popped up for the front seat core: the cut angle on the aft edge of the bottom core didn’t quite match the seat back. As you can see below, at the midpoint of the seat cushion this gap was about 3/4″. On each side it was about 0.9″.
I annotated this information on the pic below and then sent it on to Oregon Aero so they could deal with it appropriately. Clearly if I had blindly followed their instructions the measurement for where the seat cushion angle met the seat bulkhead could have easily been off over 3/4″.
When I say that Phase I for the seat cores is officially complete it’s because I drove about 45 minutes up to the FedEx facility at the New Bern airport to ship the cores back to Oregon Aero.
At over $100 to ship these cores back, believe you me I want to ensure that they are as dialed in and optimally tweaked as possible when they arrive back so that ZERO majortweaks are required when they go back for upholstery!
•••
28 April 2020 — Today I got the seat cores back from Oregon Aero, which was a bit of a surprise since I knew they were on their way, but they arrived a couple days earlier than the tracking originally stated.
The seat cores 2.0 are a HUGE improvement over the initial versions. All the cushions fit MUCH better —darn near final state— and even the look of them in place is vastly improved.
Alice and Lisa at Oregon Aero worked every tweak I asked them to… here the thinned and “ridgidized” front seat leading edge, the back filled area (yellow) around the fuel selector valve, and simply eliminating the small indentation we were trying to create to allow for the cup holder (not needed).
The front seat upper cushion actually makes visual sense now and looks 10x better as well. It follows the angles of the front seat bulkhead and looks like it belongs. Huge, huge improvement.
Grant it, these are my initial visual observations of course. I will definitely need to do an extended butt-in-seat test again to assess the new mods.
I have to say, my biggest disappointment is the front seat headrest. They thinned it down by a good inch like I asked, and also lopped it in two horizontally at about the midway point, but it’s a mess as far as having any faint semblance of symmetry. It’s just all wonky! Luckily it’s a small piece and should be a quick fix.
Not to be negative, because I am really happy with the results of this last round of tweaks… but I can see that the angle of the uppermost front seat top will have to be tweaked so that the top back edge is reset about 1/2″ aft of where it is now.
That being said, it just all looks SO much better than it did before!
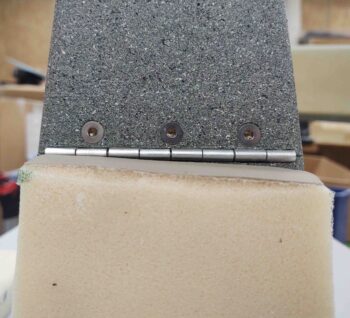
I had them split the pilot’s headrest pad for practical reasons when on the ground. I think this headrest pad will provide me just as much comfort –when I use it– as would one that’s a solid piece.
I plan to mount the lower headrest pad so that it’s fixed in place pretty much permanently. The upper headrest pad will most likely just be velcro’d in place to allow for easy removal.
This configuration will allow me access into the headrest storage without having to remove the entire headrest pad (as before) and, moreover, it gives me a padded stop for the upper part of the headrest to rest on when open.
Ok, so where the front seat improvements were definitely significant, the back seat updates are night-n-day from the state these cores were in before.
The lower seat cushion is significantly wider and fills in the area between the two armrests very nicely now sans the huge gaps on each side that were present before. The added padding material is even visible along each edge.
The freshly tweaked back seat upper cushion is a phenomenal improvement over the first one. It’s significantly wider, which hides the spar storage access opening, and the height is perfect now. Previously it was so short on the top side that the cushion simply fell into the spar storage opening.
I’m very pleased with the job Oregon Aero did on both front and back upper seat cushions. They really made these seat cores look like the custom fit cores that they are!
I also had Alice & Lisa tweak the back seat headrest as well from it’s prior distinct flat spots and angles to a simple curved shaped.
BTW, any slight misshapes or minor alignment issues typically get wrangled in when these cores are crammed into their respective upholstered covers.
Here we have another couple shots of the back seat headrest and the top portion of the back seat upper cushion. Note the height of the back seat cushion… they nailed it!
•••
23 May 2020 — Although certainly one the easiest, least-difficult tasks in building this airplane, the Seat Core Butt Test, or SCBT (I just made that up…ha!) is something that requires a good chunk of time to be allowed for…
Well, I started off this morning with a goal of completing a long-overdue email reply to my buddy Dave Berenholtz. He was discussing his seat cores when it dawned on me that I should finish my email to him while actually sitting in –and testing– the latest Oregon Aero mods to my seat cores.
One of many issues Dave is having with his Oregon Aero seat cores is clearance between his head and the canopy while sitting in the front seat with the cores in place. Here I’m showing that I have about 4 inches of clearance above my head while sitting in my front seat (obviously with seat core in place).
One of my issues with the initial version of my seat cores –both front and back– is that the upper seat pad did NOT follow the “curve” of the seat where there was 4″ vertical section on the front seat at the top (and ~6″ vertical section on the back seat).
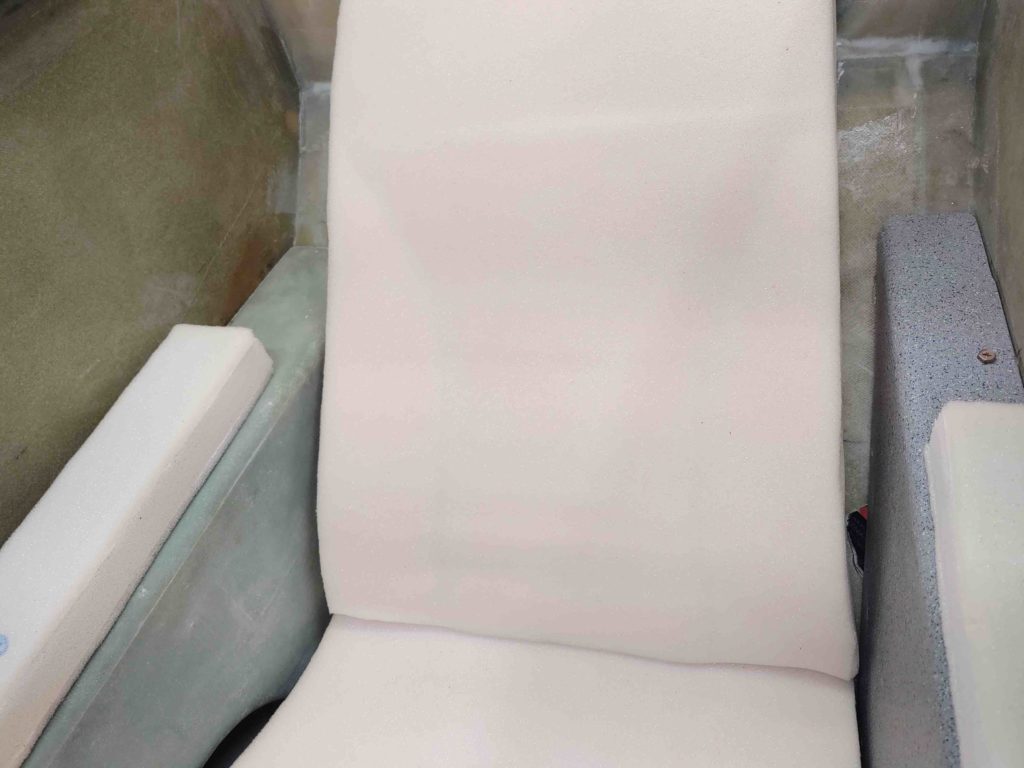
Well, Oregon Aero corrected this on my latest version 2 seat cores, as can be seen below through the canopy (and in my previous blog post) . . .
With the uppermost portion of the front seat pad now in place, it pushes my shoulders both up and forward in the seat. Lending itself to the first definite reason I needed to check head-to-canopy clearance with the new seat core.
The second verification check was with visibility, which there is a noticeable improvement for the better. Not much, but definitely better vs worse, both to the front and sides. In fact, I can almost see the top line of my nose hatch while sitting in my normal position inside the cockpit on the version 2 seat core pads.
Clearly (as in contrast to my dirty canopy) the visibility is excellent. This is due in part to my having moved my seat almost an inch forward at the very early stages of fuselage construction.
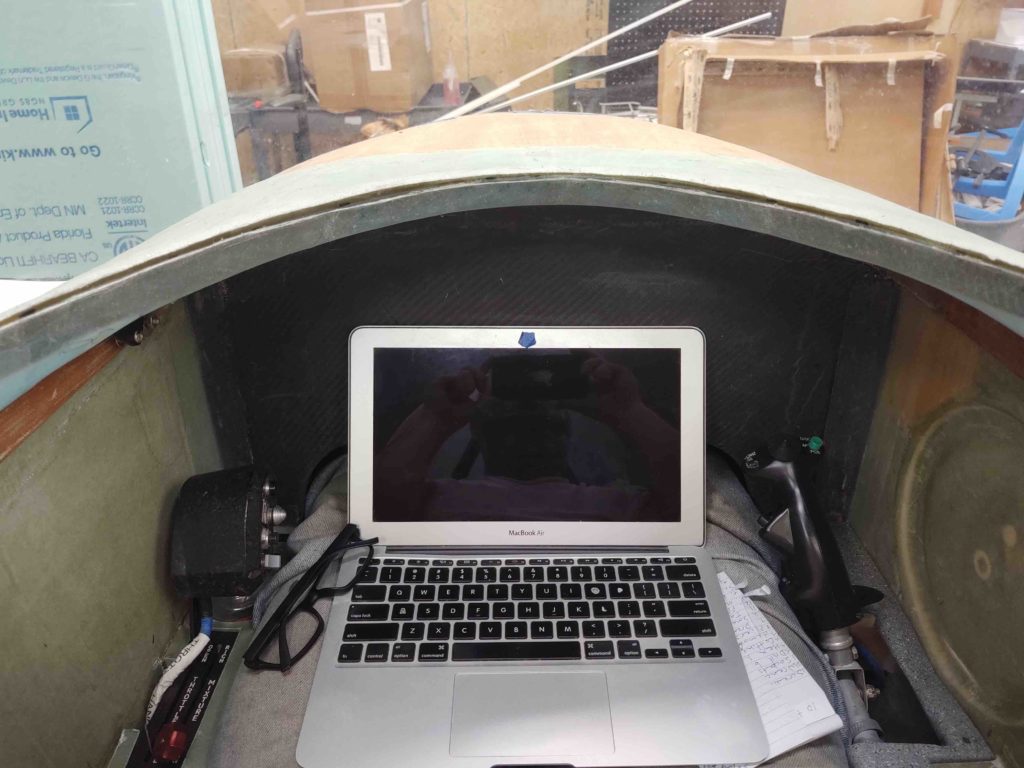
I have a very old MacBook Air that has terrible battery life, but it’s small so I was using that to pen my reply email to Dave for about the first half hour sitting on the front seat core.
Well, as the laptop battery was getting to it’s last breath, my daughter serendipitously called which gave me something to do for another 45 minutes!
Thus, for this “Butt-in-Seat” test I spent over 1 hour and 20 minutes sitting on the version 2 seat cores. Honestly, I could have used a little bit more lumbar support, but upon exiting the plane my hips didn’t feel as they did somewhat after the first seat core check (at least a few hours later).
Speaking of exiting, with the new lower profile front edge of the front seat it was very noticeably easier entering the plane with these modified seat cores. I still caught my right heel on the way out, but I don’t have my seat cores secured/velcro’d to the thigh support as I will when the bird is flying.
Exiting is still not optimum, but it gives me some much-needed thigh support while still much easier to exit than version 1 of the seat cores, so I can definitely live with this setup. And not to be snotty about it, but the majority of my buddies that are telling me to whittle that front seat edge thigh support down to a razor’s edge for easier egressing are notably shorter than I am… and I think their requirement for thigh support is an inherently different configuration than with me and my longer legs.
Bottom line, I would say that I’ll look at a bit more for lumbar support for longer flights, but I consider this seat core version 2 butt test a successful one!
•••
25 November 2020 — This evening was all about the finally dialing in and capturing required tweaks to my Oregon Aero seat cores. I put the seat cores back in place place in the fuselage to do one thorough final assessment of how they fit before I send them back to get upholstered.
This also gave me a chance to do a quick knee clearance assessment on my GIB side sub-panels. I’ll remind ya’ll that I’m a long-legged 5′ 11″ tall, so I consider myself right at the max height for someone to travel comfortably in my back seat on a longer trip. Any shorter heights than me should be fine comfort wise.
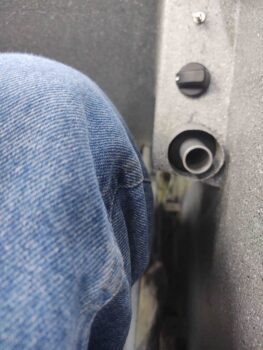
With my feet placed at a comfortable mid-point on the floor board, my knees are actually behind the sub-panels and rest quite comfortably on the fuselage sidewall.

However, if I move my left foot forward to just aft of the pilot’s seat, my leg just below the knee rests on the edge of the left side sub-panel. It’s not horrible nor is it digging into my leg, but I wouldn’t want to keep my leg at this position for a considerable length of time. Not optimum, but not horrible either.

Conversely, the right sub-panel is no factor since it is narrower than the distance that the control stick tube is from the sidewall. Thus, my leg rests against the control stick tube before it makes contact with the edge of side panel. Clearly this what I had envisioned for both sides, but the left didn’t make the grade.
I then went into the house and spent a good hour referring to my heating systems electrical diagram to hook up first the front pilot seat seat warmer pads to test them out, and then the back GIB seat seat warmer pads to test them out. I’m happy to report that they both worked fine on both the high and the low settings. Not surprisingly, the low setting was just that, a bit warm. Whereas the high setting got warm very quickly and after a few minutes I was ready to turn them off. Grant it, that was in a 69º house, but still a good showing on both sets of heated seat warmers.
I then took the seat warmers out to the shop and fit both the front and the back sets to their respective seats. The front seat warmer pads needed a few inches cut off both the top seat back pad and the bottom seat pad, whereas the back GIB seat warmer pads didn’t require any trimming.
Since the folks at Oregon Aero will install these heated seat warming pads into the seats as they upholster them, I also marked the seat warmer pads to show which pad goes where, and the direction of the wiring exits [front seat pad wires exits left, whereas aft seat pad wires exit right].
I then spent well over another hour taking pics of the seat cores and annotating the final tweaks that will need to be made to the cores and headrests before they get upholstered. I then boxed up all the seat cores, headrests, armrests and heated seat warmers in the original Oregon Aero box to ship back to Oregon Aero.
•••
26 November 2020 — Since I’m not working on the actual build (due to vacation) I figured I would get the Oregon Aero seat cores finalized and off the to-do list.
I’ll note that I did get the seat cores, headrests, armrests and heated seat warmers shipped off to Oregon Aero.
My final seat core adventures started of course before I left home. During the machinations of rooting out the last tweaks required to get an optimized fit for all the seat core components, I wrote out on the whiteboard this list of 9 tasks needing completed:
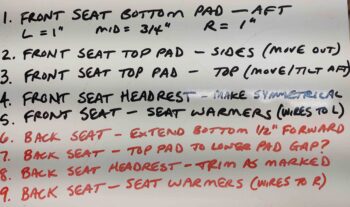
In no particular order, I’ll show you a smattering of some of those tasks.
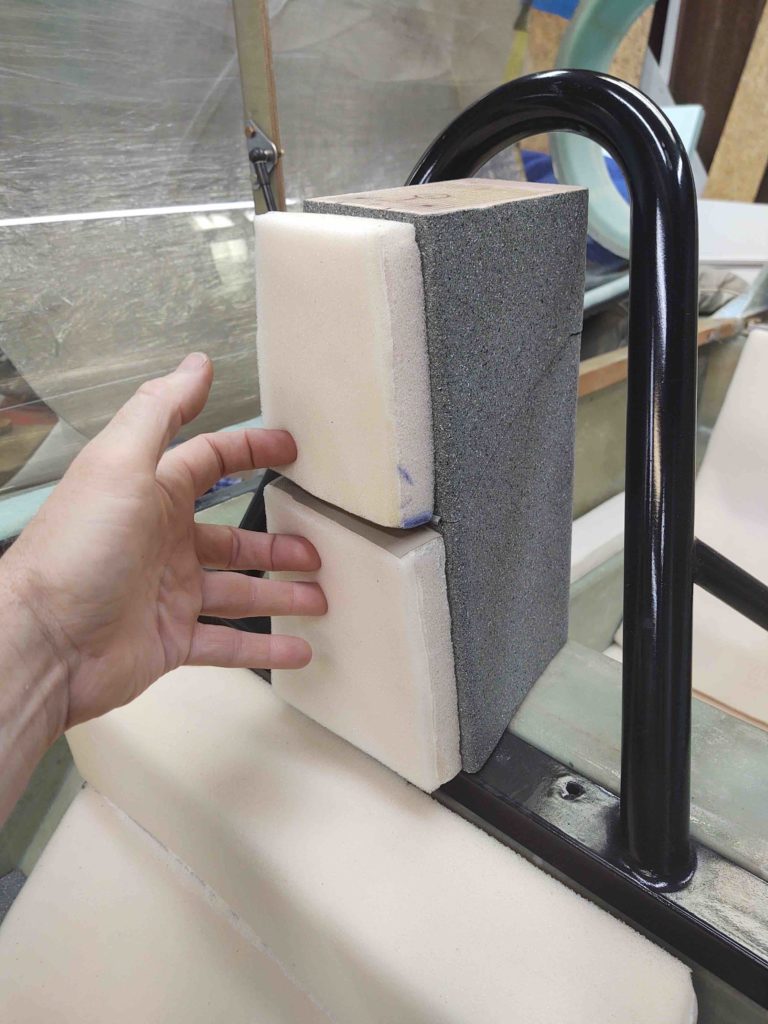
First off is the pilot headrest. The pads on these definitely need tweaking and are not even nor symmetrical.
Here’s a closeup.
And the top headrest pad…. not as bad as the bottom, but still needs some tweaking.
I spent a bit of time making up these templates that I will take with me on my trip out west. Since I’ll be fairly close to Oregon Aero, I plan on stopping in and conferring with them on these final tweaks and my upholstery scheme. I’ll drop these templates off for them to use if needed.
One issue of rather minor concern is the front seat lower pad gap with the seat back bulkhead. It’s a decent sized gap all the way across so I put on the list so that they can easily fill it in.
Here’s a quick drawing of the issue going on above.
As for the front seat back cushion, it needs to be just a bit wider. Right now it will tilt a bit one side to the other and I want it fitting snuggly in between the 2 armrests. I noted some dimensions along the side for amount required to be widened at that spot.
The last big item on the front seat back cushion is the gap at the very top aft of the seat cushion with the front seat top structure. The top section of the seat is angled forward just enough to create a noticeable gap here, and I want that minimized as best possible.

Onto the GIB seat, there is a gap between the upper cushion and the bottom cushion that’s notable as well. So I annotated all the right/center/left dimensions to have this minimized as well.

Since the front edge of the lower GIB seat is peaking out from beneath the cushion, I want another 0.5″ added to the front of the cushion simply to provide the GIB with as much thigh support as possible.
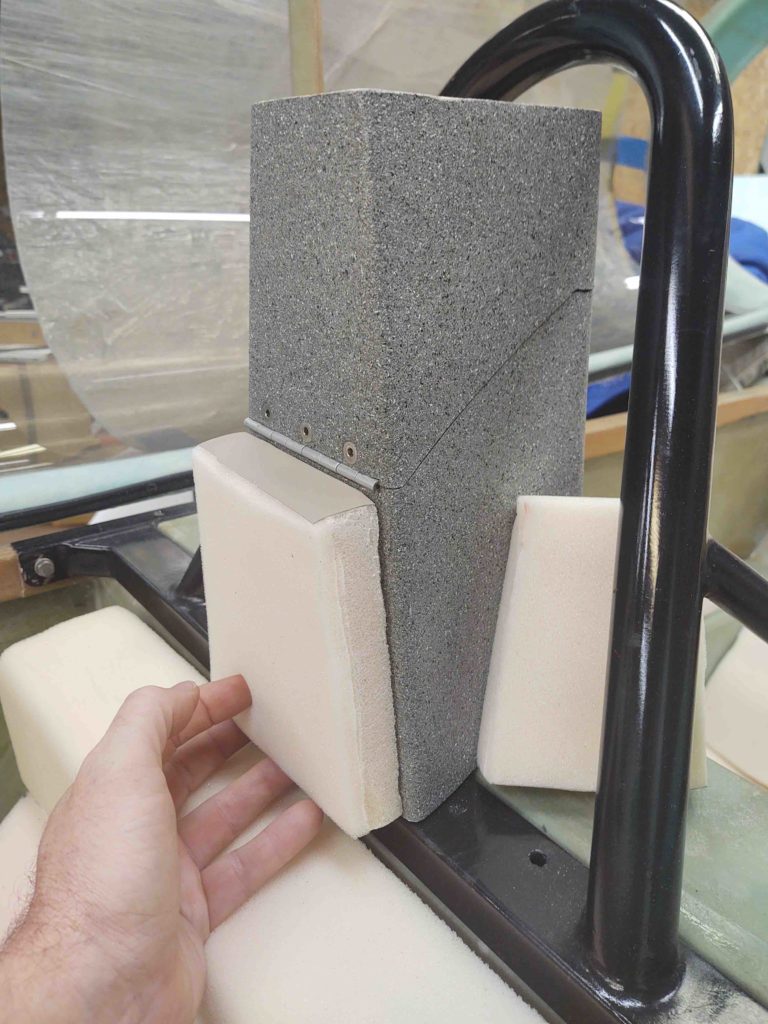
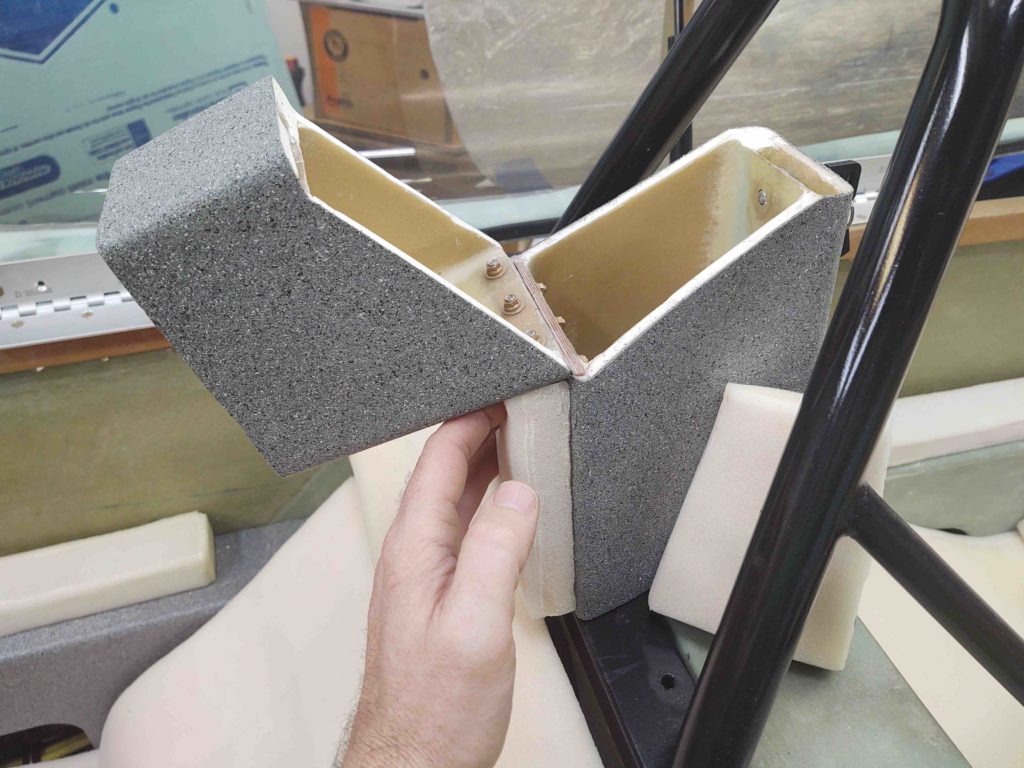
Finally, with the current configuration of the GIB headrest pad it doesn’t allow me to unscrew the top 2 CAMLOCs. So I’m simply having them shave off the upper “corners” of the GIB headrest pad to make those CAMLOCs both visible and removable so I don’t have to remove the headrest every time I want to gain access to the D-Deck components (i.e. GRT EIS, etc.).
All told I spent a good 3 hours writing these tweaks up in detail to the folks at Oregon Aero to ensure the final mods were done in optimized fashion.
Moreover, I then spent another few hours finalizing my color choices and my upholstery scheme and sending that off to Oregon Aero as well. For the upholstery, ya’ll will just have to wait for the big reveal to see the colors and design! (grin)
•••