
Rough River 2018
As I mentioned in a blog post, Marco was in town Monday (24 Sep) for training and stopped by for quite a few hours to talk shop and have dinner at a Peruvian chicken place that I turned him on to.
While here, Marco and I discussed Rough River with the underlying assumption that I wasn’t going. Marco’s Long-EZ is down for engine repairs and he was making plans to fly over to RR with an EAA chapter buddy in his Velocity. However, after a few “check” flights it turned out that the Velocity was having some avionics issues and needed some tweaking before flying any instrument approaches.
Thus, I got the call just a couple of days later (Wednesday) that Marco was driving to Rough River and really wanted a wingman to come with during the 12+ hour drive there … So, not wanting to leave a buddy high and dry, I decided it was acceptable to take a few days off for RR. Especially since it only happens once a year.
As it would turn out, Marco’s wife Gina did decide to go as well since she apparently felt bad that our regular cabin mate, Bruce Sinclair, could not make it this year.

Moreover, I was thinking that there’s a very good possibility that this would be my last RR to glean any good ideas before finishing my airplane!
Below are the pics I took for this year’s RR. Be forewarned that there are no full airplane pics as I was specifically looking for interesting tidbits that I might incorporate into my build. Also, I’m posting the pics per topic, not per airplane.
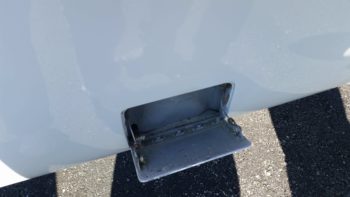
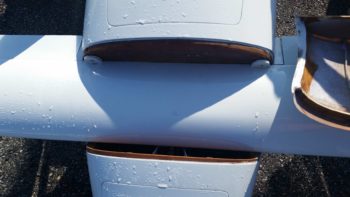
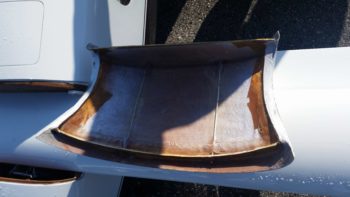
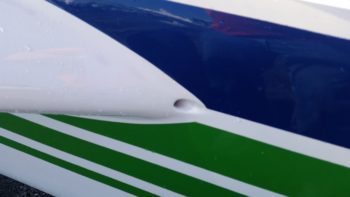
Starting off is a unique ingress/egress step that pops out of fuselage sidewall of Robert Harris’s Long-EZ, much in the same manner of many military aircraft.
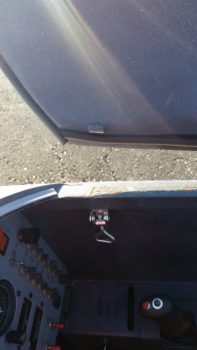
Another means of providing an ingress/egress step is shown on Jim Price’s Long-EZ, with a retractable rod/tube type.
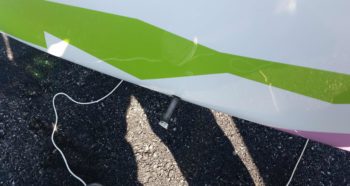
Note that the step sits just forward of the left thigh support/lower instrument panel when stowed.
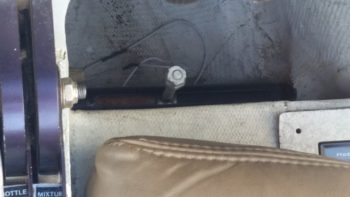
Here I tried to get a shot of Jim Price’s retractable step both on the inside and outside of the fuselage.
Marco’s buddy Chris from Chesapeake showed up at RR, so I took him over to introduce him to Bill James and check out Bill’s awesome Vari-Eze. While at Bill’s Vari, I wanted to look at how Bill had done the internal lips on his removable canard cover.
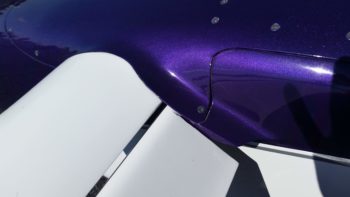
In turn, here’s a partial shot of Robert Harris’s canard and aft nose cover held in place by screws. As you can see, there is a screw on the top side of the cover where it transitions into the inboard elevator fairing. I too will have a screw holding the aft nose cover to the inboard elevator fairing, but my securing screw will be located on the bottom of the fairing.
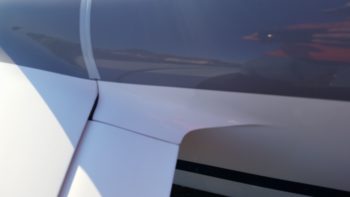
As far as the elevator fairing shape itself, I really like the one on Curtis Wray’s Long-EZ (originally built by Dave Lind).
Mike Toomey had his beautiful newly finished Long-EZ at RR (he also owns/flies a Cozy III) and I took note of the fresh air vent inlet that he placed at the strake/fuselage intersection. He said it works great. As a point of note, this is a considerably smaller version of James Redmon’s Berkut 13 fresh air inlet –which James says works great as well.
Since I have a large, oversized canopy I am very interested in keeping the front right corner of the canopy secured to the fuselage. Below is the front right canopy latch on Curtis Wray’s Long-EZ.
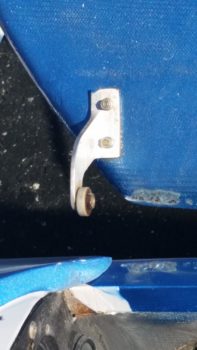
Whereas Jamie Hicks has a roller type canopy securing “hook” on his beautifully painted Vari-Eze.
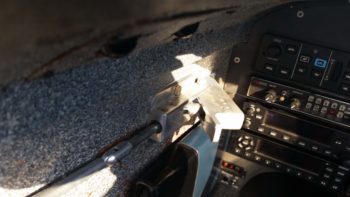
On Saturday Mike Bowden showed up with his once-twin engine Long-EZ, which is now powered by a single O-360. Mike has been gracious enough to have some extensive discussions with me on how he constructed his canopy latch handle that I will in most part emulate. As you may recall, I had started with the thought of using Jack Wilhelmson’s EZ Rotary Latch canopy handle, but its installed configuration impedes with my GNS480 GPS unit and F-15 throttle handle . . . yes, space is tight in my Long-EZ!
Since I hadn’t seen Mike’s bird since we discussed the canopy latch I wanted to get some good pics of it. Mike wasn’t around when I grabbed these, and unfortunately I never got a chance to talk to him!
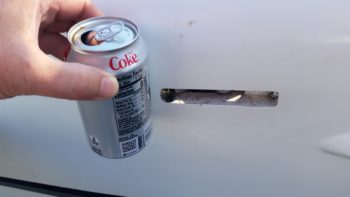
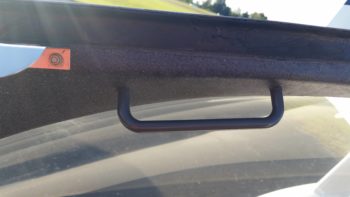
Here’s the external side of the latch, which resides on the upper side of the fuselage just below the longeron.

For size comparison, I held up my Diet Coke can. Also, note the very tip of the strake on the lower right side of the pic.
Here’s the internal view of Mike’s canopy latch. Again, my version will be heavily based on Mike’s version, but it will have a couple of distinct differences since I will have a canopy latch hook above and forward of the canopy latch handle (Mike’s canopy has a fixed windscreen on the front, negating the need for a forward canopy latch hook as is standard in most Long-EZs).
For my final canopy-related tidbit, I grabbed a shot of Curtis Wray’s canopy handle. I like the idea of having a little handle, but mine will either be along the lines of an indent or small ridge to grab ahold of with my fingers, or a spring loaded handle that returns to a flat profile against the internal canopy frame surface once I release it.
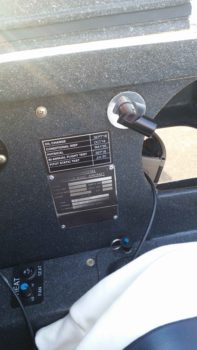
Back in the GIB area, here’s a shot of Nick Ugolini’s very nice interior on his Long-EZ. You can see a bit of the strake window, the GIB LED map light and the heat controls. I grabbed this shot mainly to take note of the position of the LED map light, and as a point of note in my Long-EZ: all the heat controls are up front.
My final RR pic with one last shot of Nick U’s Long-EZ. I really like the professional look of his fuel site gages. I will add one final point of note, and that is I had heard a vehement disapproval of the red cork ball floats inside the fuel site gages by a number of people online. It seems the issue was that static builds up and causes the red cork float to stick to the interior of the site gage rather than float on the surface of the fuel, thus making it hard to ascertain the real fuel level in flight (BTW, I also have fuel tank probes that feed fuel quantities to my EFIS). But then when I asked a myriad of people at this RR whose planes had the red cork floats in the fuel site gages, none of them reported any issue other than the need for an occasional wrap of the gage to knock the red cork float back into the fuel.
I had planned on drilling a hole to remove the red cork float, but now I’ll assess it more to figure out if that’s really necessary or not.

So another Rough River is in the history books! I really am very hopeful that my pics at next RR will include throngs of people hoarded around my finished Long-EZ!!!