
If you asked me why I didn’t rig the rudder cables up to the rudder pedals while I had the wings on the bird and it was unpainted, I wouldn’t be able to tell you. My guess is that I was still waiting to research and discover the final intel on the springs I brought up last blog post.
I also think I lumped the task of rigging the rudder cables in with finalizing the plumbing of the brake lines, since this involves my pedals as well. The bottom line is that hindsight is 20/20, and I am wishing that I would have done this task at a more opportunistic point in the build.
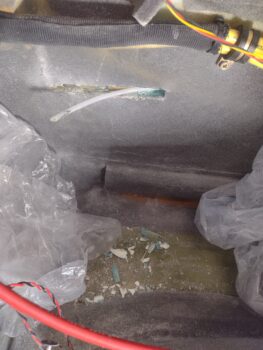
It certainly would have been significantly less nerve-racking, as cutting into the sidewall with the ever-present threat of going too far and messing up the exterior paint just adds to the annoyance of having to cut out the rudder cable conduits to get them to exit out the sidewall farther aft, to allow space for the springs to be installed.
Here I’m in the process of exposing the right rudder cable Nyla-flow conduit, which I cut out about 1-2″ of wall at a time since it has a slight up angle as it travels aft, and the short cutouts allow me to adjust fire as needed.
I realize “normal” builders wouldn’t have to mess with this because normal builders aren’t as “special” as I am (haha!) by burying their rudder cables into the sidewalls. Nor do normal builders buy rudder/brake pedals with the claim that they don’t need springs (they probably, but not definitely, do…).
Here we have the initial mark and cut on the left sidewall (pic 1), followed up by another cut mark a few iterations later (pic 2).
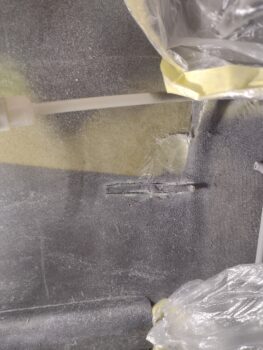

After I got the rudder cable conduits exposed and popping out of the sidewall farther aft, I then drilled and crafted a couple of 1/16″ thick G10 phenolic “washers” that I slid onto each tube, and slid into slits I created about a 1/4″ high on the top and bottom of the channels I made to remove the conduits (you can see this in pic 2).
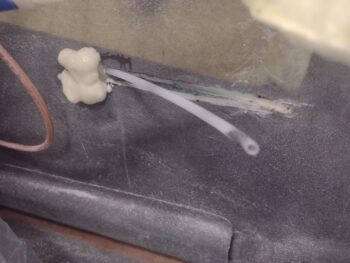
I then used foam scraps and micro to secure the conduit tube aft of these embedded washers, filling the cut out channels back to level with the sidewalls. After they cured for about an hour, I then used a bit of pour foam to fill in aft of the protruding “washers” which will allow me to shape the foam into half conical bumps on the sidewall.

It was getting late, so I left the rudder cable conduit pour foam to cure overnight, and got busy working on the electrical system.
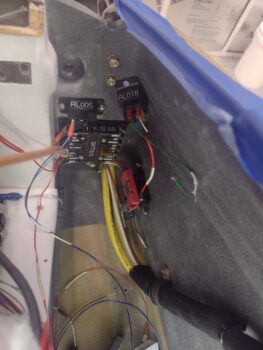
See the inline fuse at the bottom of the battery compartment labeled IF000… about the middle of the pic? The orange and red wire coming out that heading aft is the SD-8 backup alternator feed wire from the control relay in the Hell Hole, that in turn is connected to the SD-8 electronics in the GIB headrest.

Since I’m just now installing the nose battery compartment components, not surprisingly that wire was in 2 parts, one front and one aft, and needed to be joined together. I used a butt-splice connector and spliced the wires together before adding heat shrink (pic 1).
I then used some anti-chafing heat shrink wrap (that I failed to slip on before I installed the contactors) that I simply zip-tied to the wire bundle to protect it (pic 2).


My last task of the evening, which should have taken half an hour tops, was installing the battery bus, the mini ANL-15 fuse, the RL005 heated pitot tube relay and the RL018 relay that connects the E-Bus to the battery (unswitched) side of the battery contactor AFTER the SD-8 backup alternator is online and the main alternator is offline (and the main bus too).
I have 4 embedded platenuts in a raised pad on the aft side of the Napster bulkhead. Well, right off the bat one screw wouldn’t thread in. On further investigation I still had some Saran wrap plastic in there that I used to protect it while glassing it. However, the threading never worked, and it’s just not deep enough to get a tap in there to clean up the threads. I ended up drilling out an initial hole and have a 4-40 screw in there currently. This whole debacle ended up taking well over 2 hours.
Later I’ll drill that top hole out and mount a #10 screw with a nut on the front side of the bulkhead.
Ok… still… Pressing forward!