
The BATTERY BUS that is!
I finally got my wire label heat shrink cartridge delivered today and quickly pressed it into service to make 2 batches of labels, a number of which I used immediately.
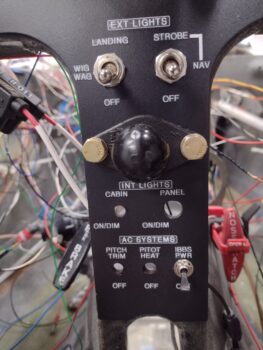
I got a late start in the shop today, and even when I got out there the physical space that is inside my panel area pushed me to call an audible regarding my to-do list. I had planned on knocking out the top pair of switches (landing and nav/strobe lights) on the center strut of the panel to all my big switches knocked out. But after assessing the space, I realized I would be making the install of the lower switches and dimmers quite a bit more difficult access-wise and visually.
I decided to start on the lower triplet of switches (Pitch Trim Master, Pitot Heat, and IBBS Master) and work from the bottom up. The Pitch Trim Switch is currently hardwired to the TCW trim system unit on the Tri-Paragon, so will not be installed until the Tri-Paragon is installed.
The simplest of the two bottom switches left was the IBBS Master power switch, so I targeted that. However, it had some required prerequisite tasks (par usual) before I could install it: I had to route the wires from the nose aft.
Sitting about the #4 slot on my to-do list for at least a week, which keeps getting squeezed out with new tasks, was the installation of Adel clamps on the NG-30 upright (aka “goal post”) on the aft side of Napster bulkhead (just above/inboard of the Battery Bus) and in a few spots on right side of the NG-30 cover.
Ahhh, but running the wires through the Adel clamps had its own prerequisite tasks (see why I’ve been kicking this can down the road?!): collecting up ALL the wires —to ensure proper Adel clamp sizes— which entailed A) finding them all, B) extending the short wires to make the journey through the Adel clamp “gauntlet” and C) terminating wires coming forward from the panel area to connect to the Battery Buss (plus simply organizing the wires in their appropriate bundle grouping).
I started by solder splicing a length of green/red striped wire to the Relay 18 control wire (upper center of pic). Later I had to extend the white signal wire of the CS6 ammeter that reports panel current to the HXr EFIS. Next was rounding up and routing the Landing Brake power wire to the Battery Bus as well as the cigarette lighter charger at the right base of the panel strut (both terminated middle right of the Battery Bus).
 Once these wires were terminated, heat shrank, etc. and installed into the Battery Bus, this completes the Battery Bus component wire population (not a bad milestone to reach!).
I then spent the next 2-1/2 hours routing/rerouting, zip-tying, sizing/installing Adel clamps a low bundle of wires and top bundle of wires down the right side of NG-30 and its cover.
 I still have a couple of straggle wires that will need extending (or terminated to its mate on the Tri-Paragon) and there is a possibility that I may have to swap out the big grounding cable that connects the “Forest-of-tabs” ground bus on the Tri-Paragon to the battery’s negative terminal (it may be just an inch too short).
Here we have another shot of newly corralled wires down the right side of the NG-30 (pic 1) and from the F22 leghole looking forward at the Battery Bus (pic 2).

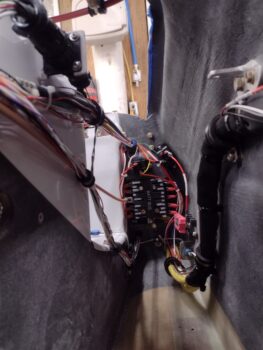
The convergence point of the P2 connector, upper and lower wire bundles coming aft is a single Adel clamp just forward of F22, about an inch up from the very aft NG-30 side plate, but actually on the NG-30 cover.
As I’ve labeled this pic: Yep, that’s a lotta wires!
 Don’t forget the IBBS master power switch… which I finally got to nearly 4 hours later!
Yes, now that the IBBS power wire was routed up to the aft edge of F22, I could better ascertain the required wire length since clearly it terminates on the switch itself. I soldered the IBBS power wire to the switch, and then rounded up, cut and soldered a black ground wire on the other switch terminal. The label for this ground wire is on the list and will be printed with the next batch and applied then.
Tomorrow I plan on installing the Pitot Heat switch and the 2 dimmer switches above that.
 I spent about 45 minutes on my last task of the evening which included installing the battery, which BARELY fit into the battery compartment… it was a struggle and I wasn’t sure if it was going to fit with the IBBS AND the main bus power and ground cables coming in/out the top of Napster.
My main reason for installing the battery was to get an exact recon on the black ground cable that goes to the Tri-Paragon ground bus. Again, it will be very close on if it fits or not. And to be clear, this is a repurposed cable that I original bought from B&C, and then decided not to use it where I had originally intended it for (as in, I didn’t cut it to this length, just trying to make it work if possible).
 Again, another VERY late night… but slowly getting there.
Pressing on!