
Where does the time go? This post covers the past couple of days . . .
Yesterday I spent many hours wrangling wires and zip-tying them into place to keep them put. I also bundled the GNS-480 GPS cable into a circular wrap and set it in place on the left lower sidewall. I then used JB Weld to affix 3 zip-tie points to the firewall to secure the GPS cable… and left those to cure for 24 hours.
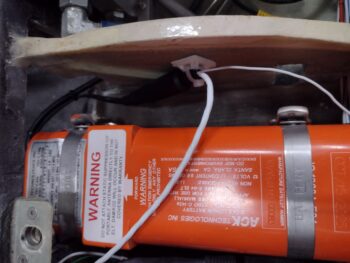
Something I also did with a single zip-tie point on the outboard of the left rib in the pilot’s thigh support to secure the GPS reporting cable to the ELT.
 I also worked a good couple of hours laying out, planning and splicing in 2 of the 4 video cameras, toning out wires to ensure I had the correct ones and splicing on wire extensions. This was for the top-of-pilot-headrest 5V video camera and the belly camera (both face aft).
Speaking of splicing, I also needed to extend 4 wires in length simply so they could routed properly with clearance… all around the quite intrusive GRT HXr EFIS when it’s installed.
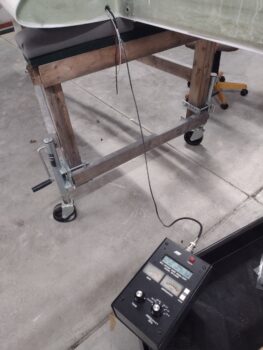
I also collected up all the connector fittings for the MFJ-259B Antenna Analyzer, as well as ensuring that any minor battery compartment corrosion was cleaned up. I then loaded up the analyzer with batteries, ensured it powered up, and then put in my vehicle to use in the morning.
DAY 2: This morning I headed over to the hangar with Antenna Analyzer in hand, connected it up the right wing —said a little prayer— and tested out the VSWR.
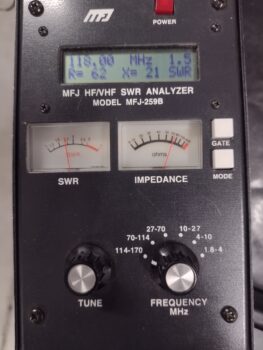
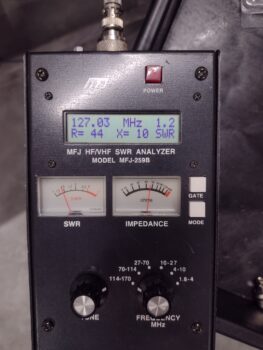
 Not bad at all. The main reading is of course at the center of the frequency bandwidth being tested (pic 2… 127.00 MHz) which reported a 1.5 SWR (top right of display). As a reminder, any SWR over 3.0 may result in radio transceiver damage due to returning transmission energy coming back down the line from the antenna.
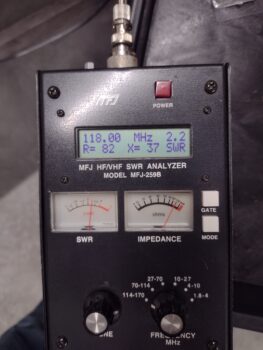
Out of curiosity I then slowly tuned the analyzer down to 118.00 MHz, hitting 2.0 in a couple of spots… clearly meaning I had the majority of SWR readings from 1.5 to 2.0. As you can see, at 118 MHz the SWR is a solid 1.5. I’ll also note the lowest SWR was 1.3 for the right winglet antenna.
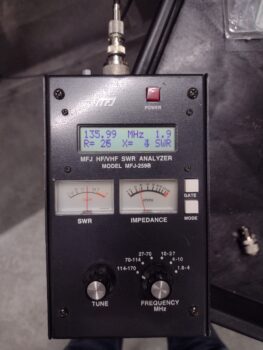
Lastly I tuned the meter up to the top end frequency for our radios: 136.00. On the way I hit 2.0 again before settling at 1.8. Not as stellar as the lower end of the frequency band, but still wholly acceptable.
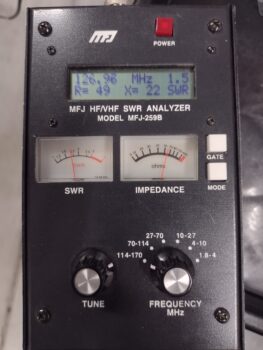
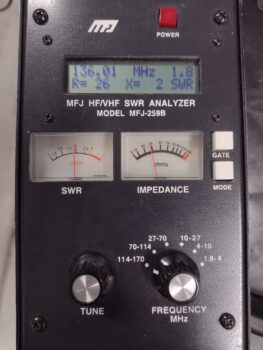
When I tested the SWR on the left winglet antenna it also tested out very well, and while the far end of the bandwidth both on the high and low ends resulted in higher SWR readouts than the right winglet—2.2 @ 118 MHz and 1.9 @ 136 MHz— the middle area of the bandwidth was apparently a sweet spot as it consistently had lower SWRs: 1.2 to 1.5.
I then again spent a good 3 hours securing and organizing wires, focusing this time on the left sidewall (GPS cable bundle secured), the wiring crossing above the left leghole opening, and along the left side of the Tri-paragon.
Here we have the wires in and around the left sidewall, just forward of the instrument panel, secured and ready for the GNS-480 GPS mounting tube to get installed.
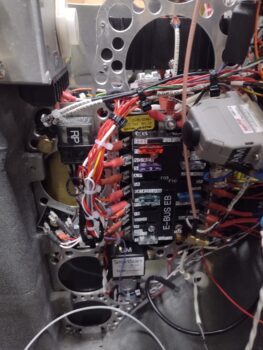
 I also did a good hour of organizing, wrangling and securing the wires in and around the E-Bus fuse panel on the forward left side of the Tri-paragon.
 I then spent another 2 hours plus on the video camera MUX and USB interface system with the HXr EFIS, as well as soldering in more power, ground and video leads for the individual video cameras. Again, the top and bottom aft facing cameras wiring is done, while here I’m working on finishing up the wiring harness for each of the fuel site gage video cameras.
 However, it was getting quite late and Jess had made dinner, so I called it a night and will resume/finish the video camera wiring tomorrow. Once the video camera system wiring is complete, this will allow me to do the final install of the GRT HXr EFIS (and also video camera tests) and the GNS-480 mounting tube.
Pressing forward!