
After some thought on my work flow, I sat down this morning and updated my task list in prep for micro-finishing the remaining surfaces of this bird.
In prep to pull the rudders off the winglets to do the inside wing-winglet fairing flange layups, I noted on each winglet that the top trailing edge was proud of the rudder TE by about 0.02″. Not much, but noticeable.
So I marked the top winglet TE and carefully evened it up with the rudder trailing edge using a straight sanding board.

Although I didn’t work the top gap between rudder and winglet, I did check in the regular plans and the high performance rudder plans to see if it called out the gap dimension. I couldn’t find anything, so I’m planning to use the 1/16″ gap that is called for in the Roncz canard plans. Although I didn’t widen the top rudder gaps at this point.
I did however take about 30 minutes to widen the aileron-to-wing side gaps to 1/8″ as per CP #43.

I removed the rudders in prep for the inside (technically “outboard”) winglet-wing intersection fairing vertical flange 2-ply BID layup. The first ply just covers the added dry micro (filler here, micro for weight) in the “trench” at the intersecting edge of original winglet notch for the rudder and new fairing flange.
Note, if you look closely you can see that I also removed the prop spinner and propeller.

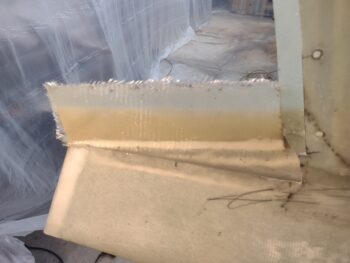
I used the Fein saw and Perma-Grit sanding tools to clean up the transition between the original winglet notch for the rudder and new fairing flange, first on the left (pic 1) and then the right (pic 2).


After cutting 2 plies of BID per side, and laying in drier micro in the intersection gap, I laid up the BID on the left fairing (pic 1) and the right (pic 2).

I then peel plied both layups… here is the left side peel plied.

I also noted that there is a slight difference in elevation between the winglet surface and the rudder near the top of the right rudder. To bring the surface elevation back into alignment I added 2 plies of BID to the inside top rudder hinge pad. I then peel plied the layup. I’ll assess after it cures.

To ensure that the proper alignment for the inboard rudder edge is maintained with fairing vertical flange, I taped the bottom inside edges of the rudders with clear packing tape and then reinstalled the rudders. I taped the rudders firmly into place, again to ensure that they sit perfectly flat against the inside fairing flange.


I also spent a good hour+ assessing the forward canopy fit with the aft nose/avionics cover and the forward fuselage near the longerons. Clearly something was lost in translation when I did the final securing of the aft nose/avionics cover because there is wider gap between the front edge of the canopy skirt and the recessed glare shield portion of the aft nose cover. The gap is more pronounced on the left side, being about 0.15″ wider than on the right.
In addition, I’m not overly thrilled with the original top curve of the longeron, since my canopy frame is more vertical (more French style) than the original lower, flatter, horizontal style canopy frame. Since I’m getting ready to do the final finish on this bird, now is the time to remedy all these issues.

Besides filling the gap forward canopy skirt gap with the aft nose cover (and possibly reworking the glare shield aft raised rain blocking edge/seal), I will most likely fill the top longeron along the forward canopy edge to create a small flange and even up the flow between canopy and top fuselage (near the longeron).
Now, to do all this, the canopy needs to be set in its no-kidding final locked configuration. This means ponying up and finishing the canopy latch assembly now —before micro-finishing— versus later as I was thinking.
Yep, still pressing forward!