
The past 2 days have been focused solely on the canopy latch system, which I need to finalize before I can complete the micro finish on and around the forward canopy-fuselage area.
Although I didn’t report on it in my last blog post, I’ll note in the last few days I tried my hand at some “Poor Man’s Anodizing” in an effort to not only anodize these newly machined canopy latch components for hardness to strengthen them for long-use wear, but of course to permanently color them as well.
That being said, the actual anodizing process worked well, but I think my amperage was too high (sulfuric acid/distilled water solution with positive & negative power applied) on the test part (modified canopy C4 bracket), which created such a hard surface (no open surface pores that occurs in normal anodizing process) that it wouldn’t accept or take up any color. Now admittedly I was using cheap dye, but it didn’t accept ANY of it, which leads me to my over-amp condition assessment.
So, with my mechanically anodized modified C4 bracket, to change its color, I accepted the fact that for time’s sake paint was the only practical way forward. With that decision made, I threaded in some cheap handling bolts, and taped up the threads to protect against paint —which clearly served to protect the internal bracket threads from paint as well.
I then hit the C4 bracket with 2 light coats of primer.

After the primer cured, I painted the C4 bracket black. I let it cure for about 30 minutes so the paint was dry, before then baking it in the oven at 175° F for over an hour. Here’s the result after it cooled down.


With the C4 bracket taken care of (finally!), I got to work re-designing the center block on the canopy latch handle where the aft opening-closing rod transits. My effort here is to attain a better over-centering action as the latch is closed.
In this effort to meet my optimized over-centering action goal, I made 2 significant design changes to the canopy handle’s center block:
1) I opened up the middle area of the block to create clearance to allow for a much longer throw rearward of the aft opening-closing transit rod, and
2) I moved the transit rod position in the block from an outboard position to as far inboard as possible.
Of course the first step in this center block redesign took place in CAD. Here’s a snapshot of that process . . .

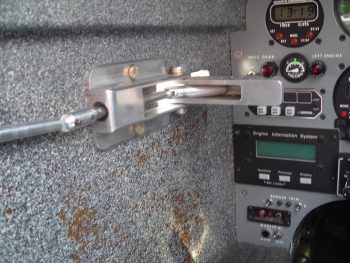
As a reminder, here is both the position of that center block in the canopy latch handle, as well as the design of the original, previous center block:

A final word on this center block before I cover the making of it, and that is that this design switch is a move from its design concept as I received it from Mike Bowden (top pic: his configuration worked, but my setup is slightly different so I need to modify it) to how Howard Caulk implemented his version of this style canopy latch handle (bottom pic).
I had a length of 1″ x 1″ 6061 aluminum bar stock on hand which I used to create the new center block. First, I cut the piece to be machined off the bar stock on my horizontal band saw.


I then essentially used my mill as a planer to reduce the block down on each side to the final dimensions (0.75″ x 0.82″) using my facing mills to knock down the faces on each side.

I then did an entire plethora of other machining tasks (possible new video coming on that?!) to get to the final new canopy latch center block created here:

Again, I moved the rod thru-hole from the outboard edge (pic 1) to the inboard edge (pic 2). Also see pic below these.


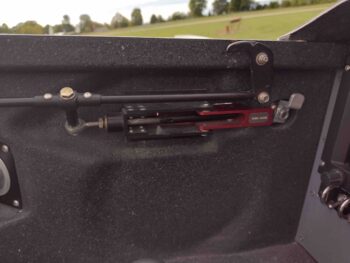
Here we have the new center block showing the hole on the inboard edge —looking from the aft side— as compared to the old version where the hole is outboard. Clearly I’ve also moved the transit thru-hole area further aft with the cylindrical addition, which will house a press-fit bronze oil-bearing sleeve for the aft opening-closing rod.

Here’s a look at the thru-hole and the clearance of the aft opening-closing rod in the center block assembly.

Since the center block is secured with 2 screws each side to the top and bottom “L” mounting brackets of the handle assembly, I intentionally kept the top and bottom interfacing surfaces of the center block as thick as possible to provide a decent amount of meat for the securing screw threads. Moreover, I did this specifically to avoid having to remake new top and bottom “L” mounting brackets.
Here’s a final look at how the center block will appear when mounted in-between the top and bottom “L” mounting brackets (obviously some cleanup will take place before install).

Tomorrow I plan on working to get this center block installed into the canopy latch handle assembly and get the canopy latch handle much closer to being fully operational.
Pressing forward!