
Another 2-day update here . . .
First off, what is not shown is the good bit of work I did on reassembling the wiring harness for the Dynon Intercom. I have a chickenscratched diagram that I made up that helps me figure out what goes where and keep track of my progress.
Also, I’ve been brainstorming how to fix the dead video camera wire in the left strake. I’ve done a few recon missions trying to get multiple cameras up in there to get some good pics… but to no avail. All have come out too fuzzy to get a good idea of what the actual problem is. I’ll continue working that issue, but dropped it for today as I focused on other tasks.
First off, after reading some feedback online from homebuilders in regards to the ACK E-04 ELT picking up unwanted noise and/or firing off false positives, I added a braided shield over the “telephone” cable that runs betwixt the audio alert unit and the panel mounted remote switch… this after a conversation with the ACK ELT bubbas since my configuration is NOT as they depict in their installation manual. A good conversation with them on this and my other install configurations to ensure all is good. Thankfully, my install passed muster with them.
 Why else call ACK? Because I’m lopping off the majority of the cable between the audio alert unit and the panel remote switch. Again, the manual shows a 6″ pigtail between remote switch to the audio alert unit, then this long cable to the actual ELT unit. My configuration is a bit opposite as it has the audio alert unit attached to the pigtail off the actual ELT unit, all on the left side of the bird, then the longer cable portion between audio alert unit to the right side mounted panel remote switch.
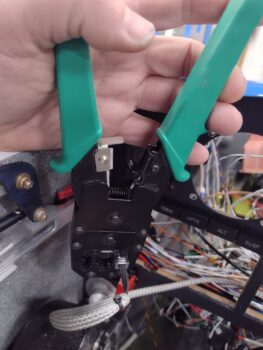
 That entailed crimping a new RJ11 connector onto the cut 4-conductor “telephone” wire (the RJ11 visible in the pic above was a test termination). To be clear, online, people have reported their units not functioning as designed when they happen to use actual telephone cabling vs maintaining the original wiring and schema (ie no crossovers).
Thankfully I had the required crimpers on hand for CAT6 RJ45 connectors, which also handles RJ11 connectors (pic 1). Here is the end result of terminating the RJ11 connector onto the wire (pic 2).

Then, before installing the Audio Alert Unit, I went ahead and installed a battery into it (as I did in the remote switch unit a while back).
 And set it loosely in place at it’s approximate mounting spot. It will simply get zip-tied (maybe some Velcro too) to the wire bundle exiting the throttle handle wiring P4 connector (which is completely installed btw).
 Here is the other end of that roll-my-own shielded cable, terminated into the right side located panel remote switch.
So why am I working the ELT install now? Two reasons:
1. I wanted to get this shielded cable run across the bottom of the panel to have it ready to bundle with the other wires as I start cleaning up and securing up all the wiring.
2. Although last I checked one does NOT need an ELT during the initial 40 hour fly-off, I do want the ELT at least in place when I do the weight & balance on the bird.
 More on the ELT…
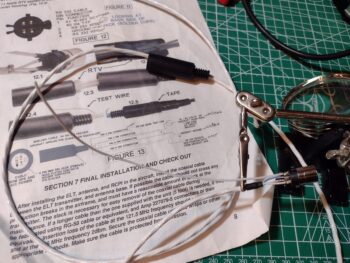
The ACK E-04 can connect to a GPS navigator to beam out the GPS position if/when the ELT alarms. To utilize this function there is a little bit of soldering required along with some arts ‘n craft time involved. The aircraft side 4-pin connector must be disassembled and a wire soldered to each of the 4 SMALL connector pins: 3 from a shielded cable and one lone standard 22 AWG wire that serves as a test lead.
Here we have the 4 wires soldered to the connector pins.
 Here the now-wired connector is seated into one half of the internal clamshell halves (pic1), before then having the internal area filled with silicone RTV (as per instructions/pic 2).

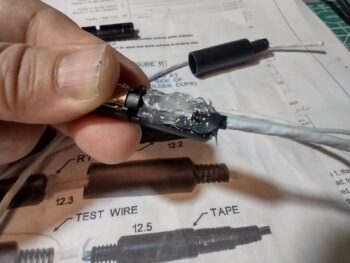
I then placed the other internal clamshell in place, which caused the excess RTV to ooze out.
 After quickly wiping off the excess RTV (with some remaining) I slid the external plastic connector barrel into place. After a 24-hour cure this will complete the required construction on the ELT side. Once the GNS-480 mounting tube is installed, I’ll finish the other cable end with power, ground and ELT source leads to complete this cable install.
 Another prerequisite task that I worked on throughout the day was a 3.5mm jack to connect up to the Dynon Intercom. This will then get a BlueTooth transmitter terminated into this jack to allow my beloved GIB (typically my wife, Jess) to pipe music into the intercom via her cell phone/iPad.
There is an oblong raised step encircling the threaded jack ring. This step is about 0.025″ high so I designed that inset into the front face of a little mounting block that I’m making up to both protect the jack’s wiring and provide a bit more real estate to Velcro/zip tie this sucker into place (where exactly I’m not sure yet).


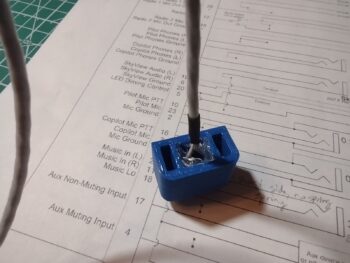
Here we have the 3x 24AWG shielded wires soldered onto the 3.5mm jack tabs. Note the 3D printed mounting housing below the shielded cable.
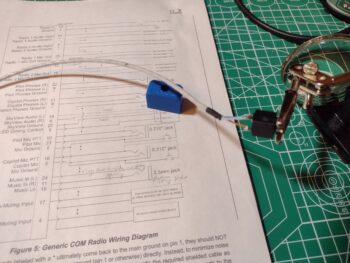 After soldering the 3 wires onto the jack tabs, I then installed the 3.5mm jack into the 3D printed mounting housing and secured it with the knurled nut.
 I then slathered on a decent dollop of RTV onto each wire to secure them to the housing to help protect/secure the wiring.
 You may be asking why work on this non-critical audio jack now? Well, because it was a very close repeat task of what I did with the ELT connector, as well as the fact that I’m not kidding myself that getting the wired intercom D-Sub connector attached to the actual intercom unit is going to be a simple EZ-PZ task (it won’t be), so once that’s done I don’t want to have to undo anything for future mods. Thus, I’m wiring this up now and terminating the wires into the Intercom’s D-Sub connector. AKA: One shot, one kill.
Pressing forward!