
I got a late start today after getting a good solid to-do list drawn up. Then after getting the first couple of items completed I went rogue… I’ll explain below.
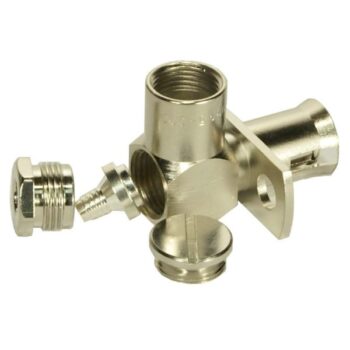
First, I called Stein Air since they have the 90° right angled connector that I need to connect up one of the 3 antennas on the GNS-480. Actually, I just needed the little internal insert shown in the middle of all the parts and was hoping Stein might have a spare in their parts bin, but not surprisingly they did not. The bad news is that I had to pull the trigger on an entire new connector assembly… the good news is that they don’t sell a lot of these, so they cut me a really good deal on the connector.
But of course since I was putting an order in for this connector, I needed other consumables so I went into 45 minute inventory mode to assess what all I needed before finalizing the order. So it turned out to be a good deal in the end.
[I nabbed this pic off Stein’s site: credit Stein Air]
 I’ll also note that I bought the remaining 4-40 screws I need to finish the GNS-480 install at a local “Aviation Hardware” outlet (aka True Value Hardware).
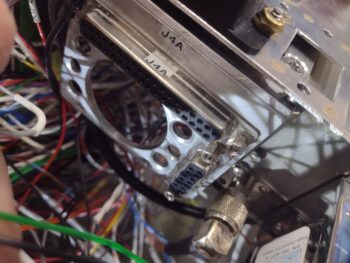
Before I go any further, I wanted to post this pic of the J4 (HXr) and J3 (Mini-X) D-Sub connectors mounted on the right aft side top shelf of the Tri-Paragon. I finalized adding all the wiring to these two connectors over the past few days to allow me to get up underneath it before I permanently mounted the top shelf.
 A few lines down on my to-do list was “Assess X-Bus fuse panel mounting.” Well, about 4 hours later here is the final result (Note: I’ve been looking for this darn fuse panel for a few days now. I no kidding spent about 45 minutes today looking in every corner of the shop and my house for it… and found it behind a leg of one of my kitchen table chairs… clearly it had fallen off the table at some point. <sigh>).
Let me refresh your memory on the X-Bus. It is the physical connection of powered components connected to the TCW Tech’s IBBS pass-thru power. In other words, although the IBBS is an Integrated Back-up Battery, it also has a pass-thru function that powers up to 5 amps worth of connected components, either from its own battery or from the power it receives from the E-Bus power that it is connected to.
Sound familiar?
This feature of the IBBS essentially makes it a “Brown out” battery, allowing all the connected pass-thru components to be powered up pre-engine start without being effected by the starter stealing all available amps during engine starting. Combine this with the Deslumpifier that does essentially the same thing for the GNS-480, and practically my entire panel can be powered up pre-engine start without risk of going off line or rebooting due to the engine starting process.
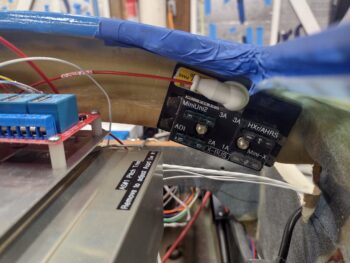 After testing out various locations over the past few months, I’ve had my eye on this spot for the final location to mount the X-Bus fuse panel. However, to be certain that the X-Bus fuse panel wouldn’t cause clearance issues with the Tri-Paragon’s top shelf, and assure access to check/replace fuses on the X-Bus fuse panel, I needed to wait until after the Tri-Paragon top shelf was installed to mount it.
Moreover, the added words “fuse panel” are actually a refining descriptor since my original X-Bus, which is still part of the circuit, is a 9-pin D-Sub. The issue was that although the IBBS pass-thru output is protected with a 10 amp fuse at the IBBS, the individual components were not protected with appropriate lower rated fuses. So I simply extended out a feed from the D-Sub (which still has a few connections on it) to this fuse panel.
In sheer vanity to save the ‘unblemished’ appearance of F28’s front face, my initial plan was to embed RivNuts into the aft side of F28 to secure the X-Bus fuse panel. But alas, F28 is simply not thick enough to allow what I wanted to do. So in order to get this task done without waiting hours for a layup to cure with (possibly) fairly robust Clickbonds (much larger than the standard ones we use), I simply decided to use through-screws to mount the X-Bus fuse panel.
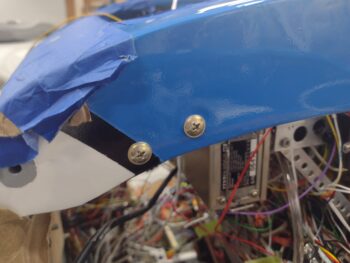 So in a rare use of buttonhead screws on this bird, here’s a pair right here! I also had to realize that my mental frame of view on this bird is it typically sitting with the nose up, but that in reality 90% of any viewing or working on this bird will be with the nose much closer to the ground with the engine installed. Thus, in the grazing position these buttonhead screws won’t be quite the visible eyesore that my anal thinking makes them out to be!
Now… time to get back to that to-do list! (smile)