
I started out this morning with what I typically start with during the build: a cup of coffee as I write out or finalize my day’s To-Do list.
Well, I had just finished my To-Do list and started work on the panel, which was in the house (important detail). I dialed in the GNS-480 GPS so that it fit in the panel, and then I drilled the screw mounting holes for the HXr EFIS (#6 screws) and the Mini-X EFIS (#4 screws). I was remiss in mentioning this on my task list for the panel on yesterday’s blog.
It’s been a bit chilly the last few days here as we move into Fall, so when I went outside to head for the shop I realized that it was a very nice warm day. A day, perfect for?? . . . painting!
So my To-Do list almost instantaneously vaporized into thin air as the new task was to get the nose area internal painting finalized.
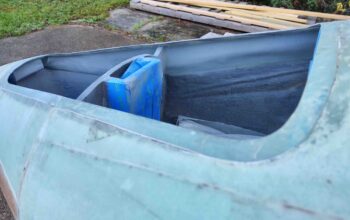
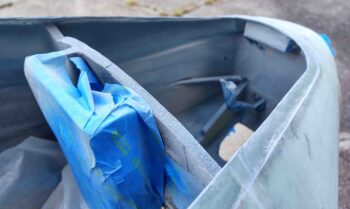
My first actual shop task was cutting, sanding and cleaning up the 1-ply BID layup in each channel on each side of the nose hatch door hinge bracket mount.

I then spent about 45 minutes prepping the nose area for paint. I clearly didn’t want any paint getting up into the cockpit or on the canopy.
I started out with some primer on the unpainted surfaces. And then that’s when the proverbial NO-GO hammer fell.
So about a month ago I picked up some Trunk paint from a local auto parts store, the same paint I used previously to paint the avionics bay area, nose wheel well cover, etc. However, when I started painting today, it had a noticeably green tinge to it. I then realized that if you looked very closely at the cap (and read the small label on the back!) it was black with aqua speckles. I didn’t realize, or expect, that that was a common color for trunks… but it wasn’t going to do for my nose paint.
Oh, hold on boys and girls, the story gets better. Well, I told my friend’s daughter, my little buddy, that I’d hang out tonight. My painting window had passed, so on the way over to their house I stopped off at an open auto parts store… no joy on any of the right paint.
Then, on the way back home I checked WalMart, which was open later. Not the same brand, but it looked like the same color paint: black with gray speckles. Ok, so I bought it.
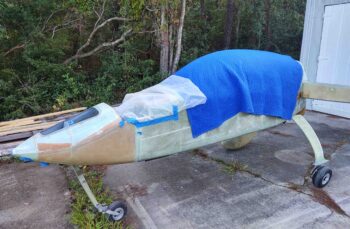
Determined to get this paint laid down tonight to cure (so I can get on with the nose build!), I pulled the fuselage out of the shop and set up some extra lights. I shook the can up, did a test shot in the air, and then started spraying. After a number of strokes I realized something wasn’t right . . . wouldn’t you know —NO KIDDING— someone switched the caps! This was not black with gray specks, it was a metal gray with black specks.
And now I’m in a real pickle: unlike the black with aqua, I really like this color! Plus, I’ve got the fuselage out in front of the shop with all the lights set up… So I said, “Screw it, I’m going 2-tone!” (meaning the battery compartment will get a different color of paint). I was getting something DONE tonight!
So here it is . . . in all of its semi-glory! (To be clear, I’m not looking for perfection on this internal nose paint stuff, just cleaning up all the disparate foam colors and glass mismatches). BTW, from Napster aft will be the original black with gray specks.

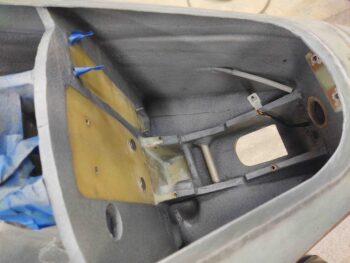
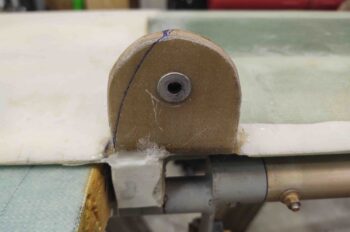
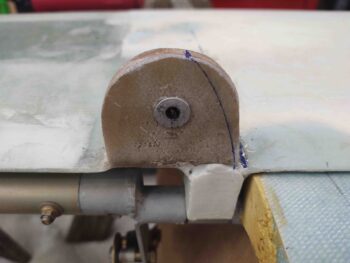
One thing I didn’t show last night was I actually popped the canard onto the fuselage to check out the fit and look with the upper nose completed. I quickly realized that when I had last installed the canard, the top nose area around the front end of the longerons was much fatter. With the new trimmed F28 outboard edges, it made the canard upper mounting tabs a bit wide on the outboard side. I marked the mounting tabs and then removed the canard.
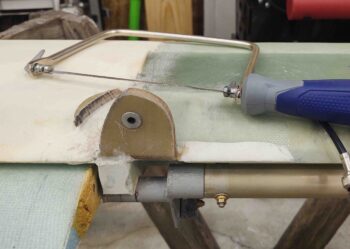
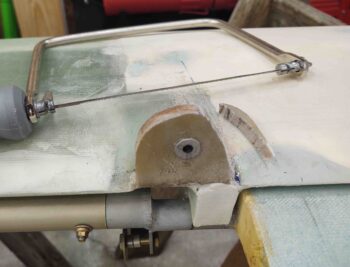
Well, in my fervent quest to get yet one more thing off the To-Do list tonight, I grabbed my coping saw and trimmed down the outboard excess on the upper canard mounting tabs. I’ll certainly have some sanding to do to finalize the shape and fit, but the major lifting on getting these to shape is done.
Tomorrow I plan on finalizing the interior nose painting and then moving on to the nose hatch latch and the aft nose and avionics cover install.
Wow, that’s a bit radical of a trim. Not sure what to think about that. Is that not going to adversely affect strength in that area?
Nahh. Those things are so thick, and the trimmed piece at its fattest was maybe 0.25 inch wide. I didn’t shave any off the bottom width where it attaches to the canard either. I suspect you could shave off the rounder part on the other side and have very minimal effect on strength, although I’m doing that. And no other option, since these things were stickup out past the top nose edge line.
Ahhh the classic two tone. Proving that perfection IS the enemy of …..timely progress.
Who’s to say that two colours is not zone demarcation and a happy intended consequence of questionable labeling by person or persons unknown?
Exactly, ha . . . Well stated!