
Today I started off with some fairly in-depth research on how to install the nose hatch door “J” hinges in a manner and configuration where they will simply work.
So I discussed hinge configurations back and forth some with Terry Schubert. In addition, when I found out Terry Lamp and Mike Toomey were down in Chesapeake visiting Marco and Chris Cleaver to help them with their respective condition inspections, I called and spoke with both Terry and Mike.
Terry deferred to Mike, and Mike had some good advice. I think if I have any hope in actually getting these hinges to work, it will be on his word that I should mount the hinge pivot points as high and as forward as feasibly possible.
Thus, towards the end of the evening I Dremeled out as far forward as I could in the channels I’ve created on each side of the nose hatch hinge bracket.
I’ll see if I can make the hinges work, which obviously I’d really like and really prefer, but I’m not going to continue to spend countless hours on them. If I get no joy on the next round of hinge efforts, I’ll have to really consider going in a different direction.
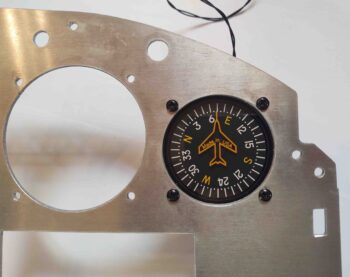
I did spend a couple of hours “playing” around with the canopy and looking around to locate some electrical components. I started off by installing the vertical compass card which fit fine, as did the screws in the holes.
Apparently the cutting action of the plasma creates a beveled kerf on the bottom half of the round cutouts, since every hole required some cleanup almost completely just on the bottom half. After about 10 minutes of filing, the holes were good to go to mount the top instruments into (from left: MGL clock/timer, Trio autopilot, TruTrak ADI, and vertical card compass).
Moreover, of the 16 mounting holes that were plasma cut, only one requires drilling to provide about 0.020″ extra clearance for the screw.
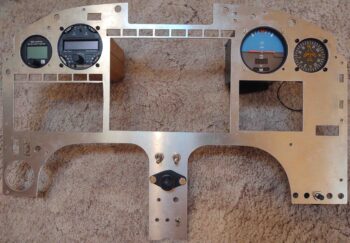
The holes in the center strut were NOT as impressive as up top. For some reason these lower holes were all cut about 0.050″ to 0.100″ to the left of where they should be. I drilled the top (light switches), second (RAM mount) and fourth (component ON/OFF switches) row holes, essentially making them oval vs round. I’ll assess as I go along whether I need to fill in the edge of each hole by TIG welding in some filler aluminum.
I then spent a good couple hours on the canopy, after removing it from the fuselage. Sorry, no pics.
I filled in with micro the last few areas on the interior side that needed it, and then got to work on the left-side canopy frame to sand/remove as much of the flocro I had added to the underside to make the surface straight and fill in any depressions. The bottom line is that it was just too much flocro and wouldn’t allow for me to have the canopy seal in place with a good interface with the aft turtledeck or the front-side aft nose/avionics cover. So I vigorously removed as much flocro as possible while still maintaining a straight surface.
Tomorrow I’ll continue working nose and canopy tasks, while also doing a bit more on the panel to prep/populate another 5-6 more vacant holes.