
I didn’t do a blog post yesterday because it was all about research. Over about 12 hours worth, including old 1980’s Sq. III videos with Dave Ronneburg and David Orr (aka Beagle) on cowlings, baffles, etc. Ahh, if I had only watched those in year zero!
With the bottom cowling on, I grabbed a very long 1/8″ drill bit and chucked it up. Then I drilled 3 holes in the cowlings that marked the most critical components suffering from lack of clearance between them and the lower cowling. Those components (marked with arrows on green tape) are:
1. The centerline carbon fiber air induction tube.
2. The left inboard exhaust pipe 90° elbow.
3. The left cold air intake tube (the right side is already cut).

My initial plan for the centerline carbon fiber air induction tube was simply to extend the structure of the belly RAM air scoop to end [externally] just a bit aft of the cold air induction tube [internally].
I first found and marked the centerline of the bottom of the lower cowling.

And then marked the proposed extension of the aft RAM air scoop structure, or swoosh if you will (technical term).


First I had to locate exactly where the carbon fiber air induction tube wawouls situated in relationship to the cowling… so I drilled another bigger hole, mounted the bottom cowling and took a peek.
From there I used my trusty Fein saw to cut out an oval peek hole.


I then needed to make a decision. You see, the tightest clearance between the carbon fiber air induction tube and the bottom cowling is about 1/8″. And that is literally for maybe 1.5″ going forward. From there the remaining air induction tube has a decent amount of clearance.

My secondary plan, which would be way easier and much faster, was to cut a relief hole in the bottom of the cowling to then recover with CF. Since the average thickness of the cowling is about 0.07″, then if I relocate the “floor” underneath the very aft portion of the carbon fiber air induction tube to the existing exterior surface of the bottom cowling, I could then reclaim that 0.07″ of clearance…
I know, I know! Barely nothing. But that would then put me at just under 0.2″ of clearance. Plus, since I’m only using enough carbon fiber (1 ply) to cover this relief hole, then there is a bit more give than the much thicker cowling. Essentially what I’m creating is an oval “soft spot” on the bottom of the cowling that when painted will be indistinguishable from the rest of the bottom cowling; will keep the air in; and will have a considerable bit more give if “pushed around” by the more stout carbon fiber air induction tube.

It took a few iterations to get the clearance dialed in.


Pert near final!

I took the lower cowling outside and did a fair bit of sanding on it before bringing it back inside and cleaning it up.
I then taped inside the hole with some thick duct tape.

And slathered some pour foam into the hole.
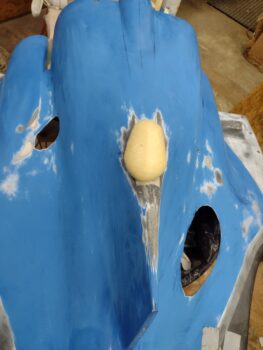
Baking some more bread! (A side view).

About 10 minutes later, after cure, I then hacked the foam down before sanding it to match the bottom cowling surface.


I then applied clear packing tape to just the foam area.

And also a layer of peel ply that was cut the same shape and size as the foam.

I then laid up 1 ply of CF (see the horse head? Hint: it’s sideways)


I then peel plied the layup.

To be clear, if after flying for a bit I notice any significant chaffing, rubbing or contact between the CF air induction tube and the cowling, I will then employ my initial plan and take the RAM air scoop aft end all the way to nearly the end of the bottom cowling boat/shark/rudder tail to ensure the required clearance is on hand.
As the first CF layup was curing, I then notched the left side divot that will allow just a bit more clearance for the cold air intake tube.


I then added a “propeller” to my bird. I noted that in the propeller installation instructions it says to check the distance of the prop from the TE of the wing on each side to see if the prop is rotating in a perfect circle perpendicular to A/C centerline.
I decided to investigate the dimensions of the prop not only on how it aligned with the wing on each side forward of it, but straight out 90° from the prop hub.
That’s when I fell into yet another rabbit hole. . . (they’re everywhere on these builds!!!)

If you remember about 10 months ago, before I mounted the winglets I did a deep dive on if my wings were straight and equal to each other. Since I hadn’t installed the winglets yet nor did I have the engine installed, I didn’t have nearly as many solid data points to refer to on just how the wings were looking. Back then they looked great and I determined —in many different directional dimensions— that they were only 1/16″ off in length from each other.
Okay, great!
But when I ran a straight line along the front surface of my “prop” . . . whoa!!!! Did I find a different story! I made a not so pleasant discovery and was staring down the barrel of my wings being off in F.S. (Fuselage Station), sweep, whatever you want to call it, by a good inch [read below as I clarify this statement].
Now I will note that my first assumption from my previous confirmation (mentioned above) was that my wings were of course straight, it was the engine that was off kilter (not up/down as before, but left/right).
However, after taking a myriad of measurements I confirmed that my engine is exactly in line with the fuselage. So it is a bit of an odd situation. The engine is almost dead on with the fuselage, but it is off when compared to the wings (since the wings are off from each other).
To convey just how off they are, the straight line out 90° to the LEFT/port side from the prop hub and along the straight “prop” I have temporarily installed has the line crossing the forward outboard corner of the aileron just kissing the corner. Conversely, on the RIGHT side the line crosses the outboard forward aileron corner an inch forward of that corner. The same goes with the intersect point from “prop” to each winglet, with the right side being about 1.2″ forward than the left.
“Strange things are afoot at the Circle K, Ted!”


It gets weirder. Interestingly, all the flying surfaces are dialed into the nose. When I measure each wingtip, aft top winglet corner, etc. to the nose, I’m at most 1/8″ off between them one side versus the other.
Finally, I’ll report that the CS spar/strakes are a hair over 1/8″ off perpendicular to A/C centerline.
I did a quick dive into the plans on wing sweep, which can be up to 3″ off between wings and Burt says a Long-EZ will still fly just fine.
I also removed the left wing, added a thin washer inboard and a thick washer (vs thin) per outboard bolt. I intend to add/swap washers to the right wing as well… more to report tomorrow.
For now…. yep, I’m calling it a night.