
I started off today by finally getting in touch with Matt at Custom Aircraft Parts regarding my exhaust pipes. It sounds like there is a good a possibility that I may be able to send my stock pipes back for them to resale and then have them simply make another set for me that will be configured to fit my tight cowlings. More to come on this of course.
I then called Electroair and thankfully they had the Molex connector and pins in stock that I need for my MAP Sensor, so I’ve got those on the way via UPS.
Next came immediate task #3 of 3 that I had written down from last night: find short 4-40 screws to mount the 9-pin D-sub connector to the GRT MAP sensor. Well, another one of those shop/garage/house searches and I have no short 4-40 screws. And I didn’t feel like chopping one short using the Dremel tool given these things need to less than a 1/4″ total. I did find some 3/16″ brass 4-40 screws at a local hardware store (Lowe’s didn’t have any… shocker) that were perfect for my task.
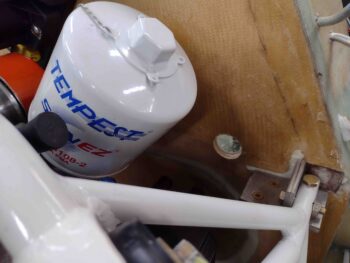
Upon returning back to the shop I then set about to drill my other, right side engine electrical connector hole through the firewall. I already had a 1/2″ hole down in this corner, which you can see lit up slightly at around the 7 O’clock position on my 1″ round duct tape hole position guesstimater.
Note the brown phenolic nutplate tab in front of the hole? This prevented me from drilling the hole straight in. So, I would either have to fill in my existing half inch hole with flox and drill a bit more inboard and up (45º from current hole) or drill from the outside in . . .

Which I chose to do. This required me to use a flexible drill shaft with a 1″ hole saw, but I took my time and it actually did just fine.
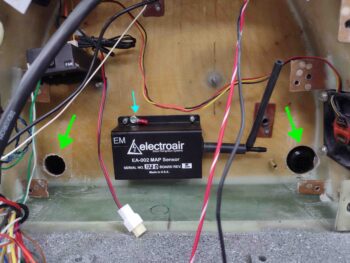
I then temporarily taped the electrical connectors in place to check fit. P9 is on the left (right in pic) while P10 is on the right (left in pic). For P9 I’m repurposing the larger diameter hole (1.5″?) that I drilled in at a slight angle. Once the P9 connector is mounted I’ll fill in the slight gap around the connector on the inside with fire block RTV. Connectors and holes highlighted with green arrows.
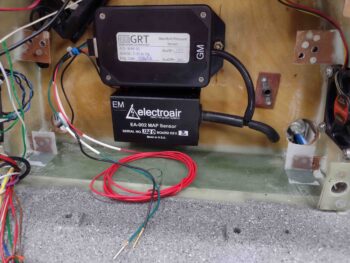
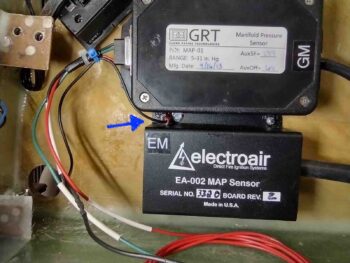
Note the blue arrow in the middle. The problem with building, then moving, building then storing your project for long lengths of time, then building and moving again is that you lose track of some of the more esoteric requirements for installing some components. Case in point here: the Electroair manual discusses mounting their MAP Sensor on the firewall, where it would likely be attached to a grounded plane. I called Electroair years ago and they actually prefer the MAP sensor NOT be mounted to the firewall, but on the cool side of it (makes sense, thus my call). Per the manual, no ground plane in turn requires a supplemental case ground (this MAP sensor case is metal). Did I remember this? NO!
The only reason why I picked up on this little detail was when I was reviewing my wiring diagrams to ensure the wiring was correct for both GRT and Electroair MAP sensors. I had a note showing the Electroair MAP sensor case ground tying into the GRT MAP sensor ground wire before terminating into the D-Deck ground block. This drove me to drill a small pilot hole and use a sheet metal screw to attach a small ring terminal to facilitate attaching a wire to the Electorair MAP sensor case for supplemental ground.
Here I’ve crimped a ring terminal to the end of a piece of black 22 AWG wire (that I cut off from the other end of the D-Sub ground wire) and solder-spliced it to the GRT MAP sensor ground wiring. Again, this will provide a supplemental ground to the Electroair MAP sensor case.
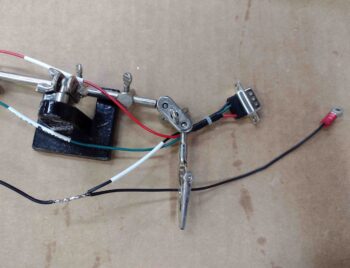
I then covered the solder splice with heat shrink. Ground mod wiring complete!
Mounting the GRT MAP sensor was a bit of one of those chicken-vs-egg scenarios… with the mounting holes behind the tube port on one side, and behind the D-sub connector on the other. Speaking of the diminutive yet problematic D-Sub connector: I actually tried to mount a backshell on the 9-pin D-Sub connector earlier, but it wouldn’t fit into the hole on the plastic case. I even trimmed the hole both top and bottom to allow it fit, but it would have required even more extensive trimming on the sides… so not really wanting a backshell mounted anyway (due to it’s space-sucking size) I chucked it. The backshell would have of course negated the requirement for short 4-40 screws since they’re a part of that kit.
Once I got the nuts in place to secure the GRT MAP sensor, I then attached the tube on one side and the D-sub connector on the other. With so little space off to the side I ended up using the little screwdriver/wrench tool from my Dremel Tool to tighten the D-Sub screws.
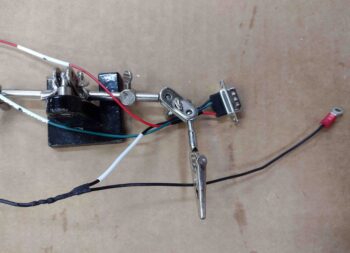
I then connected a short length of tubing connecting up the fitting from both MAP sensors to the through-firewall barb fitting.
Also in this pic, note that I cut and terminated the GRT MAP sensor ground and signal wires with a D-Sub pin and socket. Only the power wire remains uncut.
Lastly, on each side I treated the raw wood edges of the electrical connector holes with raw epoxy. I also wetted out the hole for the sheet metal screw that secures the Electroair MAP sensor case supplemental ground ring terminal and added a small dollop of flox on it before driving the screw in… this will help prevent the screw from rusting due to the moisture in the wood. And finally, look at the bottom nutplate tabs which have a ply of BID each to secure them to the top of CS spar, replete with a small flox fillet each. And of course peel plied.
Here we have the Electroair MAP sensor case supplemental ground 22 AWG wire attached to the metal case via a ring terminal and sheet metal screw. I failed to get a shot of this before I mounted the GRT MAP sensor, so here it is.
I of course need to connect up the Electroair MAP sensor electrically to the Electroair controller with the incoming Molex connector, but beyond that the MAP sensors are mounted, plumbed and wired onto the cool side of the firewall. Tomorrow I’ll work on the engine side of this system in an effort to finish up the entire MAP system.