
Today I started off by knocking out another long overdue electrical task, minor really as it is: adding heat shrink to relay #9, the relay that handles COM1-COM2 PTT flip-flopping. The tricky part to this endeavor was finding a decent-priced source of supply for the 1-1/2″ diameter heat shrink to complete the job. I looked on McMaster-Carr but they wanted to much for the amount I needed (their prices are usually reasonable, but the order quantity for stuff like heat shrink is often a bit much). In the end I was able to find some on Ebay.
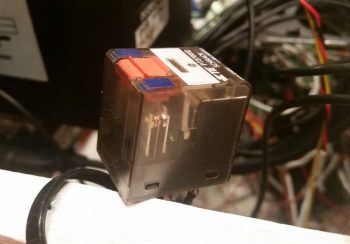
I’ve actually had this heat shrink since last week, but as you know, I’ve been a bit busy lately. The heat shrink worked great and covered the relay nicely.
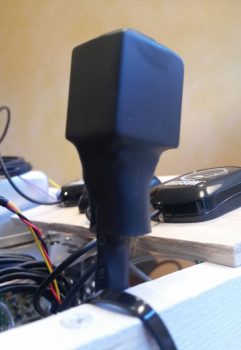
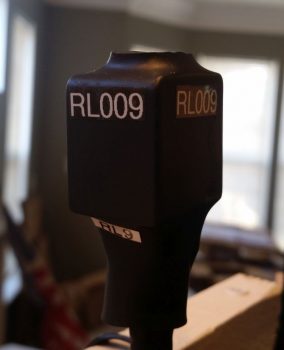
I then labeled the relay to ensure I can tell what’s what inside the avionics bay. When I do my cable management efforts in the not-too-distant future, I’ll cinch up the bottom opening of the heat shrink with cable lace.
I then called GRT and got a lot of stuff resolved (actually 2 phone calls a couple hours apart). First, I solved the case of the missing EGT & CHT probes and they are sending me the sets for my engine (an oversight on their part, but they are remedying it in an expeditious fashion).
Moreover, one of their EIS techs, Eric, was great in providing me a tech sheet on just how to hook up my #3 GRT OAT probe to use as an air/heat temp sensor inside my air/heating ducts. A couple key issues is that I needed to use a 4.8V excitation signal from a 5V source (luckily I now have that at the front side of the aircraft) and I needed to solder in a 10K Ohm resistor on a pigtail that went from the signal wire to ground. Once I did that, Voila! … it was up and running. With just one minor tweak of the Scale Factor setting and I was in business.
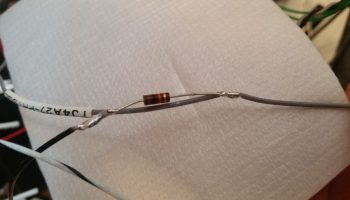
After I soldered in the 10K Ohm resistor on the ground pigtail, I then covered and secured it with heat shrink.
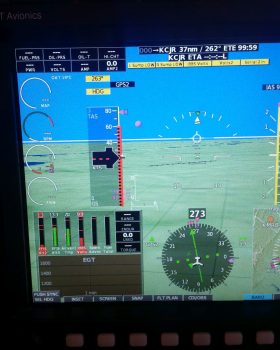
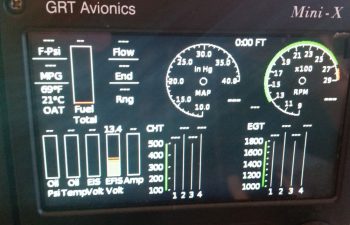
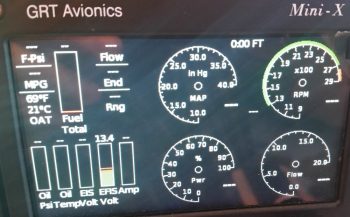
I then got to work on setting up my engine data display on the HXr EFIS. I’d like to point out a few things in the pic below. First, note column #3 “Airvent Tmp” and column #5, “Spark Advnc” in the lower left inset. Next, note the yellow “L Sump LOW” and “R Sump LOW” alarm states across the top, which not currently being hooked up to the low fuel sensors they alarm due to no signal…. I also got some more refined info on dialing in these Sump Low Fuel alarms from GRT as well. Finally, note that in column #1 I have a low voltage alarm on EFIS Voltage 2, which is the E-Bus feed to the HXr.
Since not all data points are available to each display area. For example, the vertical data columns in the inset don’t necessarily have the same data points to display as say the 4 black combo boxes stacked up in the upper right corner of the inset. I played around with these a while until I finally got the data showing that I wanted.
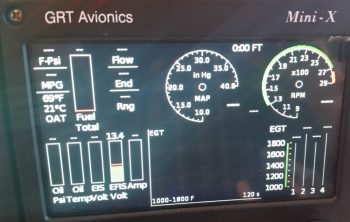
I then went to the split screen engine data page. Note that my #2 EFIS power input is still red in the pic below. Also note the new red numbers in the EGT and CHT graphs at the bottom, which is showing up since I set the limits.
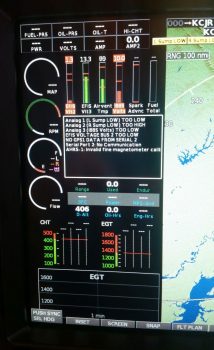
I finally took a moment to see why my EFIS Volts2 input source was alarming, and quickly discovered that I had no fuse in the E-Bus slot where the HXr connects to… so I popped a fuse in, and no more alarm. However, I would like to point out even further the bus power source data below. Column #2 in the inset is EFIS Volts3 power input which comes from the X-Bus, or IBBS. Now –since the IBBS is not installed– it’s simply jumpered off the Main Buss, so those two busses read the same: 13.3V. But the E-Bus voltage reads 13.0V. Why? This is due to the Schottky diode that lies in the middle of the connection between Main Bus and E-Bus. Schottky diodes extract a toll for their services, often up 0.7 of a volt just for being in the picture.
After setting all my engine data limits, inputs and parameters in the HXr, I then did the same in the Mini-X. I made a few quick changes right off the bat like changing out the Carb temp reading in the upper LH corner to “MPG.”
I then did a bit of exploring and found a few cool things: such as the 6 different engine page display types on the Mini-X.
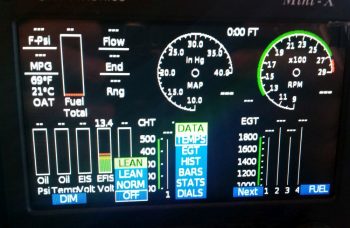
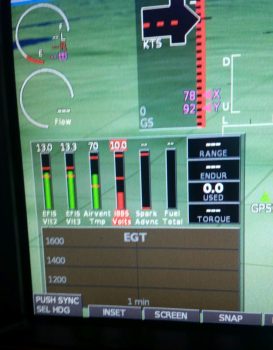
Here is DATA menu #2: EGT as shown above that I selected. I also set some display parameters like dropping down the max RPM on the dial from 3000 to 2800 RPM. Note that it will still display the actual numerical RPM if it goes above 2800 RPM (the dashed lines at about the 4-O’clock position of each dial), it just doesn’t show it on the dial. The reason for narrowing the dial’s range is that it actually makes it more readable since it increases the granularity on those setting numbers displayed (i.e. makes the space bigger between the numbers) in the normal operating range. If it goes above say, 2700-2750 RPMs, it will definitely let me know!
Here’s another page: STATS.
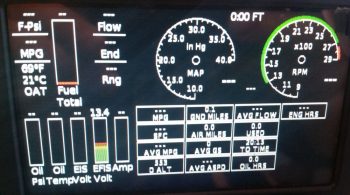
And lastly, a dials page that adds % power and fuel flow in dial format.
After spending a bit of time configuring all the EIS display settings and inputting all the limits and parameters, I then zeroed out all the limits on the actual EIS4000 box. Thus, until I fire the engine up and taxi around, I’m pretty much done with programming engine data stuff on the EIS. It will truly be just a matter of fine-tuning the numbers from here on out.
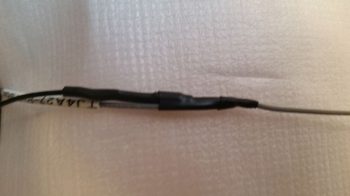
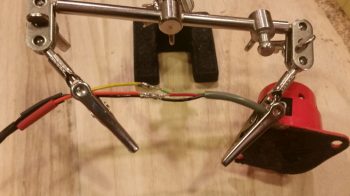
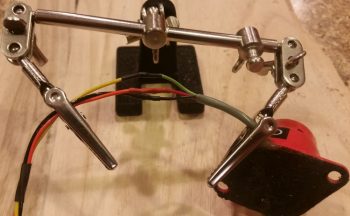
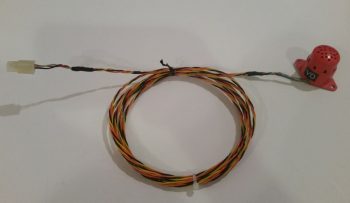
I then targeted one more electrical system task that has been on the list for quite some time to finally knock out: replacing the fuel vapor sensor wires that run from the actual fuel vapor sensor (located on the face of the GIB seat bulkhead under the right armrest) to the fuel vapor sensor control head (located on the nose wheel well [NB] cover). I tried the lighter test on the gray 3-wire cable last year and it failed miserable, so out it goes and in with aircraft grade Tefzel wiring. In addition, as you can see in the pic below, I wanted to get rid of that bulky connector about a foot away from the sensor unit.
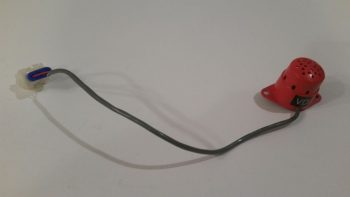
The first order of business was to get rid of the offending connector and then leave only just enough of the original wire to be manageable. I cut away a bunch of the gray outer insulator to expose the 3 wires.
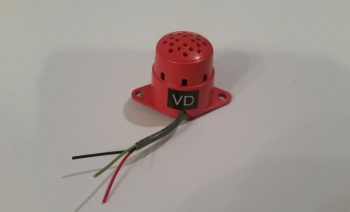
I then rounded up a twisted 3-wire bundle that I bought from Stein to attach to the sensor.
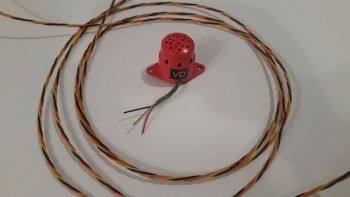
I soldered the 3 sensor wires to the 3-wire bundle (all wires ~22AWG).
And then of course added protective heat shrink (pre-placed) over the solder splices.
 With the result looking like this. I had already chucked the other WWII-era looking gray wire bundle in the spare wire bin, and was too lazy to dig it out for a comparison photo…. so we’ll focus on the new & improved!
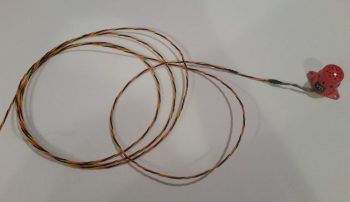 A closer view . . .
 I then grabbed the connector for the other end of this wire bundle (I should have noted that I went down to the shop and got a measurement of the required length for a comfortable run: 9.5 ft) and solder spliced the wires onto the opposite end of the 3-wire twisted cable.
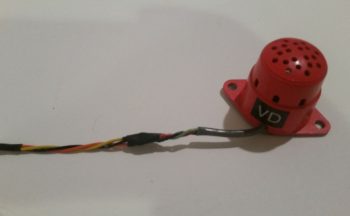
 While I was at it, I cut the ground lead of the fuel vapor control unit to rid myself of as much non-aircraft wiring as possible, and added in a length of black 20 AWG wire for the ground. I was thinking of removing the inline fuse, but for some reason didn’t. However, after some further thinking I realized I want to repurpose that inline glass fuse holder. So I still have one small step to do in removing that inline fuse and (re)extending the red power wire with Tefzel wire.

I then spent about 45 min. updating all my electrical diagrams with what I had learned today.
Which reminds me, one of the diagrams I updated was on the SD-8 back-up alternator system. My fellow local Canardian, Ron Springer, posted a question on the AeroElectric Connection forum regarding a 15A fuse shown on the B&C wiring diagram for the SD-8. On the diagram it shows this inline 15A fuse residing between the SD-8 Alternator and the voltage regulator.
In Bob Nuckolls’ AEC book, he adds a Bridge Rectifier to the SD-8 circuitry which provides a self-excitation feature, which makes it so the SD-8 doesn’t need to see power coming from the battery to “turn on.” However, in the various circuit diagrams Bob has, there is no mention or depiction of this 15A inline fuse.
So I jumped into the fray and asked Bob specifically about this fuse (there was some confusion as to exactly what fuse was being discussed, so I offered my “clarification” services . . . haha!). Bob replied with:
 I'd forgotten about that fuse being
 added some years ago. It's a good idea. One of
 the failure modes for the rectifier/regulator
 places a dead short on the SD-8 output. The fuse
 keeps the dynamo from smoking. The RMS current
 flowing out of the dynamo is about the same as
 the DC output current from the rectifier/regulator.
Thus my reason for adding the 15A inline fuse back into the mix, and of course updating the Charging System electrical diagram to reflect this change. Amazing that after all these years Ron sparked a discussion on that fuse just days prior of me needing to get a final answer on that specific fuse in order to proceed.
Tomorrow will be more smallish electrical taskers like the one I did today. Again, I’m attempting to clear all these “lesser” important tasks that need to be done, but ones that I wouldn’t want to do during good glassing weather . . . which is still a bit away.