
As I mentioned before, I’m kicking myself that I didn’t grab some before shots of the indentation at the junction between the aft fuselage sides —right at the firewall— and the bottom cowling vertical front edges.
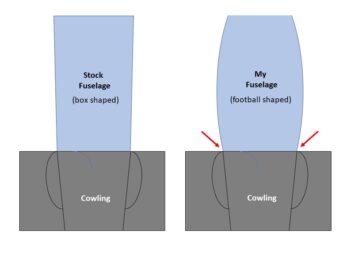
Again, the issue was my rounder (more football shaped) fuselage vs an original stock fuselage and then mounting Mike Melvill’s carbon fiber cowlings to it.
A little reminder of what I’m talking about with this diagram I’ve used a couple of times previously.
I’ve been slowly going through the machinations of getting this seam filled, on both sides. Not a hugely difficult task, but definitely a bit of a time bust considering all the back and forth iterations of filling the aft fuselage side, then matching that to a degree by filling the bottom cowling vertical front edges… then repeat.
If I had to do it over, I would probably do 2 things:
A) Work this area pre-armpit cooling intakes install, and
B) Use pour foam, shape and then glass with a ply of BID before finishing.
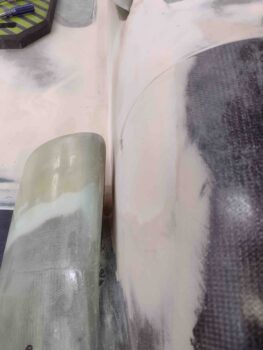
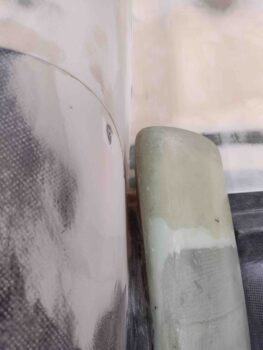
You can see on the right side (left pic) that the indentation has been pretty much filled and the sidewall is straight. On the left side (right pic) —which definitely had a more significant indentation at the seam— there is still as slight depression, but it has been minimized greatly.
Also I’ve noted, the filler adds about 1/8″ to 3/16″ on each side, so my gap between the inside edge of the armpit scoops to the fuselage sidewall are now around 7/16″ vs the 3/4″ called for in the Melvill cowling install instructions. I’ll reiterate that I don’t foresee any issue with these new narrower gaps between intake and sidewall.
I’m heading out of town for a break to visit friends for the next 5 days, and will get back to work full bore when I return.