
Today was all about getting the bottom cowling dialed in and tweaked to final configuration to allow me either do a final micro refill or press forward with epoxy wipes.
I spent about 3 hours (yes, hard to believe) getting the final position of the bottom cowling dialed in. The main issue was the thicker sidewall fills both on the fuselage side and the front cowling edge that needed sanded and fine tuned. I had the cowling on & off the plane about a dozen times in getting it back to its original installed position to allow the cowling’s outer CAMLOC holes to line up right in line with their associated mounting flange receptacle holes on the bird.
After getting the final sanding done, I then blew off all the micro-filled areas with compressed air, then did a general cleaning with Simple Green. I then donned mask and gloves to wipe down and scrub the bare carbon fiber areas with PVA cleaner to remove any and all traces of mold release agent.

I then did another round of cleaning with acetone a while later right before hitting the bottom cowling with its first round of epoxy wipe, using West epoxy with 206 (slow) hardener.
Notice that I also epoxy wiped the belly-mounted video camera mount as well (sitting atop the cowling in the pic below).
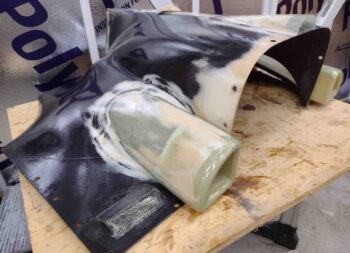
I had planned on doing a full 5 epoxy wipes, but with my last wipe ending up being in the wee hours of the morning past midnight, I called 4 good and will press on from there. I have noted at least 2 minor spots where I’ll probably need to do added refills after I sand down the cured epoxy wipes.
Again, note the epoxy wiped belly-mounted video camera housing on a paper towel in front of the cowling.

And after my many adventures on my bottom cowling, I called it a night.