I am very close to starting back on the build, although it is quite amazing to me how much extraneous junk that I’ve had to contend with from selling my other house. Dealing with this has been the long tent in the pole preventing me from getting back on the build. And having been in a full-on repair blitz during the time leading up to the house actually closing, I’m just now really get all the tools & materials sorted out, organized, and put back into their proper places. Additionally, during the last week I have been doing some odd & end stuff on the build, much of it stuff I was never able to really put together before since I didn’t have all the pieces parts in the same location. As I’ve been getting my shop and house in order to build, I’ve also been focused on prepping –at least mentally & planning wise– for some other parts of the build. So, here we go.
Canopy Latch: A note that I’ve had for a while in the middle of my electrical switch diagram states to account for the panel space required by the canopy latch arm that sticks out horizontally into the space near the throttle handle. I became acutely aware of how much space the canopy latch was really taking up when I sat in my buddy Marco’s Long-EZ specifically to note clearances, required reach to cockpit items/switches, and simple ergonomics. It emphasized that the note on my switch diagram truly had merit, and that I must indeed account for this most necessary but intrusive component.
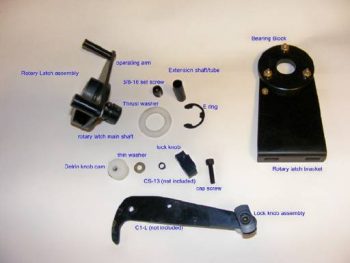
Thus, back at my hacienda, I finally got around to pulling out the EZ-Rotary Canopy Latch kit that I bought from Jack Wilhelmson (eznoselift.com). I first (re-)inventoried all the parts to ensure I hadn’t lost anything over the years. I then did a quick (re-)review of the installation procedures to get a feel of what I was up against. My main current concern was of course the clearance with the instrument panel, and luckily with this setup the bearing block hangs down from underneath the longeron, and not straight out from the panel, thus giving me back the 3-4 square inches that I wouldn’t have been able to use on my instrument panel if I had installed the plans version of the canopy latch (pic below is from Jack’s website).
Electrical System: Ah, yes, this beast keeps rearing its head. Yes, yes, I am very close to a final system configuration, at least for now. But stuff is still cropping up! I equate it to trying to get all the dish soap out of a sponge: every time you squeeze it more soap comes out again! So . . .
Pitot Tube Electronics & Components: Starting back in the beginning of 2013, my buddy Marco and I started brainstorming on a heated pitot tube design for our Long-EZs. Recently, Marco has been doing some truly amazing work on the electronics that drives the pitot tube heat. In preparation for the electrical components that he’s developed for the pitot tube, I recently purchased another airspeed switch, and a new 3-position ON/OFF switch that has a momentary ON position in the farthest up point to reset the electronics if need be. Marco has been detailing a lot of this on his phenomenal blog, What have I gotten myself into!
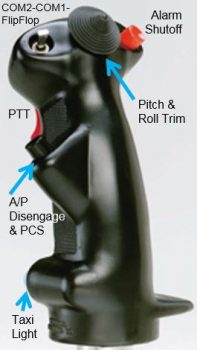
Control Stick Button Role Refinement & Swap: While down in Virginia Beach getting my first Long-EZ ride from my Marco, he at one point recommended that I swap my alarm momentary shutoff (left side of stick) with my A/P disengage & Pilot Controlled Steering (PCS) button (upper right of stick) on my control stick. Well, I have to admit that I was a little resistant at first, but after pondering the idea and getting into the Trio Avionics Autopilot manual (and really finding out the advantages of using PCS), I actually had an epiphany while driving home one evening: since the top right button is the hardest to reach on the stick, then why not use it to control something that I will use very occasionally in the air, and almost exclusively on the ground. Whereas with my new found understanding of PCS, I am confident that I will use that much more while flying. Thus, I wanted the A/P button in a much more user friendly place on the stick, so of course I swapped them… which is simply code for I changed the CAD drawings for both the buttons’ electrical wiring connections. Nonetheless, thanks again Marco for setting me straight! ha!
Here’s a pic identifying my current Infinity control stick button & switch assignments.
AG6 Warning Annunciator (#2): As I was getting a bunch of these ‘final’ items squared away before jumping headlong back into my build, I submitted parts orders with B&C, Mouser & Aircraft Spruce. Part of my order with Mouser was a direct result of my discussion with Rich from AircraftExtras.com, who gave me a bunch of great info on the AG6 warning annunciator. To drive a myriad of warnings that would normally require an LED on the panel, I ended up calling a number of vendors to confirm the correct resistor values & wiring circuitry to use with their specific products. Once I had the recommended resistor values in hand, I fired off an order to Mouser for all of them. That also helped me to finalize which of my components would/could utilize the AG6 to annunciate an alarm condition. One thing was certainly clear after I figured out what-was-going-where for my alarm annunciations, and that was that I didn’t have enough “where” to go to! I needed another AG6 to handle the increased number of components connected to the AG6(s) to annunciate their alarm conditions, so I ordered a second one.

The missing 2-Amp Circuit Breaker! One day last week as I was updating my electrical system diagrams I ran across the 2-Amp inline fuse for the SD-8 backup alternator activation switch on the circuit diagram. As I was assessing that switch specifically, for some reason the inline fuse didn’t seam like the right fit. I pulled up the B&C install manual and sure enough it showed a 2-Amp circuit breaker, NOT an inline fuse! I then went back through the last couple of versions of Bob Nuckoll’s Z-13/8 system architecture diagrams and…NO inline fuse! “Huh?!” sez I, “Where did I get the idea for placing a 2-amp inline fuse there?” Well, I finally found it in an old version of the system diagram that I had started with back in 2012! I guess it pays to review, or, well, it actually costs money since I had shell out some more to buy a 2-Amp Circuit Breaker. Regardless, I’m just glad I found my oversight & corrected it ‘early’ on. By the way, this scenario is exactly why I’ve been critically assessing literally every component in my electrical system!
Engine Cowling Installation: Over the past few days I also wanted to get a lot smarter on exactly how the upper & lower engine cowlings would be mounted, specifically the hardware to do so. This meant getting much smarter on Camlocs and the Skybolt Croc system. I researched a fair bit and bought a few basic Camloc components in my last Aircraft Spruce order to test them out. In addition, I’ll be using Mike Melvill’s 82° stainless steel hex-drive screws that he discussed in the Canard Pusher newsletter (CP 73).
Electrical & Aircraft Component Weight: Upon receiving the new 2 amp circuit breaker and AG6 warning annunciator I decided it was time to spend a good hour to update my estimated aircraft weight worksheet. I added all the new components, eliminated old ones, and weighed a number of components that until previously I only had factory listed or estimated placeholders for. When I finished, my Long-EZ had gained 10 lbs, with its new estimated weight still just under my max goal weight of 1,000 lbs… but just barely! And by barely I mean less than a pound under. The good news is that I have a lot better idea of what is going into my airplane and now have hard weight data vs. estimated/unknown data variables. Obviously, since I now have a lot of this stuff on hand, I can get the actual weight of each item. Moreover, I have padding built into the weigh figures for the electrical system, avionics/equipment, and main airframe components. Thus, I suspect to be somewhere near 1,000 lbs. for my final weight, ± about 30 lbs. (yes, yes, more likely plus than minus!)
Integrated Backup Battery System (IBBS) model selection: One thing that I did in the planning of my future components order is to mock up the fit of my TCW Technologies IBBS in the nose where I plan to install it. After a discussion with Marco on the W&B on his new Long-EZ, I figured a pound of extra weight gained by moving up from the 3 amp hour IBBS unit to the 6 amp hour unit would actually be beneficially. However, there’s just one problem with moving up to the bigger 6 AH IBBS unit: it won’t fit in my planned location! No worries though since the original 3AH IBBS unit that I had initially decided on will work, so back to square one. Another decision crossed off the to-do list.
Fuselage Trueness, Squareness & Alignment: At some point after returning back from overseas I took a myriad of different measurements on my fuselage, from a myriad of different locations on the fuselage: bulkheads, Left/Right/Center, angled, etc. to assess & evaluate to what extent my fuselage is true, square and aligned. If you’ve read much of my blog you know that my fuselage is not perfectly aligned. That being said however, I had never taken the time to really sit down and figure out what my measurements meant. After really pouring over them for about 15 min, I concluded that my fuselage is acceptably square between the firewall and F22 bulkhead. Another thing I did when I made my measurements was to clamp a 6 foot level to the front & aft sides of my fuselage and then measure the outboard distance between each straight edge/level. What I came up with after multiple measurements, and after recently analyzing the data, is that the difference between each side (at essentially B.L. 36L & B.L. 36R) is just a hair over 1/8″ off. Not bad, and easily correctable when I install the CS spar & canard to the fuselage, respectively.
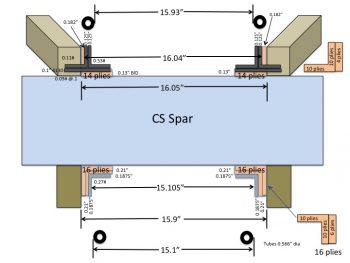
Engine Mount Extrusions installation: This next thing I did was something that solved a question that has been gnawing at me for some time: How exactly will my engine mount extrusions be mounted to the fuselage/CS spar/longerons? Well, between last night and today I finally measured all the critical players and worked out an installation solution. Since my aft upper & lower longerons are thicker (since I was originally planning on having a much wider fuselage all the way back including the firewall) AND my back seat is about 0.8″ wider, I needed to detail out exactly how thick the extrusions needed to be, and how many plies of BID to use to get the spacing correct. As you can see, on the lower mounts I’m adding 6 more plies of BID along the sides and using a 3/16″ thick 2024 angled aluminum extrusion. On the top I’ll be using 1/8″ thick 4130 steel extrusions with 4 extra plies of BID on the sides of the extrusions. The weight penalty for all this is about 1.5 lbs.
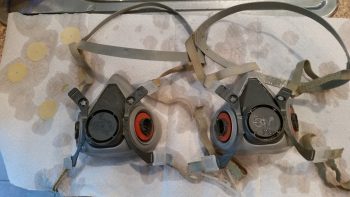
Finally, in prep for my upcoming reintegration back into the build, I performed the ceremonious refilling of the Flox and Micro containers. And cleaned my respirator masks. (Hey, if this isn’t a clear indication of getting on with the build, I don’t know what is . . . ha!)