
I understand that buying stuff for the airplane is not necessarily building. However, at the risk of sounding like a broken record, the research & collaboration that goes into deciding what to buy is often lengthy, in-depth and time-consuming. I realize that I’ve been identifying and detailing a lot of the pieces/parts that I’ve bought over the last month or so, but a lot of that is due to the current cold weather and my downtime during household good move trips/visits to North Carolina. Again, the fact that there’s so much research that goes into the decision of what to buy is a big reason why I post the items on this blog, because it is actually a big deal (IMO) to first make the decision, then get the item in hand.
With my blogging methodology now fully explained <wink>, I’ll get into the stuff I could do (e.g. aforementioned research & acquisition) during my trip down to NC.
Over the last week I’ve researched flywheels to enable me to pick the best one for my configuration. To back up just a bit on this story, my initial flywheel conversation during my engine build with Wayne Blackler, Sky Dynamics, Power Sport and ECi (Continental) convinced me to NOT go with Sky Dynamics’ lightweight flywheel, which was my initial flywheel selection.
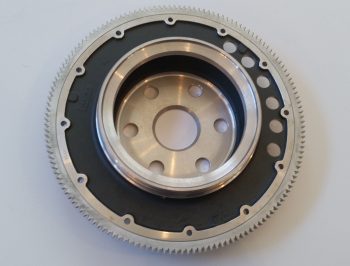
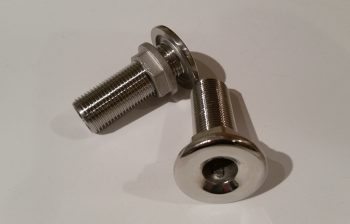
Over the past few days I spoke with B&C about 7.5″ vs. 9.75″ alternator pulley wheel diameters with them stating that there’s a negligible difference at low RPMs and no difference at normal operating RPMs. I then again spoke with Sky Dynamics and then Sam from Saber Manufacturing (super informative) regarding my flywheel selection. I did a bit more research then was ready to pull the trigger. I talked to a couple of aircraft parts places, and narrowed down my selection to 2 possible flywheels: one in Nevada and one in Florida. Air-Tec, Inc. in Florida won out since they had a new -360 flywheel (I have to use a 360 flywheel due to my 1/2″ prop flange bolts) with a 7.5″ diameter alternator pulley wheel and 149-tooth starter ring, so I pulled the trigger.
It arrived today and it really is a beautiful hunk of metal.
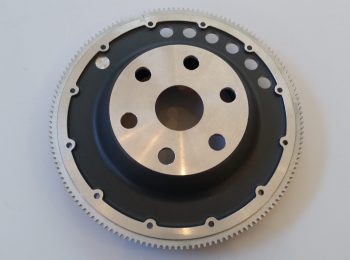
I chose to use the 7.5″ diameter pulley wheel since it reduces the flywheel weight by about a pound. A standard 320/360 flywheel with a 9.75″ pulley wheel weighs 6.3 to 6.8 lbs, and my flywheel weighs in at 5.72 lbs. To be clear, my flywheel is NOT the lightweight flywheel that Sky Dynamics sells, which has a total weight of 4.1 lbs. For me, the bottom line is that I am really happy with this flywheel!
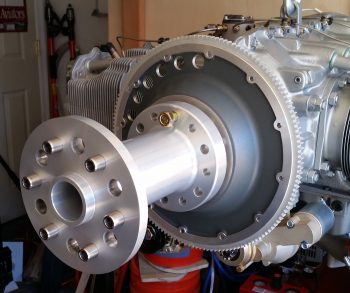
 I wanted to ensure all the parts actually fit, so I test fitted the flywheel on the engine prop flange, then checked the fit of the 8″ prop extension. Admittedly, I called Sam at Saber Manufacturing a couple times today just to ensure I wasn’t mucking anything up, specifically since the prop extension is machined to have as just about as tight as fit as possible on the center 1/2″ cylindrical extrusion of the prop flange.
With the engine hanging off a chain and thus not stationary, I couldn’t really manipulate the prop extension to get it to seat fully on the flywheel. Moreover, I need to install a shorter alternator belt than the one I received with the alternator (knowing that 9-3/4″ dia. pulley flywheels are way more prevalent than the 7.5″ pulley flywheels, I denoted that on my original alternator order… always something to backtrack on!) so I definitely don’t need to experience the pain of working on the incredibly tight-fitting prop extension twice if I can just do it once.
The bottom line here is that I now know that all my major engine parts play well together and that the only outstanding engine part I currently need is a shorter alternator belt!
Speaking of engine components, I also received the Airflow Systems 2006X 13-row oil cooler that replaces the much too big 17-row 2008X model. I had expected that might be the case even when I ordered the 2008X, thus why I never opened the box. But again, having finalized my decision on the oil cooler model size, I quickly opened this sucker up to check it out.
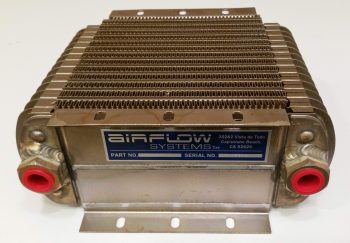
Except for one minor bend on one of the mounting flanges, it looks like a really nice unit. Moreover, I think it’s a great compromise between performance and weight/size.

Continuing on with my components acquisition review, I also received 2 more stainless steel firewall pass-thrus. These are the same size (1/2″ ID) as the one I picked up for running the CHT & EGT wires through the firewall from the GRT EIS4000. I’ll test & eval this pair of firewall pass-thrus to use for traversing the throttle and mixture cables through the firewall, without having them attached to the firewall. In addition, just as with the previous one I picked up for the CHT/EGT wires, at least 2/3rds of the threaded part will be removed to reduce the weight significantly.
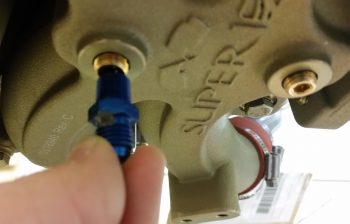
In a discussion I had with my engine builder, Tom Schweitz, towards the tail end of the engine build, he was adamant that I install a sniffle valve since I have a horizontal induction engine. So I undertook a significant research campaign to determine if I needed one or not.
The result of my research is that a horizontally induction engine owner will most likely never need a sniffle valve, but if a scenario ever played out where a sniffle valve was needed (pooling of fuel OR water in the cold air induction plenum), then the resulting effects of NOT having one could simply be catastrophic to an engine (kickback, etc.).
Thus, for a $25 sniffle valve from Airflow Performance, I figured I would have a nice little insurance policy in my back pocket against any untoward fuel or water flooding events in the induction plenum.

Superior actually makes two ports for sniffle valves on the bottom of their induction plenum (one might possibly be for a MAP-style fitting as well).
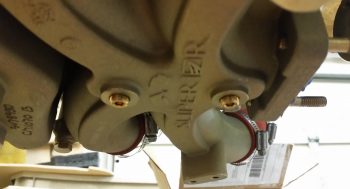
Since we park our EZs in the nose-down grazing position, and my engine is backwards (aren’t all of ours?) in regards to the cold air induction plenum, I will be mounting my sniffle valve in the forward of the 2 supplied ports on the underside of the plenum.
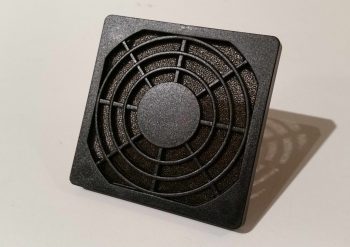
I also received the 40mm D-Deck/GIB headrest cooling fan cover that I ordered, so I’ll dutifully post a pic of it here as well!
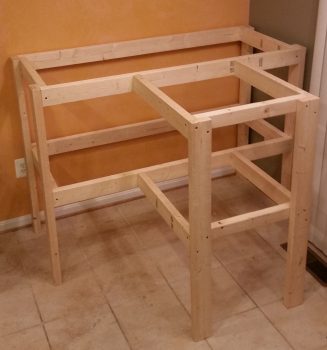
Since I did such a big haul of household stuff down to storage in NC, I am now virtually without any tables in my house. I had planned on building a work bench for the instrument panel mockup, electronics, etc. so I was able to get the frame of that completed today. Tomorrow/this weekend I plan on finishing the rest of it.
The weather remains obnoxiously cold here, so I will do all I can that doesn’t involve actual shop composite work until it gets a tad warmer. I’m hoping in the next week or so I can get to a point where I can at least turn on the shop heaters without breaking the bank for the build. One good cold weather activity that I engaged in was adding a page to my Excel spreadsheet to track ALL the serial numbers of every component that has one that is getting installed in my aircraft. I did a quick walk around and now have about 70% of the s/n’s documented in one place, and I’ll continue to annotate them as the build progresses.