This morning I started by carefully drilling the holes in the nutplate inserts I embedded into the seat back shelf that will serve as the rear bolt hardpoints for the headrest. It took about 10 good minutes to dig out the saran wrap I stuffed into the nutplate on one, and about 5 on the other. No surprise… nothing is predictable when building an airplane.
I had a couple shots that I took quickly but didn’t realize how jacked up they were until I downloaded them. Just pics of the hardpoints and the initial (official!) mounting of the headrest to the seat back assembly.
I then went on a beautiful flight for almost 2 hours. I of course didn’t get to see hardly anything because I was wearing foggles the whole time… But, I did get to a watch a C-17 on final pass about a 1000 feet below us as we traversed Quantico’s Class D airspace.
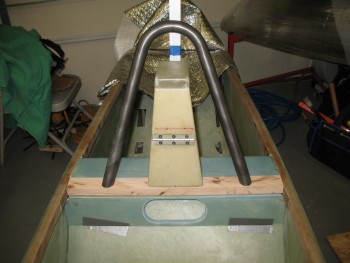
Ok, back to the build. I cut a 2×4 into the size of the 4130 crossbar to use as a substitute for sizing, fit & checking out other components on the rollover assembly. Below gives you a general idea of what the base will look like with the headrest and the crossbar in place.

I measured, mocked up and trial fitted the rollbar a number of times to get the correct angle and initial dimensions figured out. Since my rollbar will be slanted aft, figuring out the cut angle was a little tricky (at least for me…).
The lean angle on my roll bar is 69° so I cut the end of a piece of scrap wood (actually the one below holding the rollbar down) at 21° to get the correct template. I verified the angle & it was spot on.
I messed with the rollbar and contorted my mind a few times to figure out how I was going to get a straight cut across the bottom of the rollbar to make each side level with each other on a flat surface, but then add the angle in for the aft lean.
I decided to work one axis at a time. I figured out a line that if cut straight across the bottom, the rollbar could easily stand straight up with each side sitting flat on the surface. So on each side of the separate tubes I drilled a small hole along the plane of that line.
Then for the aft lean angle, I laid the roll bar flat & laid the scrap wood template piece next to it (with the 21° angle). I marked the front side of each rollbar tube with the long side of the template, then drilled a hole on the top center of the tube as it lay there on the table. Then I flipped the rollbar and did the same thing on the aft side with the short side of the template.
When I was done, I had 4 holes on each tube, 90° from each other as for as the cardinal center lines of left, right, top, and bottom of the tube, but all over the map in any semblance of an identifiable relationship. I took a Sharpie and as I started literally connecting the dots, I could see that the key to understanding the line was the cut angle and the flow around the curves of the tube. At that point I was fairly certain that I had a good cut angle for mating the rollbar to the cross bar.
I clamped the rollbar to a sawhorse & used my Dremel Tool to cut the tubing at the lines.
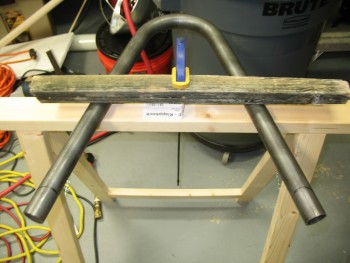
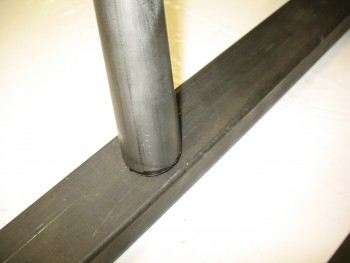
Now, I targeted the lower parts of each down tube of the rollbar to give me a lot of wiggle room to lock in the cut angle. I could envision a number of iterations required to lock in this cut. Well, that didn’t happen. I actually got it right the first time around! Which is a little annoying since IF I had known that I was going to get the cuts so good right out of the gate, I would have just marked the rollbar in the correct spot and been done cutting some fairly hefty 4130 steel!! Ha!
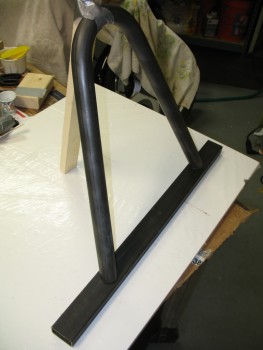
Here’s a close up shot. I’m happy that I cracked the code, but man I wish that this was correct dimensions so I could weld this puppy up!
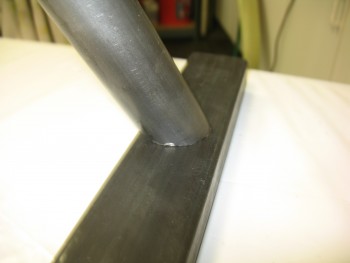
And the money shot….
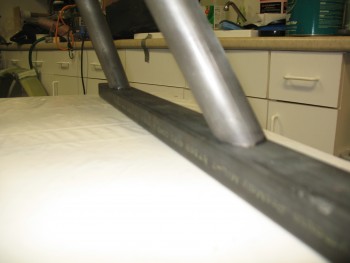
Here’s a pic showing the general feel of how this will look when it’s put together. Also, the rollbar is definitely too high and will be getting shortened another couple of inches.