
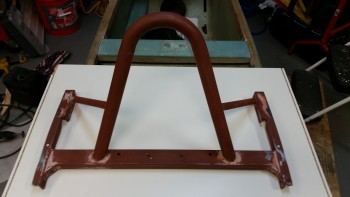
As with any finishing project, today was all about sanding. And more sanding. I sanded down all the bondo’d junction areas that needed to be cleaned up. The tops of each side rail especially needed sanding, as did the cross bar to side rail junction, and of course the rollbar to cross bar attach points as well. Basically anywhere that had bondo applied got a good resanding, or fine tuned at a minimum. I spent a good 1-1/2 hours working on this part.
I also grabbed my Dremel Tool with a cutoff wheel and radiused the front & rear lower corners of each side rail. Rounding off these corners provides a number of benefits. It keeps the corners smooth to avoid snags, scratches or nicks on people, clothing or gear. It also adds to the appearance of the roll bar assembly, in my opinion. And finally, it does help save just a little bit more weight.
I then applied more bondo. I really dislike having to add more bondo because even though it seems like you’ve got it feathered out just right between the bondo and the surrounding metal, it will show up that you don’t–glaringly–under paint. So, I did the the necessary evil and applied another round of bondo in the problem areas, knowing full well that it will require some touch up sanding and a reshoot of the final primer. [Note: I used Evercoat’s Metal Glaze on my motorcycle chopper project as a transition filler and it works wonderfully & is very EZ to use in feathering a seamless transition from bondo to metal. At this time however, I just didn’t want to spend the time or the money (it’s expensive stuff!) to get some, so I’m trudging through this part of the build in true neanderthal fashion!]
I spent almost an hour cheese-grating the new bondo, then about another hour and a half on the final sanding. After hitting all the touch up areas, I sanded down the entire frame to smooth out any imperfections & to give the next coat a surface to grip to.
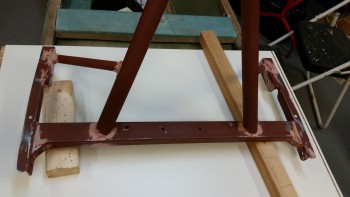
Once I cleaned up the roll bar & prepped it for its second/final coat of primer, I started by shooting the bottom side first this time. With the reddish-brown primer I didn’t shoot the bottom since it only needs one coat for corrosion protection and doesn’t need to be refinished for aesthetics sake.
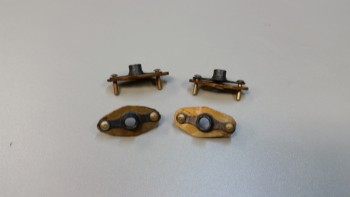
 As the bottom side primer cured, I went to work on cutting out the 4 “diamond” pieces of 1/16″ thick 2024 aluminum that will serve as the base, or glorified washer if you will, of the nutplate assemblies.
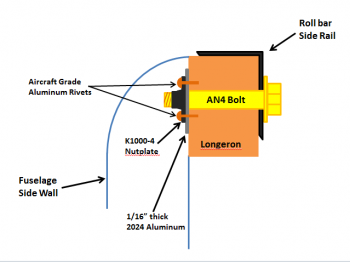
After much thought & a lot of pondering over the past month, I decided on this style bolt installation to allow for a strong, yet very light, install. To meet my design criteria, I made these aluminum “diamond” bases because I didn’t want the K1000-4 nutplates [that will be used to retain the roll bar mounting bolts] to simply sit bare on the opposite side of the longeron from the bolt head. I figured something that provided a more base-like structure, along the lines of an odd-shaped washer, would help spread the load of the nutplate & keep the nutplate from getting compressed or digging into the longeron. Since 2024 aluminum is incredibly strong stuff, than 1/16″ should work just fine.
To keep the nutplates & their associated 2024 aluminum “diamond” bases from spinning as the attach bolt is installed, I simply used aircraft grade aluminum rivets embedded into small pilot holes drilled into the longerons (remember, there’s a couple layers of glass on the outboard side of the longeron as well). The entire nutplate assembly, along with their securing rivets, will get floxed into place with the 1/4″ AN4 attach bolt holding everything in its proper position.
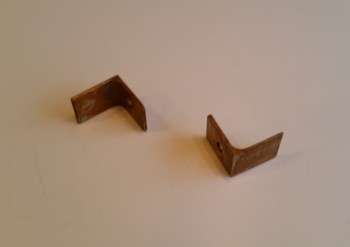
Once I cut the “diamond” pieces, I Alodined them (below) along with the 2 Roll Trim attach tabs (further below).
To give you a visual depiction of what I’m talking about, I whipped up a diagram to show you just what I mean. One note: the rivets will actually be installed at a slight angle from the horizontal on each side of the bolt, compared to how they appear to be depicted below, which is 180° straight up & down. Again, when the install process of these nutplate assemblies is complete, they will be awash & embedded in flox in every possible nook & cranny, except (hopefully!) the actual bolt end on the outboard side.
 Alodined Roll Trim attach tabs.
After my adventures in Alodining were complete, I hung the pieces to dry and went back to work on the roll bar.
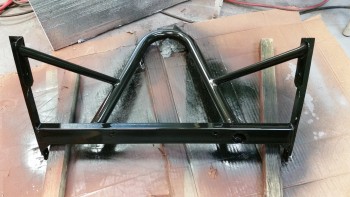
I set it upright & shot the final major coat of black primer (technically Rustoleum Gloss Black Primer & Paint). After allowing it to dry for a couple hours, I reshot the side rails & some of the bondo’d junctions to provide a little bit more build for the subsequent sanding & reshooting that will be required to smooth out the surface & joint imperfections.

After a few more hours and with the black primer coat dried, I mocked it up on the fuselage.
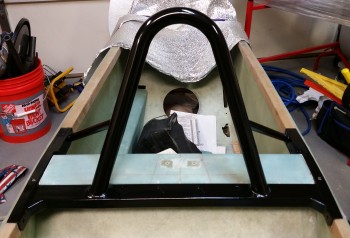
I have to say that I’m extremely pleased with the way this roll bar turned out. As I mentioned before, I still have a few more hours of work finalizing the finish on it, but overall I’m one happy camper!