
Or rather my legs actually…. !
Shortly after I got back from NC I tweaked my back a little, so yesterday, still a bit tired from the haul down to NC, I was taking it a little EZ and unintentionally ended up making the whole day a research day … I did some personal stuff and spent a lot of time on the computer researching build stuff, including a nascent plan for how I’m going to knock out the significant number of metal projects I have coming up for various parts of the build . . . throttle handle lever, starter contactor mount, canopy lever are the big ones off the top of my head.
Today I got busy on one of my tasks that I am charged to do under the auspices of the 3 DAY BLITZ, Round 2: insulating the Nose Wheel Cover (NB). After thinking about it a bit I decided to insulate NB in 2 phases, the front 2/3rds section and then the remaining 1/3 aft section. By doing it this way, it allows for more glass-to-glass contact and secures the insulating material better in place… IMHO.
I also split the 2 sides so to create a narrow trough down the center which would be a low-point depression in the insulation to ensure clearance for the bottom edge of the Triparagon when it’s mounted in place. Again, it would also provide a glass-to-glass securing point down the centerline of the insulation.
After giving the NB and surrounding fuselage floor a thorough sanding, I started by cutting to shape and then using Silicone RTV to secure the insulation to the right front 2/3rds of NB. Remember, I’m cheap . . . and if you want to be read in on a little secret: this insulation is the flooring material underlayment I bought in Germany to use as a hot-tent for post curing the fuselage back in 2012! Ha!
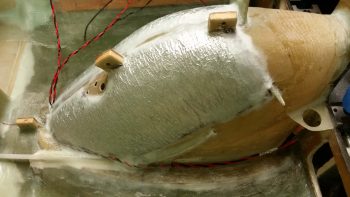
You can see that although this insulation is somewhat thin, it still has an edge on it.
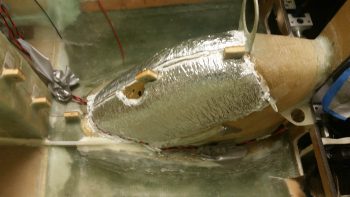
I then cut to shape and RTV’d the left front 2/3rds insulation in place on NB. You can see I used the attached nylaflow –that runs partway up NB at an angle for the parking brake cable– as the demarc point for ending the first round of insulation, with the underside getting insulted in phase 2.
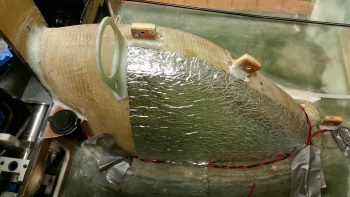
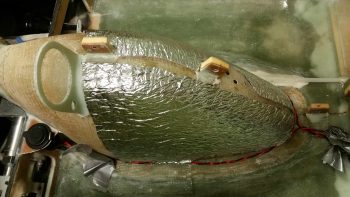
Here’s another shot of NB’s front 2/3rds area insulated and ready for a 1-ply BID glass covering.
I then whipped up some epoxy (with fast hardener) and micro’d the edges of the insulation and the intersecting corners of NB and the fuselage floor, where the respective pair of charger wires run along each side.
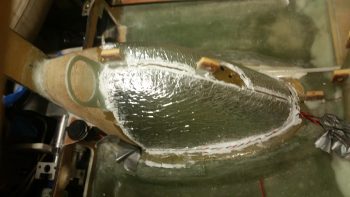
I then laid up one solid ply of BID across the entire front 2/3rds area of NB covering the insulating material I had just RTV’d in place a bit earlier. To keep the glass in the narrow center trough between the 2 pieces of insulation in contact with NB for a good glass-to-glass bond, and as deep as possible for clearance with the Triparagon, I took a length of plastic tubing (that was used for the gear leg conduits) and pressed it down over the peel plied center trough. To keep the plastic tubing in place I of course had to come up with some clamping contortions to do so.
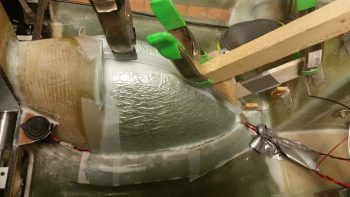
I also peel plied the glass-to-glass bonded patch where the 3 holes are for the OAT probes. I then filled an ACS baggy with sand, taped it up and set in place on the glass-to-glass bonded patch to compress the glass down and ensure the best possible bonding. I leaned the 90° drill on it to keep the mini sandbag in place and add as much reasonable weight as possible.
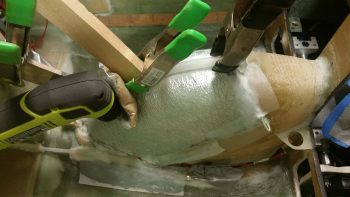
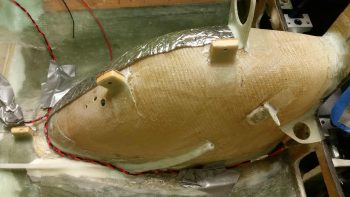
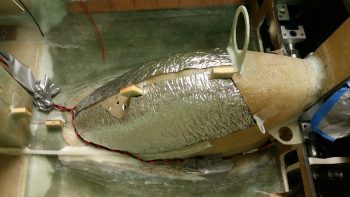
I then spent a number of hours on the phone with fellow Long-EZ builder Brian Ashton from Alaska, and after sharing our war stories and build progress, I then went downstairs to the shop and pulled the peel ply and cleaned up the layup.

I didn’t see any issues whatsoever with the layup and am extremely pleased with how the first phase of my NB insulating came out. As for the respective set of charging wires, I’m typically NOT a fan of burying wires under glass or micro, but here the runs are so short that if I did have a problem I could use the Fein saw to dig them out. I oversized the wires simply to avoid any potential problems and to handle any added heat (negligible IMO) by being encased for about a foot in a ply of glass and some micro, so I really don’t foresee any issues.
Tomorrow I plan on finishing up insulating the NB cover and then press on with other internal nose & avionics bay tasks that need completing before the top of the nose gets constructed.