
I started out today actually spending some time finishing the blog post from yesterday. Clearly I’ve been a little busy on the plane build so it can be a challenge sometimes getting a bunch of work done and then keeping the build log updated.
Due to the holidays and some work stuff I got a late start today. As I mentioned in last night’s tome, I’m compiling another few orders for ACS, Stein, etc. and I’ve been doing a bit of digging to make sure those are complete as possible before I pull the trigger.
One item I worked on earlier was developing the order for my PC680 battery strap. Since this will be custom made, I’m making sure that all the dimensions are absolutely correct. I’ll probably pull the trigger on that order tomorrow or just after Christmas.
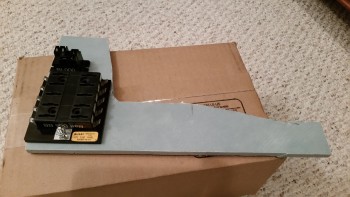
After dinner, I putted around looking for a piece of foam to act as a mounting pad for the battery buss and the relay that drive the E-Bus (Essential Bus) during an emergency if the main alternator fails. The E-Bus will be driven by my 10 Amp back-up alternator, B&C’s SD-8, but if the main bus goes berserk, than a couple of switches need to be flipped to shut down & bypass the main buss & fire up the E-buss. The relay that I’m mounting here is controlled by one of those switches.
I found a piece of 3/8″ scrap Divinycell with 1-ply of BID already laid up on it, and since I’m only laying up 1-ply of BID anyway, the other bit of cured BID is fine with me. This is actually scrap from the big 3/8″ thick panel I did back in Germany that my side consoles & arm rests were cut from. For this pad, I wanted 3/8″ thick vs 1/4″ thick foam so that the nutplates would have enough clearance.
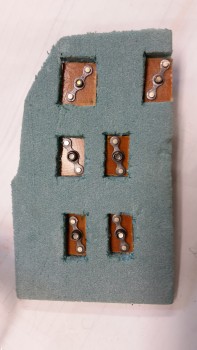
Ahh, speaking of nutplates, here they are now! All 6 of those suckers… that I just made up tonight. Actually, I’m getting pretty good at cranking those guys out and can gin one up now in just a few minutes.
The 4 nutplates on the bottom of the bus & relay mounting pad are the K1000-08’s, and the 2 on the top are the K1000-06’s.
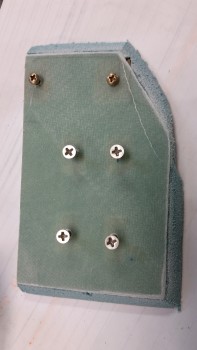
And here’s a shot of the front of the Battery Buss and Relay mounting pad. You may be wondering why I’m even going with this mounting pad vs just mounting these to the back of Napster (aka F1-3 Bulkhead). Well, I just didn’t care for the idea of putting 6 holes, albeit small, into a primary structural bulkhead. So I opted for this solution to minimize holes in Napster. (I’m sure once you see the holes for all the wires, you’ll ask, “Who is he kidding?!” ha!)
As you can see, I also beveled the edges to provide a nice ramp for the BID.
I dug around in my scrap BID pile but couldn’t find anything big enough to cover this piece. Pickings are getting sparse in the BID pile! I had to head to my local Glass Cutting Table and cut me a fresh slice off the rack!
I then put the BID in its pre-layup home: plastic, since ALL layups are prepregged . . . aren’t they?! haha! I traced about a 1″ space from the edge of the mounting pad onto the prepreg plastic to ensure that there would be a decent sized overlap for the BID onto the surrounding glass once the pad is attached to Napster.

After filling the nutplates with plastic wrap to protect the threads and micro’ing them all into place with blue wing foam backers, I then proceeded to mount the pad. In my new found love affair with 5-min glue, I actually left 3 small spots open on the back of this pad with no micro-paste in order to place dabs of 5-min glue. I then pressed it onto the aft right side of Napster and held it in place for about 5 minutes.
I then cleaned up the edges, made sure the fillets were good and that the edge ramp foam was micro’d as well. I then cut my prepregged ply of BID on the previous outline that I had drew and laid it up. Here it is below with the outer piece of plastic still in place.
I should note that I realized a tactical error that I made just before I laid up the BID. I looked at the pad, then grabbed my battery buss fuse block and held it in place where it would mount. As I suspected, the access to the Fast-On tabs on the left side near the NG30 upright would be a little tight, albeit not anywheres impossible, to get the wires’ Fast-On connectors on & off… not that I’ll be doing that a lot once the electrogizmos are set. But, just to add a little ease of access, I skooched the whole thing over to the right about 0.2″ and filled in the resulting gap with more thick micro.
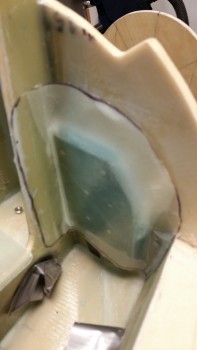
I then pulled the prepreg plastic and proceeded to form the sides down into place. I noted that for some reason at the upper right angled corner that the BID had split open and it wasn’t allowing me to coax it back to being somewhat normal. With that corner being thin, I grabbed another piece of scrap BID and laid it up over the small corner split and pressed on.
After the BID was all wetted out and the lay down looked good, I peel plied the layup with one piece of peel ply cut at the corners so that it would lay down over the irregular surfaces.
One last note. After I had pulled the mounting pad away from the NG30 upright almost a 1/4 of an inch, I noted after a bit of time laying up the glass that the darn thing must have moved some on me, mainly at the top, but it did move back towards the center a bit.
Oh, well. No real harm . . . no foul.

I was also going to micro in the H100 foam in the center space between the BC1s for the front bulkhead, but as I was prepping to do so, my Spidey sense started tingling stating that I should wait until I clear up a few more variables surrounding the battery compartment components. So, I waited.
Tomorrow I’m planning on putting the NG30 area back together after cleaning up the front battery buss layup and drilling all the Saran wrap out of the holes. I also plan to get the spare tire figured out, the brake reservoirs and associated Click Bonds glassed in place, and the front nose foam cut and ready to glass into the battery compartment area between Napster and the F-7.75 bulkhead (which I’ve nicknamed “the Roundel”).