
The title is for my buddy Dave B!
Well, after messing around upstairs a bit when I finally got down to the shop in the early afternoon I was met by an oil crisis . . . as in engine oil was all over the floor and I was in a crisis! Apparently, with the engine inverted the plug in my crankcase vent gave way and the engine oil exited out onto the large protective drip pan that I have under the engine. But then the oil pooled up on one side, dipping the pan on that side and overflowed the pan edge onto the shop floor in an area about 3′ x 6′. It just so happens that corner of the shop is where I have a decent amount of wood stored up against the wall.
After nearly an hour of cleaning up the oil, I then started in on the wood by trimming all the oil contaminated parts off.
I then rotated the engine upright and reconfigured the spark plugs and cylinder dehydrator plugs by replacing the top spark plugs with the cylinder dehydrator plugs and firing up the engine dehumidifier.
I had been cleaning and organizing the garage a bit when I discovered where the oil tanker ran aground in my shop, so I went back to that for a bit after I cleaned up all the oil to get the shop a bit more clean and organized.
After some much needed shop cleaning and organizing, I finally used the deck chair pad that I purchased along with my pad of blue memory foam to experiment with different sitting heights. I think I’ve found what I like which would equate to about a 3″ bottom seat cushion that transitions into a 1-1/2″ to 2″ seat back cushion. This configuration really gives me a decent seat height for visibility and not feeling like I’m crammed into a low sitting 1950’s mini sports coupe.
I then spent a good 30 minutes dialing in my “final” rudder/brake pedal locations, which I wouldn’t be surprised if they end up moving by 1-2 mounting holes either fore or aft after the rudder cables and brakes are connected and operational.
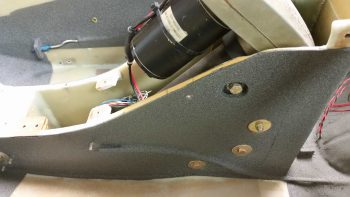
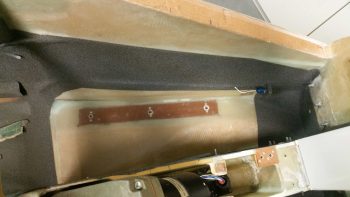
I then removed the rudder/brake pedals and got to work on the laborious task of prepping the front nose area for paint. It was quite the pain, but I knew if I didn’t do it now that I wouldn’t have an opportunity to do it later so I knocked it out. Moreover, I wanted to get this nose paint shot and curing overnight.
After about 2 hours I had the nose area taped up and was ready to lay down some paint.
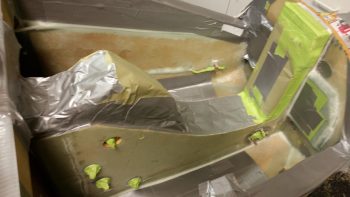
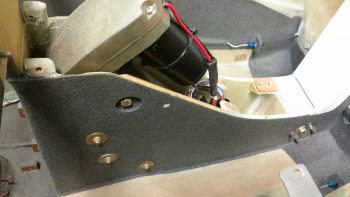
I started with a couple of light coats of gray self-etching primer.
And hit all the exposed spots in the nose area.

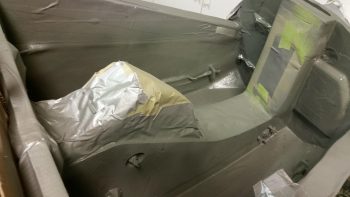
After letting the primer cure for about 45 minutes, I then hit it with a couple coats of the speckled top coat, which is the same trunk paint I used on the nose wheel cover (NB) and avionics bay area.
I let the top coat alone to cure for 30+ minutes and then removed the protective tape and paper.
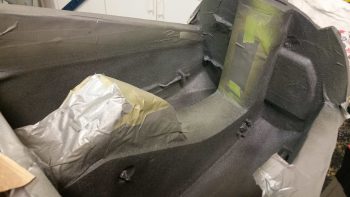
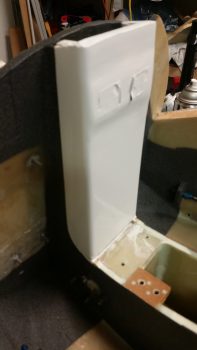
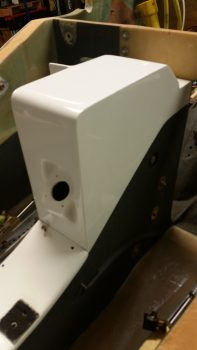
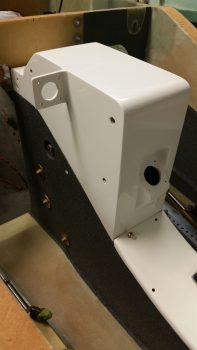
If you were wondering what my white paint job was all about, here it is. As you can see it’s simply a designed accent feature to “cap” the forward end of what is essentially a big white stripe down the middle of the nose compartment. I figured the white NG30 covers and front mini-bulkhead would lighten up the nose compartment to offset the use of some dark speckled paint. Plus, I think the dark vs. light contrast just looks snazzy!
I left a good majority of the floor unpainted for a few reasons. First, I didn’t want to paint an area that I felt was a higher traffic area. Next, I did’t want too much dark paint in the nose compartment both from an aspect of visibility (being too dark) and minimizing paint weight where possible. Lastly, I like to keep a bit of what I consider the cool build features exposed, so analogous to the lower longerons that I left exposed, I could see the dished floor pan and embedded phenolic pedal hardpoint as some good/fun discussion points at fly-ins, etc.
I should also note that I will be adding in a small length of Nylaflow as a cable guide between the bottom of the pedal “S” curve on the front of the pedal assembly to a bolted in AN111-3 hardpoint that is located in the lower sidewall forward of the pedal assembly… on each side of course. The resulting layups to mount these small cable guides requires that the lower side wall remain clear, for now. I’ll most likely finish the sidewall paint down to the corner once these cable guides are in place. I should also note that I left the floor clear on the forward side for the foam/glass work that will be required to mount the oil “tower” storage box as well.
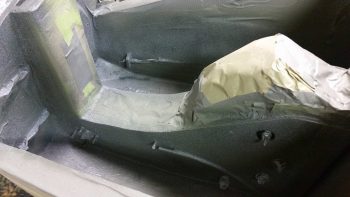
I then finally brought my vision for the nose compartment to life by setting the forward and aft NG30 covers in place. Granted, the forward NG30 cover is not finished to the mirror shine that the aft cover and forward mini NG30 bulkhead are, but once the wiring, parking brake, brake lines and oil “tower” box are all in place the visibility of this piece will be greatly reduced anyways, so I’m leaving it as the duller looking member of this triad.
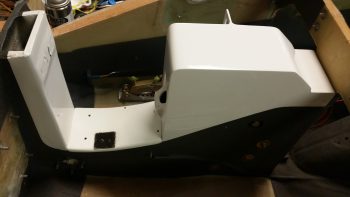
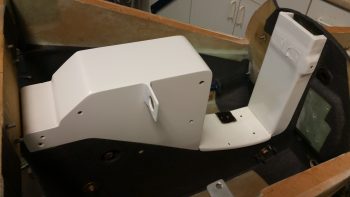
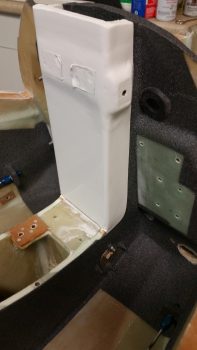
Here’s more of a view from the top that you would most likely see peering down into this compartment with the front nose hatch open. Note that I will have to obscure (read: destroy) the look of that beautiful top plate of the aft NG30 cover (left in pic below) when I mount the Radenna SkyRadar-DX ADS-B antenna to the NG30 cover. Alas, I think it will still look clean enough . . .
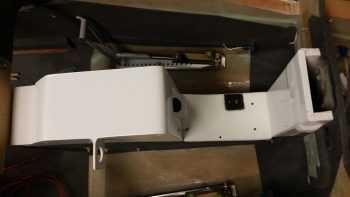
I’ll end this evening’s post with a couple of angled side shots showing the contrast of the white NG30 cover and the dark painted NG30 sides. This really was the affect I was going for with the white NG30 covers and forward NG30 mini-bulkhead as accent features. I had originally planned on using no paint at all so the dark paint would not have been visible obviously, but a relatively small amount of paint really does do such a great job evening out all the splotchy build textures and multiple colors assaulting one’s eyes as they peer into these compartments. I think for a minimal weight penalty it really does the trick nicely (as a point of note, I have not yet pulled up the rather large taped off floor segments in the avionics bay yet, which will expose even more non-painted floor area).
Tomorrow I will press forward with finalizing the nose internals to get ready for the nose and canopy build. I will most likely finally get around to mounting the canard to facilitate glassing in an elevator control hard stop and finalize the canard top tab mounting hardware configuration & install.