
I started off today with a quick couple rounds of clear on the left front armrest paint where I covered up the attack of the fibrous plant nodule. I’ll note it’s not 100% covered, but now you’d have to really look for it to know it’s there. Interesting to note is that I used red Sharpie to mark the position of my lower thru-holes to secure the armrest to the cockpit brackets… and I see a bit of bleed through. I guess my EAA instructor from long ago was correct in telling us to never use red Sharpies as we build since it can bleed through to the top coat of paint. Hmmm.
Also of note, yesterday I picked up 4 stainless steel #6 hex drive button head screws with washers. Since I’m using them to secure the Oil Heat Sub-panel I painted them black and then clear coated them with a couple coats as well.
I then spent well over 2 hours in my electrical system documentation, updating components, confirming circuit configurations for the throttle caution & warning micro-switches, tweaking various ground points on different ground busses, and doing the same on my power busses.
I also captured the wire colors and mini-Molex pinouts of the Oil Heat Sub-panel to annotate those in the wiring diagrams (i.e. also build a new one). I also printed off and labeled wires and components. Lastly, I tweaked the wire assignments for the RAM air can butterfly valve actuator and annotated that as well. Still to do is to find my list or relays since I need to add a couple new ones to the mix.
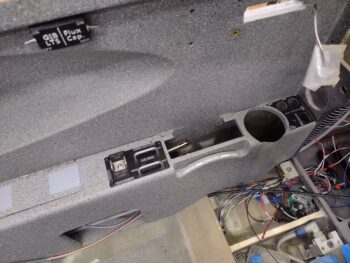
I mentioned last week that I took about 45 minutes finalizing an order to a local vendor to create some cockpit placards for me. Well, after I stopped in a couple of days ago to verify what I wanted he finished the order. The primary item I was looking for was a label/placard for my GIB light panel to make that visible and readable. The vendor wanted a PDF to use, and somewhere in translation his height measurements came out about 0.3″ short. Still usable, but I had to finagle it a bit.
I then cleaned off a good bit of paint around the GIB light switches on the right sub-panel in the back seat. I think 3M 77 would have worked here but I didn’t want to spray it into the back seat, and this would have needed both surfaces covered with it. So I went with Silicone RTV, applied it and then used a cross spreader clamp in the cockpit to then use as a hard point for some smaller spreader clamps to keep the placard pressed as firmly (as best possible) against the angled sub-panel surface.
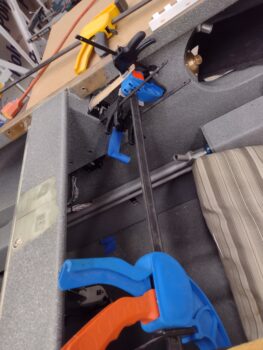
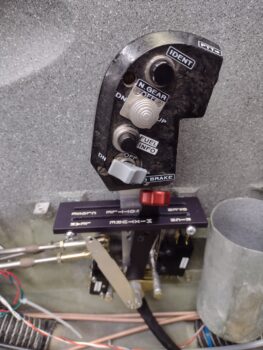
I’ll jump ahead a few hours and show you that it worked a treat. My proposed outline for this thing was the outer white line that has radiused corners. I thought it actually looked good and instead of trimming it at the line I simply slapped the whole thing in and called it a day, square corners and all. I know, I know… I’m a true rebel!
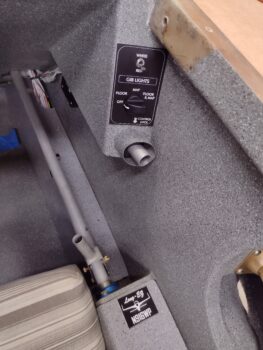
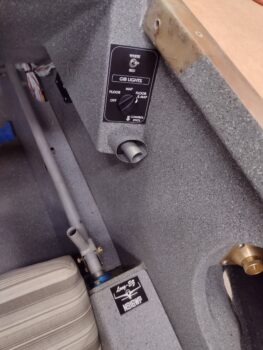
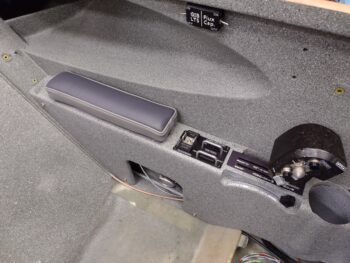
These are actually different pics, if you look at the two switch locations… the top lever switch and bottom dial switch shown manipulated. Also, the “Long-EZ [plane] N916WP” placard on the armrest is simply resting there for show and tell. I ordered 4 of these little guys simply to use for bling around the plane’s interior.
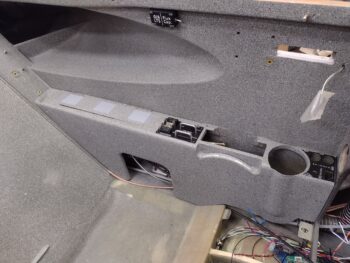
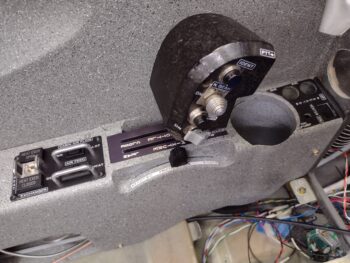
Here I’ve installed the Oil Heat Sub-panel into the left front armrest. Not shown here (see below) is that I secured its wiring harnesses with an Adel clamp and “permanently” (yeah, it’s meant to be removable) installed the armrest storage box.
I then got busy adding a bank of 3 micro-switches to the aft side of the throttle quadrant. Note the nutplates on each side of the throttle quadrant frame. I also finalized the 2-56 screw install on the throttle electrical cable guide cover.
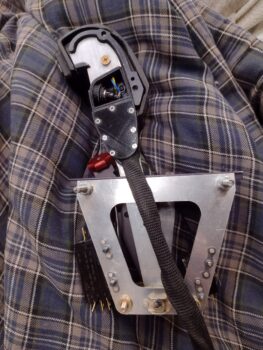
This action here of mounting the aft side bank of micro-switches is a culmination of about 3 weeks of research, configuration & space assessments, etc. You can see I’ve “Swiss-cheesed” the throttle and mixture levers to hell with all the holes to find the right pivot configurations for the throttle and mixture cable (+ 2 more holes for the slaved GIB throttle).
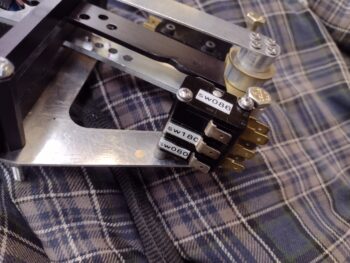
Today I then had put an indentation on the mixture lever aft edge to prevent it from tripping the wide bank of 3 micro-switches. Oh, BTW, these are actual no-kidding “micro-switches” from the original name brand, although technically these are all “snap” switches.

I’d prefer a slightly better “notification” point than what I’m getting with both these sets of throttle quadrant mounted micro-switches. In verifying the installation requirements in Jack Wilhlemson’s instructions for the front micro-switch, it says for it to initiate at 75% forward throttle to retract the landing brake for a go-around (or whatever)… mine is more at the 90+% point. Not a huge deal here, since I go full throttle on go-arounds anyway.
[Note the re-mounted throttle quadrant and Oil Heat Sub-panel wiring].
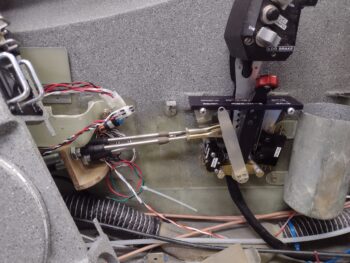
However, the aft 3 micro-switches all should ring off at the 10% or less throttle position (vs straight idle), specifically the first switch being critical as one of the 4 parameters to initiate the Automatic Gear Extension (AEX) system. Another one of these microswitches is for the AG6 gear up warning while the last one is for the stand alone gear & canopy warning system.
So these throttle quadrant micro-switches all meet the minimum requirements for what I need, but I’ll be assessing them as I start flying the plane with an eye on how to improve them if need be. IF I had space behind the quadrant, as in between it and the wall, I would mount roller micro-switches that could be depressed at the proper point and remain depressed during that state… but the throttle handle cable gums up most of the space I need. The other option would be to make “wings” that come off the throttle lever to actuate the micro-switches either significantly forward or aft of the quadrant frame. Again, I’ll see how these current switches play out and assess further after I’ve flown the plane a bit.
Now, that all being said, I did finally take a few minutes to print out and label my throttle handle. Not a specimen of raw sexiness, but as is my mantra on this bird: it’s functional!
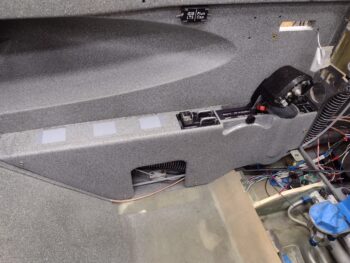
With the throttle quadrant and cup holder back into place, I then installed the left armrest and the throttle/mixture friction lock knob.
A significant issue I noted right off the bat is that in operating the throttle/mixture friction lock lever back and forth it immediately started scraping the paint off the outboard edge of its armrest pocket. I’ll ponder on this a bit, but I think I’m going to sand all this paint off and install a very thin 0.02″ piece of stainless steel in the back there to keep things looking nice and not like this bird has been flying for 20 odd years.
I then measured out and attached the velcro to the top of the armrest (each end) and the armrest storage hinged cover to allow attachment of the elbow pad.
Which is exactly what I did here… Not a bad look at all if you ask me!
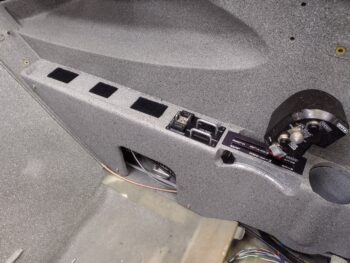
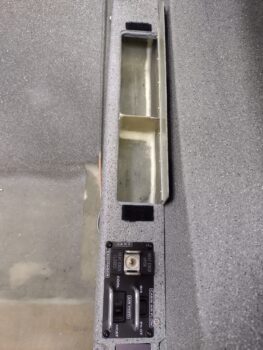
One last shot of the left front armrest storage compartment, visible with the cover in the open position. And also the newly installed Oil Heat Sub-panel (now, THOSE black screws ARE sexy! ha).
And with that, I called it a night on a very long build day.