
Well, not to sound like Debbie Downer, but today was much like Sisyphus pushing the proverbial rock uphill all the way . . .
Warning: soapbox coming. If you want to skip my diatribe then jump down to the first pic.
I started out this morning by firing up Bob (my 3D printer) in order to do a quick mod on the Throttle Friction Lock lever knob and print a new one. You see, a big part of the power in manipulating models in Fusion 360 CAD is working the construction timeline of the part. This CAD program is one of the few things where you can “go back in time” and fix something, or place one part feature “back in time” so it impacts the other features in the model. It’s a very powerful tool once you get the hang of it. But as with a lot of tools, it can be both a blessing and a curse.
Like the SciFi stories of the guy building a time machine, going back in time, and inadvertently stepping on a butterfly just to return to a drastically altered “present” year, if you mod something early in the timeline you’re often met with a bunch of red and yellow warnings of features in your timeline that you’ve broken downstream. Those must be cleaned up and many tasks like fillets, holes, chamfers, threads, etc. must be reset to the change(s) that you made. Thus I “broke” my lower corner fillets on the modified Throttle Friction Lever knob and simply deleted them with the intent of taking 10 seconds to add them back on before pressing forward in 3D printing the part.
I’m going to digress even a bit more. When I was stationed in the UK back in the 1980s at RAF Upper Heyford, I continued my college education taking night classes at the University of Maryland European Division. The cool thing about taking college courses on base was that amazing professors from the somewhat nearby British Universities took the opportunity to teach Americans at the base. RAF Upper Heyford was very close to Oxford, so in short, a number of my professors teaching my college night school classes moonlighted as very tenured professors at Oxford, Cambridge, etc. by day. It was actually pretty darn cool.
That being said, my computer science professor was the “grandfather” of computer programming for the British Government and was the project lead on a number of original databases, etc. for the British Army, various governmental statistics departments, and so forth. His agreement with U of MD was that if you wanted to take any courses with him you had to pass his initial course: Introduction to Pseudocode, which I was told by the registration office not to take if I was concerned about my GPA. He was very tough and a lot of people did not simply ace this non-typical 101 level course. This was essentially boot camp for “coders” as this professor referred to computer programming. Moreover, this course was all about one thing: programming logic.
Now, I said all that to say that a glitch that I experience in the later versions of Fusion 360 is that with all your files (now) being stored in a cloud, the wet dream of the collective hive mindset geeks, is that it occasionally loses its connection so that the program is working, but it won’t let you save your stuff. Or worse, appears to let you save it but then it’s not there later. I’m sure as par usual I could spend 20 minutes researching this to learn how I need to do something different vs simply pushing ‘save’ to meet their convoluted requirements on how to operate a program…
To make a really long diatribe a bit truncated: the modded friction lever knob that I worked on for a good hour and then “saved” under a specific file name was nowhere to be found. I’m convinced that 90% of these geeks would have been abject failures if they had attempted to complete Introduction to Pseudocode. As we had to prove in that course, what often appears as an original great idea does not work in the real world. As is the case in the geek-inspired bullshit cloud interface that Fusion 360 switched to a couple of years ago: it too often does not work in the real world.
Off my soapbox.
With my CAD and subsequent 3D print task a non-starter, I got to work on a pre-requisite task to the somewhat simple task of ‘permanently’ (it too being removable) installing the cup holder. Yes, a seemingly benign task as installing the cupholder had to be preceded by installing all the guts of the diminutive forward heat sub-panel switches and lone dial…
Here being the end result of a multi, multi hour effort (that I of course had planned on being less than an hour).
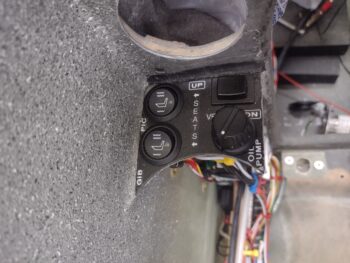
This sub-panel serves 2 distinct heat functions that are determined via an UP or DOWN (A or B) switch in the forward/inboard corner. When UP, this switch allows the front and back heated seats to be fired up, but cuts off the oil heat function… which comes down to restricting amp usage. In the DOWN position, the selector switch transfers control (electrical juice) to the oil heat PWM oil pump controller, clearly disallowing any heated seat functions to ensue.
Yes, this prerequisite task turned into a half day affair in finding parts and hardware I had squirreled away years ago and hadn’t really looked at since before I moved down to NC.
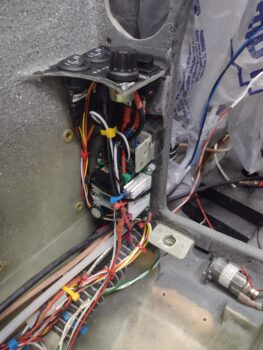
Physically, the heart of this sub-panel is the PWM controller board for the oil heat pump. This board is mounted with 1/4″ nylon standoffs to the front side “below-decks” area of the instrument panel bulkhead, that conceptually makes up the unseen front wall of the left front armrest. Yes, it’s a bit difficult to see given all the wires surrounding it.
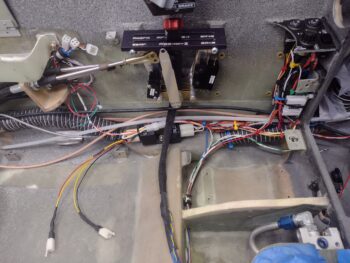
In addition to the oil heat PWM controller board, the heated seat pads have 2 rather bulky auto style relays that get mounted underneath the throttle quadrant. Included in this kit are also two bulky inline fuse holders (not visible) that I stuffed down in between the lower sidewall and SCAT heat duct.
After solder splicing in the power cross connect wires for the heated seat pads, I then spent a good bit of time wrangling all the wires and getting them somewhat organized. I’ll note that all these electrical wiring tasks were of course after I did a thorough review of my electrical wiring diagrams.
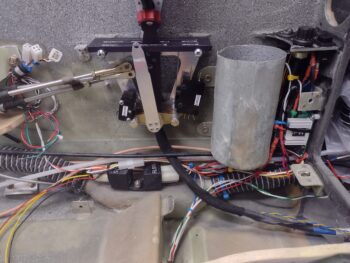
All my machinations on getting the forward heat sub-panel installed and wired up was seriously a prerequisite task for simply installing the cupholder with 4 bolts… which I used Loctite on since this is its “permanent” install. As you can see, there would be no way to get access to install all the bits of pieces for the heat sub-panel with the cupholder installed… it’s simply in the way.
I’ll note that after my wiring shenanigans today, that all that’s really left wiring-wise under the left armrest is the half-dozen or so wires to the throttle quadrant micro-switches (the oil heat valve actuators need to be installed, but the wiring harnesses are ready for connecting those up).
The next task on my list was to do the no-kidding install of the throttle quadrant, but honestly by this point mid-evening I was mentally spent, so I called it an early evening and will attack the throttle quadrant tomorrow. I will also finalize the oil heat exchanger install (I forgot the gasket sealant to ensure/mitigate air leaks) and then roll into the GIB throttle install.
One final point: with the existing wiring that is in the bird currently, the oil heat PWM controller is already hardwired into the electrical harness. It’s been just laying in the left compartment under the pilot thigh support for literally years now. I’m not really keen on having a lot of electrical components in the bird while I micro finish it for paint, but I’m making an exception with this heat sub-panel since the switches are integral to the sub-panel wiring running and installation. Obviously I’ll take as much precaution as necessary to protect it while I create a lot of dust during the micro-finishing stage.