
As I mentioned in last night’s blog post, I had every intention of working on the prefab strake leading edge, ribs and baffles to prep them for the upcoming strake build. However, when I walked out of my house to head towards the shop I noted how warm of a day it was, at least compared to the weather lately.
The shop was a tad warmer than it has been recently, with the basic wall thermometer showing in the mid-70s. I made a decision to do some layups first while the shop was nice and toasty, and possibly work on the strake parts afterwards (yeah… right!).
The first task was a repair on the left wing’s leading edge tip that has literally been on my to-do list since right after I built the wings in 2012. I don’t remember the particulars, but somehow I overlapped the top wing skin onto the peel ply that I had applied to the ply of BID on the outboard bottom wing… the BID being a foundation for the ensuing plies of UNI for the winglet attach.
Again, for whatever reason or oversight, I ended up with about the outboard 9″ of the wing LE having top wing skin glass overlapping onto a ply of peel ply. I had since removed the covering glass and the offending peel ply, but had yet to repair my mistake.
So today I started off by sanding the angled top skin glass overlapping onto the bottom of the wing, from the center of the LE down underneath, to smooth out the transition. Using the Fein saw back when I removed the top skin overlap, I had inadvertantly cut into the skin at two spots on the front underside of the wing just aft of the LE, each less than an inch long. In addition, all along the outboard 9″ of the LE centerline was a cut line varying from about 0.02″ to 0.05″ deep (I tried to get an initial pic but the lights washed out the details).
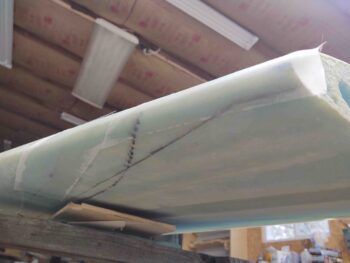
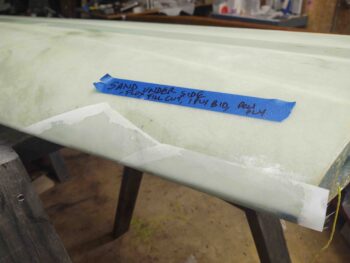
I whipped up some flox and filled the two slits and the cut line depression, and then laid up 1 ply of BID to cover the angled portion on the bottom side of the wing coming up, over and outboard to the top of the LE. I then laid up another ply of BID along the LE edge to cover all the offending errant Fein saw cuts and depressions, and to ensure the top skin was joined adequately to the bottom along the outboard LE (blue tape was a note to myself on tasks required).
I then of course peel plied (properly, this time around!) the layups.
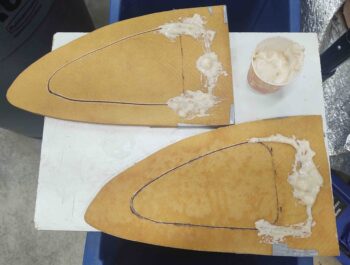
Since I was in glassing mode today, my next task was to remedy yet another sin of the past. This time a much more recent one . . . apparently the outboard strake rib (added in the Feather Light kit: not per plans) is cut significantly longer than required to allow for trimming down as needed.
I didn’t realize this until the wings were actually on and I was checking the strake outboard rib fit with the wing . . . whoa! As you can see: way too long for what I need.
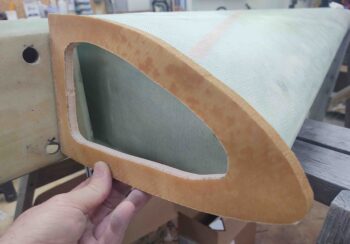
Yep, leaning forward to be ahead of the game can often come back to bite ya! As you can see I had already cut the center out of the outboard ribs to allow me access into the strake (for GRT magnetometers on the left side, and possibly S-Mode Transponder & antenna on the right side). Clearly the 1″ strip I left at the aft end of these ribs would not be enough if I need to trim these things down to fit, starting at the aft end of course.
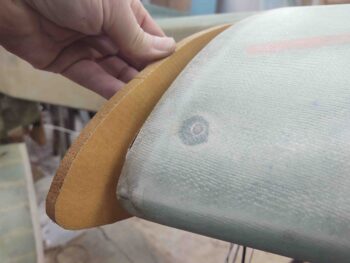
I needed to add in some more mass on the back side of these ribs to allow for trimming during install. Since I still had the center cutout pieces I would simply put them back in place and recut, leaving a much more robust aft end to trim.
Instead of messing with micro alone to reset the previously cutout rib center back in place, I turned to my new found friend: pour foam [Note the new interior lines I quickly drew up on the cutout center pieces].
After about half an hour I cleaned up both outboard strake ribs and then covered the bare foam in each seam with micro.
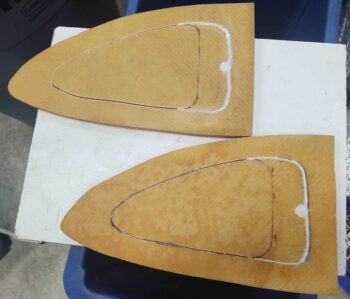
I then laid up a ply of BID on each rib and peel plied the layup. When I return from my Christmas break I’ll lay up a ply of BID on the opposite side of each rib.

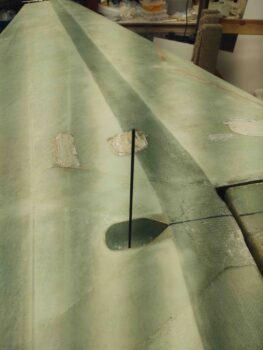
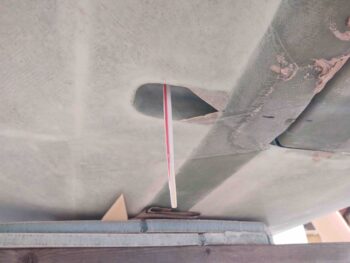
Although I was technically out of my allotted time for working in the shop for the day, I had a decent little bit of micro and epoxy left over… not a ton, but certainly enough to knock out one more quick task. I had mentally noted another item on my wing to-do list was installing the water/moisture drain from the top wing bolt trough, through the wing, down to the bottom bolt trough. This is a mod spelled out in a CP (which I don’t have the info on currently).
This is my initial drilling with a long 1/8″ bit which I left embedded for the pic (Note the removal of the left wing incident level board).
I then widened out the install hole to just under 0.3″ for the straw to fit, although I would have preferred a narrower diameter straw. I believe the globs of raw epoxy in the bolt trough are from epoxy oozing out from the spar cap during those layups (best guess… it’s been so long!), and is also on my to-do list: to clean out.
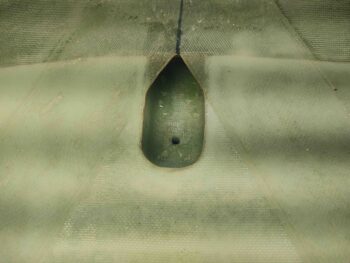
Since I was in a hurry (as per usual!) I simply pulled the straw down and then set the top of the straw even to the top of the hole in the upper bolt trough. I did back fill and smooth out the area around the straw where there were very small gaps between the straw and surrounding hole. I left the straw to cure and then also filled some minor gaps on the straw vent on the right wing, which was installed around 2012-13 timeframe.
And yes, still a bit of bondo cleanup to do on the bottom of the wing at the spar junction. I’ll wait until the wing is back off the plane before I tackle that… minimized upside-down sanding to spare the shoulder for this old dog.
With that, I locked up the shop, packed, loaded up and headed out to Greensboro for my Christmas break.
By the way, Merry Christmas everybody!