
The 5 layups I refer to in this blog title are the ones I did yesterday: Left and right fuel site gages, left and right fuselage side edge of the GIB front strake opening, and the right tank sump vent securement.
Today I didn’t get a lot done but I did finalize those 5 layups by pulling peel ply, trimming glass and cleaning them up.
I started with the fuel site gages. Thankfully the glass was still in the “green” stage and was still fairly soft and pliable. I don’t like putting protective tape on something, then laying up glass without then immediately removing the tape before final cure to ensure everything is ok. This was a notable mistake I made a time or two regarding the canopy.
On the fuel site gage I spent a good half hour on each one with a razor blade very carefully trimming glass away from the site glass and removing slivers of tape that got underneath the glass edge. The end result of my fuel site glass installation, including this effort, I would say is a solid “good.” Not stellar, but definitely acceptable. Of course once this area is painted and the site gages are marked, functional and fuel levels able to be ascertained, all this will fall into the forgettable past.
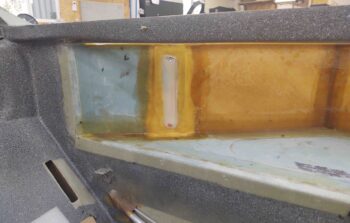
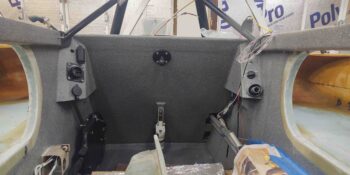
Albeit slightly out of focus, here’s a shot of both fuel site gages installed.
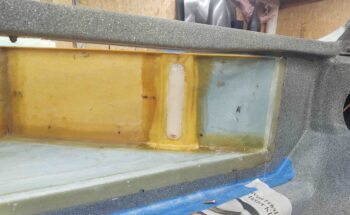
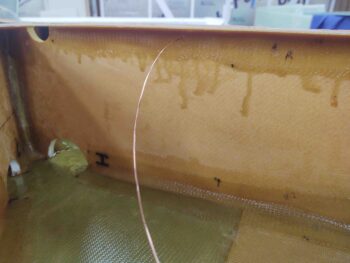
Here we have the right thigh support sump tank vent secured to the main tank sidewall.
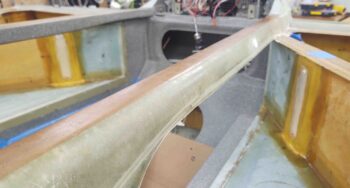
And a shot of the GIB strake openings front curved sidewall edges glassed, peel ply pulled, trimmed and sanded. These turned out just fine as well.
I did some planning and assessing on my fuel tank vents. Since those will get routed outside of the cockpit and up through the top engine cowling “shoulders” that extend forward and slope down on each side of the turtledeck, I’m going to wait until I’m ready to close out the tank with the top skins before I install those…. to ensure no damage occurs during the fuselage flip.
After determining the routing and configuration of the fuel tank vent tubing, I then proceeded with routing the fuel tank ground wire and securing it in place by tacking it to the fuel tank floor.
My understanding is that the critical point of fuel tank grounding is ridding the fuel of the excess electrons that are hanging around on the surface of the fuel. Thus, the ground wire must protrude up through the fuel surface at some point. Well, if one fuel surface break through point is good, than multiple ones are even better eh? So in securing my fuel tank grounding wire I’m simply zig-zagging it up and down a few times to ensure I have fuel surface contact throughout the fuel tank. Easy enough to do and if it avoids any refueling issue in the future than worth an extra couple of hours to do all this.
Here’s the left fuel tank. Note that the ground wire comes off the tank drain block and immediately goes up to aft upper edge of the strake leading edge. I haven’t tacked the wire at this position yet. It then roller coasters down to the tank floor, where I put a small piece of peel ply for this very reason while I was glassing the bottom skin core.
The wire then heads up again at an angle to the top of the DB baffle . . .
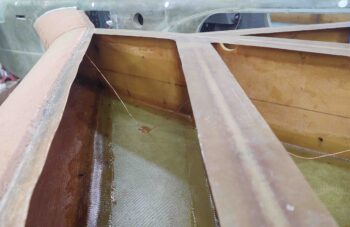
Where I drilled a small hole and ran the wire through the top edge of the baffle, right under the T-hat.
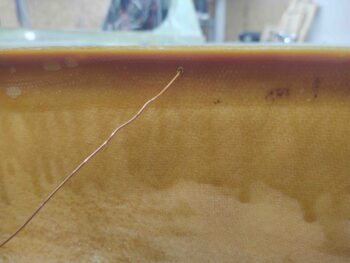
I did the same thing in the right tank as well. Here’s the front compartment ground wire vertical zig-zag . . .
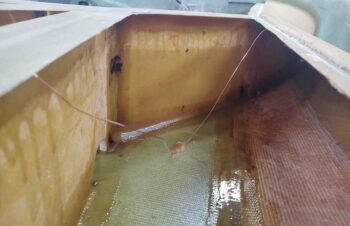
And the wire traversing the DB baffle at the very top through a small drilled hole.
My plan is to do this ground wire in stages, a bit per day for a few days. My first task for routing this ground wire was to tack it with flox and a small patch of BID to the tank floor.
Tomorrow I’ll tack it to the bottom of the strake leading edge and at the DB baffle hole. I’ll then assess the next day to decide if I’m going to add another leg going to the back corner of the tank. In addition to that, I’ll be doing final strake tasks, finish the aft nose/avionics cover install, and start working on the ailerons as I prep to flip the bird upside down for bottom strake skinning and a myriad of other build tasks.