
My Triparagon that is… or at least I can say it’s getting much closer.
Today I did a fair amount of physical work on the Triparagon, but what’s not seen is the even more work I did in figuring out optimized electrical component locations, hardware requirements, etc. I also took a quick trip down to the Aviation Dept. at our favorite Orange & Blue big box stores to pick up a few stainless steel screws, etc.
I started out on the Triparagon by positioning and then drilling the 4 mounting holes for the two AG6 Warning Annunciators that I’ll be using. The pic below actually shows the Triparagon upside down. I’ll be mounting the AG6 Annunciator boards back-to-back, one on each side of the Triparagon, with a long #6 screw attaching one side to the other at each corner of the AG6 board. Also, although not shown here, immediately following my drilling of the marked mounting holes in pic below, I drilled a fairly large lightening hole in the Triparagon plate immediately underneath/between the two AG6 Annunciator boards.
As for the right side Triparagon, besides the AG6 Annunciator board I also mounted the Schottky Diode with its heat sink, and the X-Bus (just to the left of the Main buss in the pic below). As you can see I also drilled 2 more large lightening holes just above the Safety Trim box.
Immediately after I cut the Triparagon to shape, I weighed the panel at 1.38 lbs. After the 3 total lightening holes that I drilled out today, it’s weighing in at about 1.15 lbs. My goal is to get the Triparagon’s vertical plate weight down to about 0.6 lbs, with a total weight at under 1 pound.
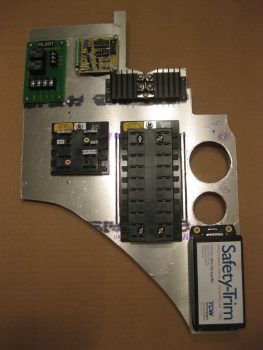
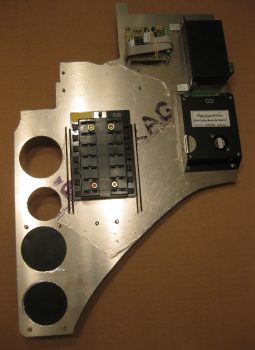
On the left side I added the twin AG6 warning annunciator, as well as the E-Bus that shares the two top bolts for mounting with the Main Buss on the right side. In addition, I mounted the Flight Data Systems’ GD-40 Carbon Monoxide Detector. I’d like to point out that although the CO detector may look a bit bulky in the pic, it’s actually very light and only weighs a few ounces. Today actually marks a pretty cool milestone considering that all my busses are in place and ready to be wired up & installed with the Triparagon into the plane!
You may have noticed a couple of slots that I “machined” (Ha! That translates to “Skil Saw”) along each side of the Main Bus, and thus on each side of the E-Bus. These slots are nothing more than wire management slots that will allow me to secure the wires to the Triparagon with either zip ties or cable lace. They are clearly in a very rough state, as is the entire Triparagon actually, and will be cleaned up later.
Obviously I’m trying to get the majority of electrical components mounted to the Triparagon, which then allows me to determine hardware, space, wiring, and connector requirements now so that I’ll have as much of it as possible on hand for when I hard mount the Triparagon into the front of the plane. I’m thinking one more good day on this baby, then on to working on the wheel pants. I should also point out that once the Triparagon meets my design & operational requirements, I’ll mount it into the fuselage directly behind the F22 center post with around 6 each K1000-3 nutplate assembly hardpoints. The nutplate hardpoints will allow me to remove and install the Triparagon whenever I need to during the build, and of course after the build as well!