
Today was all about solving one of the last big mysteries concerning my electrical system. How to get the Taxi Light to open & close into position? More precisely perhaps, how to get the taxi light in its swing down bracket to open & close, but then also how to get the light to turn on & off concurrently.
The process was as most when designing something like this: a constant battle of cart-before-horse and chicken-vs-egg arguments. I needed to figure out what hardware was available for use, and bounce those against my defined requirements for the taxi light.
After Marco’s recent visit, and again since this really is one of the last big questions needing answered on my electrical system, we discussed it at length. Upon returning home, Marco sent me a few links to some Arduino-based servos, boards & programming. To be fair, since I’m much more of a Neanderthal than Marco, I wanted something more my style: 2 wires, red & black! ha! (Ya know, simple!)
Well, after a couple of hours of on-again, off-again pre-bed late night research, I found a very viable candidate: the Firgelli/Actuonix L12-S Miniature Linear Actuator with limit switches. After figuring out if it would fit in my nose battery compartment area, which it does (barely of course), I then had to decide some specs: speed, torque/force, extension/retraction length, etc. (pic from Robotshop.com).
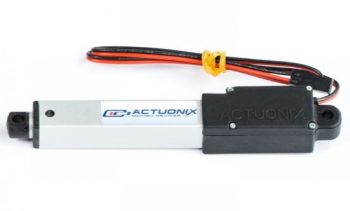
First off, the -S designation denotes that the actuator arm travels the full length out/in before hitting a limit switch to turn itself off. This was important since it allowed me to simply use an off/off switch, which … hey! I conveniently have one of those on my control stick that’s tagged to control this thing!
Before actually ordering one of these puppies, I pondered and compared the speed and force of the actuator, since those two are in an inverse relationship: as speed goes up, force goes down, and vice versa. The speeds are determined by gearing ratio, with 210:1 being the slowest, then 100:1, and finally 50:1. Again, the speed determines the force. Here’s a very short video of the speed & force difference between these actuators:
I decided to go center of mass with a 100:1 gearing option, giving me about 2.5 seconds opening time for a 30mm (1.18″) stroke actuator. Since I’m limiting the extension of the taxi light to only when the airplane is traveling 70 knots or less, than I figured the 100:1 gearing option will provide a good balance of extension speed & force. If not, I can always swap it out for the slower geared 210:1 version. Of course, my next question was if the 30mm or 50mm stroke was the better option?
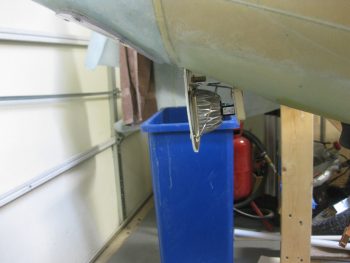
I took a couple of pics of the actual taxi light in its swing-forward position. I’m actually holding it back just slightly aft of its normal resting vertical position with the wire leads. I’ll of course dial in the light position to optimize the light pattern, but this is about where I want the taxi light in its down position.
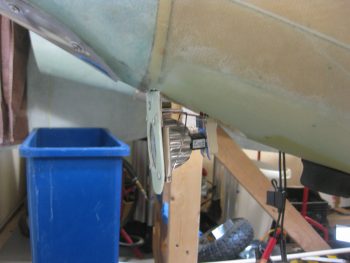
Another shot showing more of the face of the light.
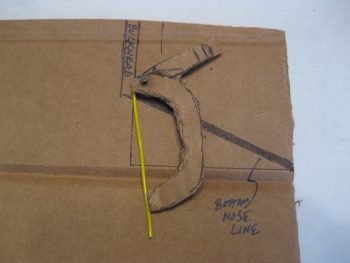
I then determined and replicated the bottom profile of the nose onto a piece of cardboard, with the -7.7 vertical bulkhead depicted as well. I then crafted an initial cardboard prototype of the bracket that will attach to both the swing-down taxi light assembly, and the actuator arm. I then marked dots 1.18″ aft of the actuator arm attach point and tried a few different positions to see if that was the correct stroke.
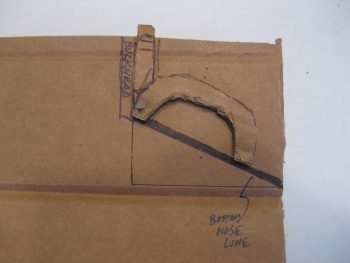
For these pics, I used a scrap piece of yellow 18 ga wire to show the swing-down light assembly positioning. Here the light is retracted flush with the skin of the nose.

Here’s estimated position #1 for the taxi light position when deployed.
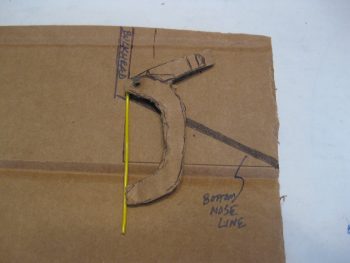
And estimated position #2, if perhaps a more vertical position provides better light projection.
With my mini-test out of the way, I determined that the 30mm (1.18″) stroke is definitely workable. With that, I pulled the trigger and ordered an L12-S miniature linear actuator with limit switches that is geared at 100:1 and has a 30mm (1.18″) stroke. By the way, besides being small, this thing is light, weighing in at 34 g, or just a bit over an ounce!
I then spent a good couple of hours reworking the electrical connection side of installing this actuator via an 8-pin DPDT relay, with the requisite wiring diagram update completed as well.
The taxi light extending/retracting on/off sequence works as follows: Once the actuator moves the taxi light swing-down bracket into the deployed (down) position, it will depress a micro-switch which will then turn on the landing light. Thus, in actuality, the blue Taxi Light switch button on my Infinity control stick ONLY controls the retracting or extending of the taxi light assembly through the L12-S actuator. Completely separate to the actuator circuit, the mechanical opening and closing of the taxi light assembly electrically closes the microswitch and turns on the taxi light… meaning there is NO electrical connection to the taxi light from the switch on the control stick!
Tomorrow will be a light build day, but Monday I really plan to start finalizing all the Triparagon installation and the panel-forward electrical shenanigans.
Excellent alternative to a complicated Arduino setup, Wade. I like it.
Thanks Marco! Yes, I’m very happy with this actuator setup!