
Today was all about waiting…
That being said, I really like how this new Pro-Set epoxy handles during layups with it low viscosity and ease of wetting out the CF cloth (I haven’t used it on fiberglass yet). It doesn’t exotherm and it mixes well with the standard amount of inherent air bubbles.
That’s the positive. The negative is the LONG cure time… and this is with the medium 226 hardener. I talked to my buddy Brian Ashton —who uses Pro-Set— and although he uses the slow 209 hardener, he says he waits a WEEK for a component to cure. While I’m sure his patience will be rewarded in very strong, heat resistant, highest Tg parts out there…. that is a laser-scoped killing headshot to production, IMO.
(“Perfection is the enemy of progress” – Gen. David Patreaus)
I believe I’m getting a hint of that week cure time with my medium 226 hardener, in that I now very firmly believe that 24 hours is the minimum cure time for the part to begin hitting any resemblance of strength, rigidity and shape-sustainment. And for the record I actually downloaded the Pro-Set with 226 hardener data sheet and confirmed my epoxy-to-hardener ratio numbers and they were spot-on.
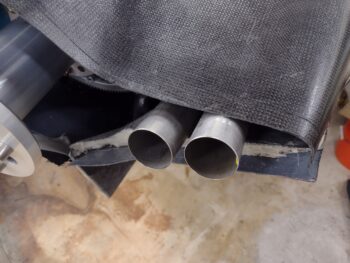
Back to the actual build: As I did on the left side, I dug out some of the aft end foam separating the old/inner bottom cowl skin and the new/outer cowl skin on the right side. This shot again gives you an idea of the depth difference between the two. Note the trim line marked on the peel ply . . .
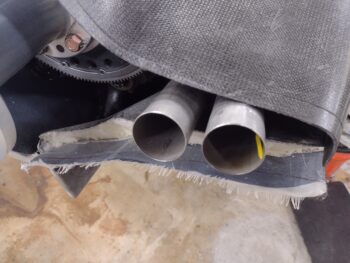
which is exactly what I did next: trimmed the aft edge of the right side new cowling skin close to its final position, in line with the top cowl aft edge above it.
I then needed to kill a good bit of time waiting for the bottom cowl left inside CF layup to cure… in that I was not getting back onto any bottom cowl layup ops today since I finished the left interior layup at around 2130 last night.
Still very much bottom cowl related, I made copies of the armpit scoop interior baffles on regular 8.5 x 11″ sheets of paper and labeled the best one of each pair as a “Master Copy” which I filed away in the house.
I then used 3M 77 spray glue to attach these baffles to thin cardboard.
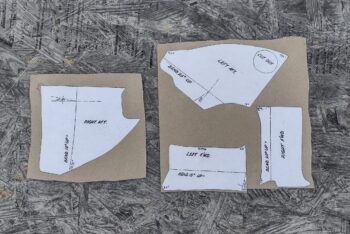
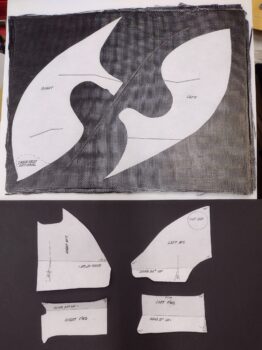
Once dry, I cut the lower cowling armpit scoops’ interior baffles —now on cardboard— out and bent them slightly (not to the exact degrees annotated… yet) and placed them on black poster board (pic below).
The way this works is that there is a mini-wall created on the inside edge of each armpit scoop (think of the actual bottom cowl wall continuing straight up as if the armpit scoop wasn’t there) that keeps the incoming air channeled in the immediate armpit scoop inlet. The big templates up top in the pic below are those walls, and the long curved part is the bottom and matches the armpit scoop curve. The peaks and valleys are simply the wall closing off what it can, but taking allowance for the air intake pipes of the engine. I’ll point out again that these are from Mike Melvill’s bird that had an IO-360 with a stock oil pan. Clearly mine will be different and these baffle templates are merely a starting point to get me moving in the right direction, the large templates most likely and understandably needing the most modification to my engine configuration (with cold air induction).
In addition, note that on the large wall templates (top in pic) where you see the dogleg lines of the actual air-diverting/directing baffles (bottom in pic) —one per cylinder— that tie in at 90° right angles to these added inside walls… the inside walls being vertical & oriented parallel to the aircraft CL, while the smaller baffles are horizontal and not only sit perpendicular to the aircraft CL (left-right), but also across the entire armpit scoop to deflect the incoming cooling air up into the respective cylinders.
Finally, the large sidewall templates are sitting atop a Feather Light-included cured 3-ply CF sheet that is used specifically for cutting these interior sidewalls out and simply floxing/gluing/glassing them into place.
Besides my fun time with arts-n-crafts shenanigans with the bottom cowl interior baffles above, I sat down and really brainstormed the design of the top cowl oil check door latch. I’m happy to report that I came to a decision in finalizing the design and it will be a true chip off of the ‘ol shoulder of Bill James as to how he uses wires and conduit for securing panels in place: a 0.090″ “wire” routed through Nyla-flow. Simple, relatively lightweight and EZ-PZ. Not sure when I’ll get to creating and installing that, but I suspect some time shortly after Rough River, which starts this week.
Tomorrow I plan to complete phase II on the right side bottom cowl. I still need to trim and clean up the old cowling skin, foam, tape, and peel ply before cutting the CF interior ply and laying it up. I may get around to removing the peel ply on this layup before I head out to RR, but the bottom cowling will certainly be going back onto the bird to get a good near-week cure time while I’m hanging out with my Canardian buddies in Kentucky.