
Yesterday, as a retired military officer, I spent a few hours doing what I was best trained to do: build a PowerPoint slide deck that covered the possible COAs, or “Courses of Action” for the possible configurations for installing the fuel injection servo. Of course it was replete with pros and cons for each one, as well as specific install requirements for each configuration as well. I also took a detailed look at the throttle quadrant control movement vs. servo throttle and mixture levers manipulation, and servo levers configuration and range of motion for each COA.
I ended up with 3 different possible install configurations, with the current way as COA 3. COA 1 is to simply flip the fuel injection servo upside down as compared to how it’s currently installed. Most of the mass of the servo is low and to the right (thus the current location of the cowling interference), which I would then of course transfer to higher and more to the left. This would most likely result in having to actually put a spacer in the middle of the two elbows to allow clearance for the top -4 fuel line port.
COA 2 is to mount the fuel injection servo directly to the cold air intake plenum, facing aft. The drawback to this configuration is possibly having 180º air —most likely more turbulent than if coming in straight— entering the servo intake. I’ll need to call Allen at Precision Airmotive again and confirm whether or not that is an issue.
Today I flushed out all I could on the present configuration, COA 3, and then assessed COA 2 as well, since COA 1 requires physically moving fuel ports (read: snipping safety wire) on the servo.
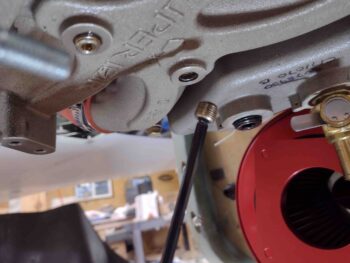
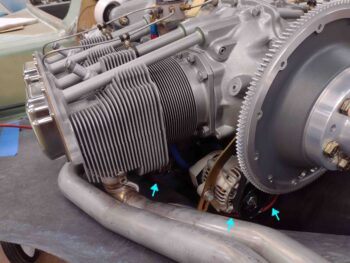
I determined that I wasn’t truly accounting for all my data points regarding the installation of the fuel injection servo unless I at least temporarily mount my Sniffle Valve… the install location on the bottom of the cold air induction plenum which I’m pointing out in this pic:

What is a Sniffle Valve? Well, for those with a cold air plenum it is a safety valve to ensure that any type of liquid, be it fuel that drains back down from the intake manifolds or perhaps water entering into the system after a good rain is drained free and clear from the cold air intake plenum prior to engine start. Specifically, it’s to ensure no fuel is pooled up in any quantity that when ingested at engine start would induce a backfire. No muy bien!
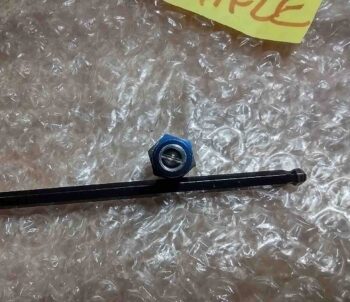
You can of course make a Sniffle Valve yourself, but it is just easier in my opinion to buy one from the good folks over at Airflow Performance. Here’s what it looks like from the outside.
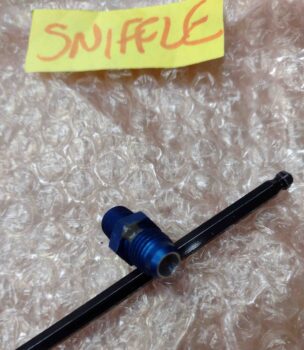
Inside is a ball bearing that falls down/open in its natural state when the engine is off, thus opening the port for all unwanted liquids to exit the plenum during the engine-off state. Once the engine is started, the vacuum from the air induction system pulls the small ball bearing upwards and keeps it locked in the closed position until the engine is turned off. Simply but very effective.
Since our Long-EZs are placed in the grazing positions after engine shutdown and prior to engine start, I am using the forward Sniffle Valve port to drain away any excess/unwanted fluids. Since this engine is mounted “backwards” I’ll note that on a “normal” install most tricycle gear planes would use the other port, which would be the forward one. Also in a tractor configuration, the Sniffle Valve port I’m using is what the taildragger bubbas would use.
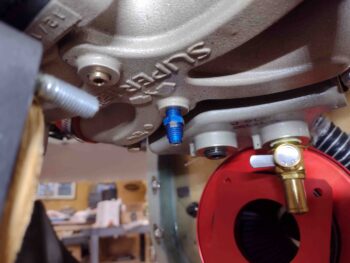
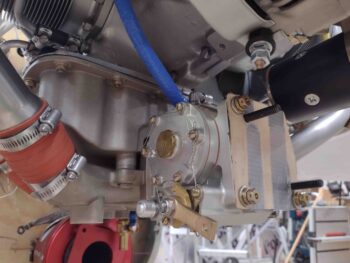
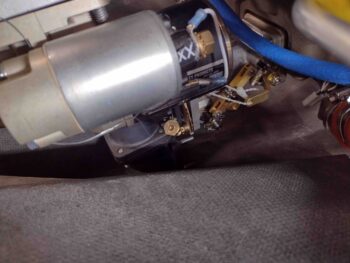
I installed the Sniffle Valve without any thread goop simply as a temp install to ensure clearance with the fuel injection servo, as we have here:
I didn’t grab any shots, but after some trial and error with the current FI servo configuration (COA 3) I determined that by adding washers again to make the bottom elbow 90º (versus actual 85º) and with a 0.090″ spacer in between the two “90º” elbows, I could get some actual clearance between the lower right side of the servo and the bottom of the cowling… maybe 0.08″. The main fuel hose would still definitely have to be moved from the right side to the left, requiring more circuitous routing.
I then grabbed a fairly thick aircraft cable and tested the throttle and mixture cable loop back that would be required for those cables. I even talked to a custom cable shop in California to inquire about how much I could bend these cables without inducing negative pressure on the cables or effect good operations.
You can just make out the red cable in areas of the lower cowling.
I then took the bottom cowling off to assess fuel injection servo install COA 2.
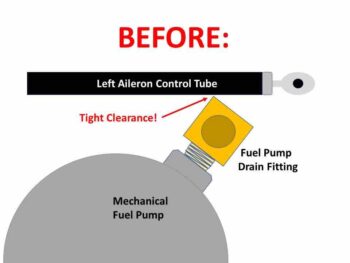
I should note that yesterday I also did an inventory and took a hard look at what options I had for installing an angled fitting into the mechanical fuel pump drain port that would allow acceptable clearance with the left aileron control tube.
I assessed a 90º aluminum barb fitting I had on hand (that I bought specifically for this), but it actually jutted out farther from the fuel pump body than did the brass 90º fitting (with female threads for a straight barb fitting). The more I looked the more I realized that the brass fitting I had was about as low profile as I was going to get without rolling my own.
With the bottom cowling off and decent access the firewall area, I wanted to thoroughly flush out this brass 90º fitting to see if it could be used, or if I needed to keep looking for other options. I had tried the fitting in place, and observed a couple of days ago that there was a scant bit of clearance until I went full right aileron. Then the left forward corner of the brass fitting just kissed the aileron control tube. Note that this is with the brass fitting hand tightened into place, so I’m fairly certain I can get one more full revolution of insertion here.
In looking harder at the brass fitting, I realized that it was a cube with the male threads protruding out one side, with the round threaded female port on the bottom to then thread in a barb fitting. The round channel for the female threads left quite a bit of meat at the corners, which was exactly the area causing the interference issue with the left aileron control tube.
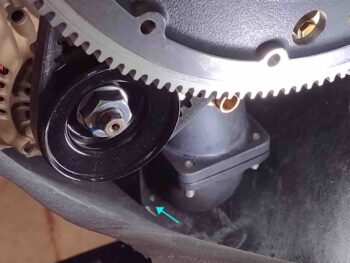
I took the Dremel and knocked down the corner edges a good bit, and after a couple of rounds had an acceptable amount of clearance with the aileron control tube. Never as much clearance as I would like, but enough that I seriously don’t think under normal flight ops it would cause any interference issues. Moreover, with now completely rounded edges of the fitting exposed to the control tube, any possible contact during, say, some high G maneuvers would only result in some momentary minor rubbing and possible paint blemishing vs any edges catching against each other.
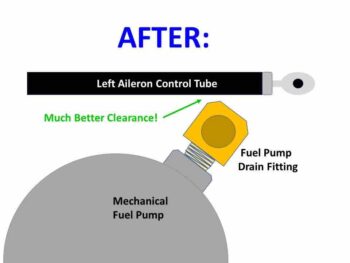
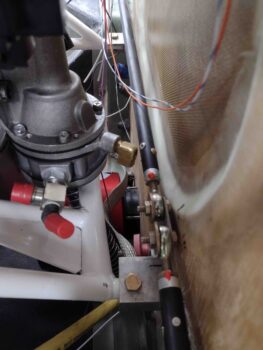
Here we have the mechanical fuel pump drain 90º brass fitting installed (remember! here it is only hand tight) after I rounded the sharp-edged corners. Clearance is still tighter than I’d want, but this is about as good as it’s going to get unless I can find (or make) a lower profile fitting. I’ll keep on the lookout, but I’m going to call this acceptably ok until that happens.
I then ginned up a thin plywood bracket to attach to the (now) aft face of the fuel injection servo as it is mounted facing aft directly onto the cold air intake plenum (COA 2). I installed 2 CS 5/16″ screws to allow me to then mount the elbows onto the servo.
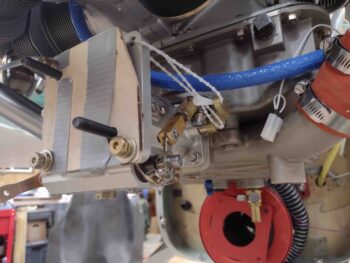
Which I did here. Obviously the elbows aren’t installed in a perfectly tight and flush manner as they would be with a proper adapter bracket, but certainly good enough to give me an idea on cowling clearance.
I have to say that the more I looked at COA 2, the more I really like this configuration. It places both fuel lines in very optimal positions with about as zero interference or clearance issues you can get with this install. It also places the throttle and mixture levers at good angles and distances from the bracket hard points on the bottom of the cold air plenum. Moreover, although it requires much tighter length tolerances, it eliminates throttle and mixture cable U-turns in the cowling… with direct Point A to Point B cable runs from throttle quadrant to levers. Again, so far the biggest drawback is the potential issue with turbulent air entering the servo from the directly attached 180º elbows. Well, and clearly a slight hit on aft CG as well.
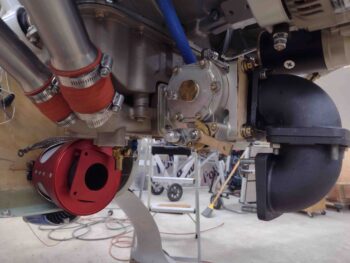
Well, my temporary plywood bracket with attached elbows exposed exactly what I had hoped it wouldn’t: interference between the ~180º elbows and the inside bottom of the cowling…. so much so that with all the CAMLOCs installed on the right side of the cowling, there was no way to get ANY CAMLOCs installed on the left side.
Here’s a shot from the right side of the aft-facing fuel injection servo and the ~180º elbows that are interfering with the bottom cowling fitting.
While not what I had hoped for, the data that I’m collecting from these various COA test installs is helping build a decision matrix for getting this fuel injection servo installed in the most optimized manner for this engine-cowling combo. If I go with COA 2, it appears that I would pretty much have to fabricate my own air duct to get the air from the RAM air can into the fuel injection servo. This might ultimately be a blessing in disguise given that I could most likely make it tighter and thus possibly add 2-4″ of a straight air intake just before it enters the fuel injection servo. Not to mention that it would almost certainly be much, much lighter than these 2 bulky aluminum elbows.
Pressing forward!