
I started off today with a phone call to B&C Specialty Products to get some final intel on mounting both the starter and the alternator, clearly both B&C units. I had the install manuals in my hands and had reviewed them, but one thing I was curious about was the ground path.
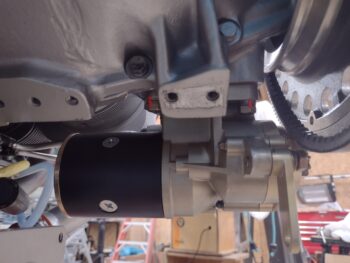
You see, they both use the engine case for ground, but I saw a slight issue. Both the alternator and starter boss pads on my engine case were painted. I did a continuity test to see if I was missing something with this specific paint, but there was no electrical connectivity to the paint.
Thus the phone call with B&C, who confirmed that it’s a good idea to have a majority of the paint off of those bosses to allow optimal contact for ground path. I grabbed a shot of the starter boss paint removed (I left an edge right at the corner) but it not surprisingly came out blurry.
I then applied a thin coat of dielectric grease on the face of the boss before mounting the starter and torqueing the nuts and bolt to spec. I then applied orange torque seal to the nuts and bolt.

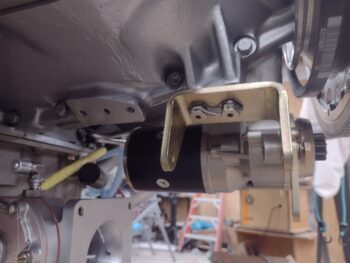
Here’s a shot of the mounted starter from the inboard side. I had determined earlier that it would be easier to mount the starter first than the alternator, since it allowed access to these inboard mounting nuts.
If you look on the engine alternator mounting boss, you can see I removed a decent sized patch of paint there to get good metal-to-metal contact for the ground. To be clear, I specifically asked B&C if the mounting bolts alone provided enough of a ground path to the engine for starter and alternator ops. Again, they highly recommended removing a decent amount of paint for optimized electrical ground conductive-ness.
As with the starter boss, I applied dielectric grease to the boss and alternator bracket before mounting it and torqueing the bolts to spec. Then, as per the manual, I safety wired the bolts and bent the metal tabs down over each bolt.
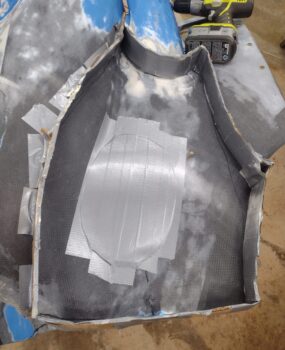
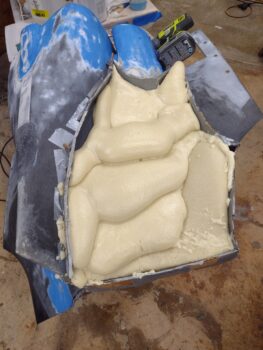
I then spent well over an hour prepping the left side of the bottom cowling for pour foam. I taped up the large hole where I removed the alternator clearance bump and then put all the perimeter dam walls in place.
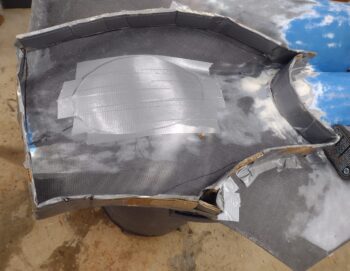
Here’s another shot from the side.
I then spent the next hour laying in different batches of pour foam. The first batch was the last of X-30, and all the rest was a different brand, but the same exact stuff.
I then took the rest of the night off for a later dinner with Jess. I needed some time and space to ponder exactly my plan for the lower cowling.
My thought is that if I’m going to modify the lower cowling, why not do all that I will probably do in the future now and get it over with. My concern as I’ve been looking at the bottom cowling is how tight the curves are, in both vertical and horizontal references, in regards to the air flowing around it. As per usual, I’m sure it works well enough as is, but with another day’s worth of work could I really optimize that airflow and have it flow nice and smoothly right into the awaiting prop?
Here’s a pic of Klaus Savier’s bottom cowling. Note how smooth the surfaces are, even the respective protrusions for internal component clearances. This design, which Dave Adams adopted on his bird, actually presents the air to the prop in an excellent flow.
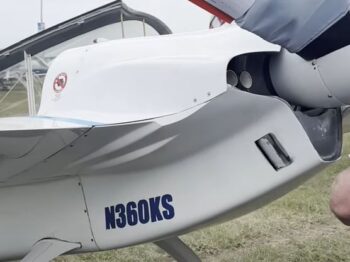
This pic above is actually a screen shot from the video of Dave and Klaus discussing their respective Long-EZs at Oshkosh. Here’s the video link if you’re interested.
I’ll note that Klaus mentions that due to all the mods he has made to both the top and bottom carbon fiber cowlings, that they now weigh about 10 lbs. a piece. I weighed my bottom cowl just before I started the work above. Now granted, I’ve sanded most of the paint off, but it weights 5.2 lbs.
I’ll reiterate that I would rather take an extra day or two to plan out a much better performing bottom cowl, with acceptable internal clearances, allowing me to NOT have to modify my spinner “lampshade” flow guide, and be as light as possible when finished with minimal, if any, future mods… where is the downside?
And yet I’m still pondering!
More to come . . .