
The last couple of days I’ve been sanding down all the aircraft components that I painted with blue paint. I got a good coat of paint on all these parts, albeit considerably too thick. I’m new at this boat paint stuff —which is not like rolling on house paint!— with the paint itself having significantly different application characteristics than the primer.
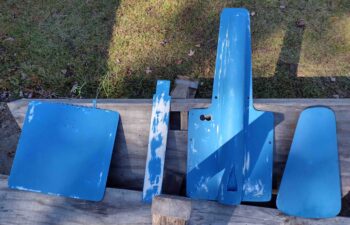
I’ll note that my primer work was not up to snuff on the nose gear fairing and nose gear doors, so I very aggressively sanded those starting with 220 grit, then moved to 320 and finished with 400. Clearly a lot of blue was taken off and these bits have a lot of white primer showing up again.
I had good discussions with both Jason at Epifanes and Paul at Jamestown Distributors and feel that this next round of painting should go much better, as I dial in my skills on this paint application.
And I’ll say it again: this is exactly why I wanted to start painting on the bottom of the plane first! To knock out this finishing/painting learning curve on less visible items as I dial it all in.
I’m also going to state that I’m fairly certain that when all is said and done, and the entire airplane is finished and painted, that this beast below —the bottom cowling— will prove to have been the most difficult part to finish and paint. Not surprising since the channels on two sides of each armpit scoop really add to the challenge of finishing/priming/painting this component… and keep in mind, that equates to 6 surfaces on these channel sides of each armpit scoop that must be finished and painted.
Yes, I’ll be glad when this guy is done! Regardless, here’s the shot of the bottom cowling’s blue paint sanded and ready for another coat.

I figured that it was also time to clean out the gap at the junction of strake and wing, on each side. I started with a hack saw blade but this proved insufficient to cut through this hardened primer. In fact, I stopped this futile attempt once I chipped the edge of the right wing.
I then proceeded to use my ever-trusty Fein saw. To ensure I got a nice straight cut I taped a long straight edge at the edge of the cut line.
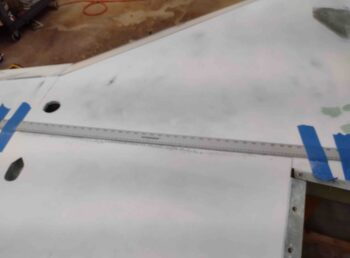
Here’s the result. Of course I did this on each side. I will note that I measured the thickness of the Fein saw blade at 0.035″, so I’ll guesstimate that thickness of my strake to wing gap is no more than 0.045″ . . . not bad.

Tomorrow my intent is to finish all the prep and lay out my blue paint scheme on the bottom of the fuselage, and get that sucker painted!