
Today I started out by spending a good half hour finalizing an ACS order to get some much needed hardware & material on order, especially for the upcoming gear installation.
I then ran out to run a myriad of errands that I needed to get done. When I returned the first thing I did was spend almost a good hour clearing off the canard work bench, and cleaning & organizing the shop.
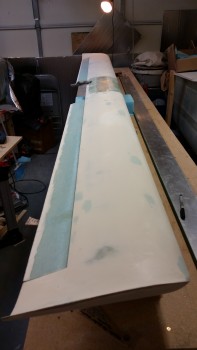
I then got to work sanding the TE area of the canard with 220 grit sandpaper. I wanted to keep it a finer grit, but after a bit of sanding I realized that 220 just wasn’t getting it all done, so I switched to 150 grit. Much better to get the stubborn areas leveled out & smooth.
I then flipped the canard around & started working on the LE. Although I sanded both the LE & TE, they’re both going to need a decent amount of filler. I want to wait though until I get a (real) high build primer to apply a couple of coats of that before doing any filling with putty, etc.
I then spent a good 45 minutes sanding the TE of the elevators to width to match the elevator templates.
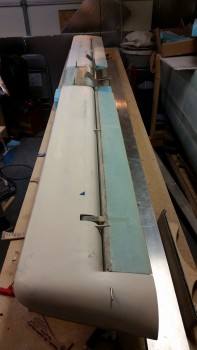
Once I had the widths dialed in, it was time to mount them. Now, it seriously may just be my build (but from the reports I don’t think it is) but for those of you that haven’t inserted one of the stainless steel hinge pins into the elevator hinge channel, it is simply one of the most silly pain in the asses that I’ve ever dealt with… it is seriously a huge PITA!! I finally got so frustrated (and exhausted) trying to get the right hinge pin installed, that I pulled it out, took off the elevators & then tested the hinge pin separately in the canard mounted elevator hinge tabs, and then the elevator itself. Both seemed to work fine, but a little tight.
I took some 320 grit wet/dry sandpaper, hit it with a shot of WD-40 and “scrubbed” the entire hinge pin. I then tested the other side which actually needed some honing out on the NG6 hinge hole (with a 3/16″ drill bit), but I eventually got everything working smoothly. And I also treated the left hinge pin to a 320 grit rubdown as well.
I then reinstalled the hinge pins & remounted the elevators, which resulted in still a sheer amount of pain again, but at least this time they were moving . . . albeit ever so slowly!
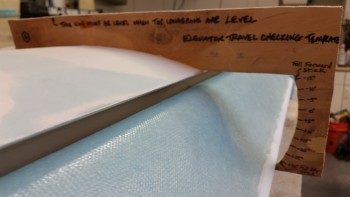
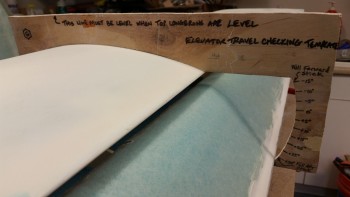
Once the elevators were installed, I checked the gap between the bottom of the TE & the top of the elevator. The taped-together popsicle sticks I used to test the spacing were from the original set of spacers I used when I installed the original elevators. I double-checked the width of the spacer and it was right at 0.22″. I checked the fit of the spacer into the gap between the canard TE & the elevator on 3 spots each side: outboard, middle & inboard. Of all 6 spots, I got 3 spacings that were spot on (meaning 0.22″ gap), while the other 3 were just a tad tight (closer to 0.2″). So my spacings are looking great.
I then checked the up/down degree travel for each side of the elevator. For the up travel I got 15+° on each side.
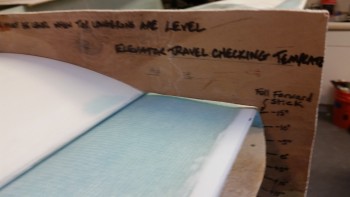
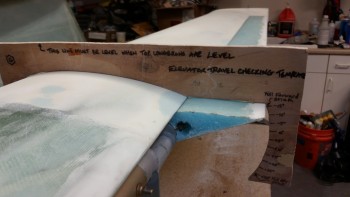
And for the down travel I got well over 30° each side. So my elevator range of motion is phenomenal.
As for having any issues, I basically have 3 problem areas with the new set of elevators:
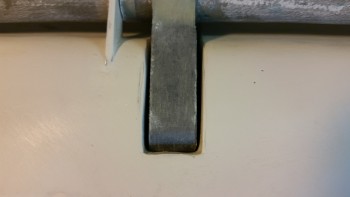
First, when I was trying to install the hinge pin on the left side, it felt like it was making it so I could barely pivot the elevator. Then it took less than a minute for me to realize that it wasn’t the hinge pin creating this friction, it was the left outboard elevator weight getting stuck in the channel. After further investigation I could see where it was pressed up against the forward side of the elevator weight notch in the canard. A little judicious sanding will clear that right up.
Next, (not shown) are the outboard TEs of the elevators vs the inboard TEs of the canard swoosh tips. The width of the elevator is not matching the associated TE of the swoosh tip, so this will have to be death with as well. To be clear, we’re talking less than a 0.1″ difference.
Lastly, but definitely the most serious of the issues (also not shown), is that the inboard third of the right elevator TE is about 0.07″ higher than its counterpart elevator TE on the left side. I measured this TE mismatch while the outboard TEs were matched at 0º elevation with the canard swoosh tip. I’ll have to figure this one out before I proceed.
All in all, for having to re-glass & remount the elevators, I’m really pleased with the quality & fit of the elevators on the canard.
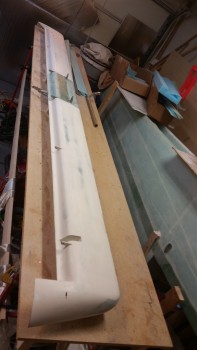
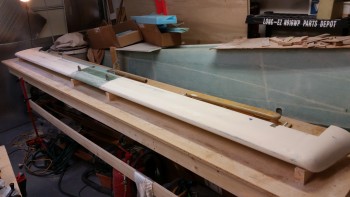
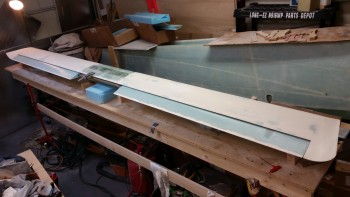
I then grabbed a couple long shot pics of the canard with the new elevators, both top & bottom views.
Tomorrow I’ll work on all the issues I noted above. I’m thinking there will probably be either some Bondo or glazing putty involved… either way, while stuff is curing I’ll be prepping other stuff for the main gear install.