
Usually it’s a layup that can turn south and become the layup from hell, but tonight it was as if all my technology turned against me. I couldn’t get my Gmail to synch on my phone, so every email with attached pics simply queued up and went nowhere, which may or may not have been associated with me having to reboot my home Internet router a number of times to get it to acquire a network IP address for Internet access. In addition, I checked earlier in the week on my phone camera’s inability to focus (note that I said “phone”, not me! ha!) . . . apparently in one of Samsung’s latest updates they actually jacked up the camera function. Their fix is to go as high res as possible on the camera setting, but that still doesn’t resolve the cat ‘n mouse game I’ve been playing with getting a number of these pics in focus. So once again, if the pics are slightly fuzzy, I apologize.
Moving on.
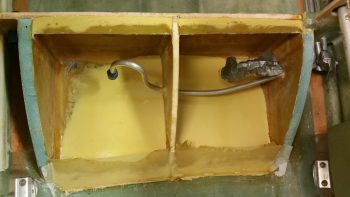
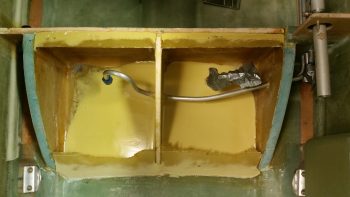
I started off today by pulling off the dam form/mold from the bottom aft side of the sump walls.
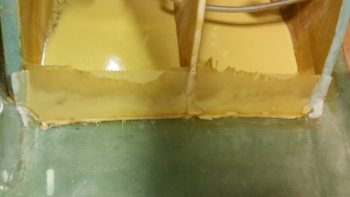
Here’s a closer up shot of the glass layups and micro with the peel ply still in place.
I then pulled the peel ply.
And spent a good while cleaning up the micro junk left over.
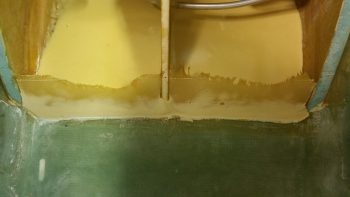
I then aggressively sanded the micro and gunk at the bottom aft side of the sump walls before trimming the glass that creates a mini wall at the bottom aft of the fuel sump.
I then stuck on a new piece of 32 grit sandpaper onto my hardboard and went to town on the upper lip since there was a decent ridge over on the left side that was about 1/8″ higher than the top edge of the sump front wall piece. I got that all evened out and the lip close to being ready for the future floxing on of the sump top.
I then ginned up some E-Z Poxy, whipped up some micro and made some corner fillets next to the fuel drain holes to ensure that any water in the sump tanks didn’t shoot past the hole and merely sit in the corner pockets. This of course is analogous to what is done with the fuel drain on the main tanks.
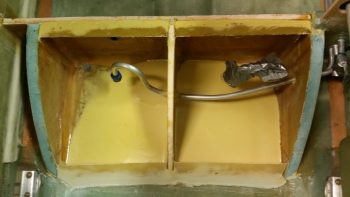
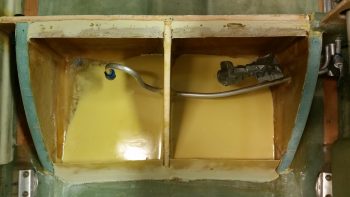
Here’s the right sump tank corner micro fillet.

And the left tank.

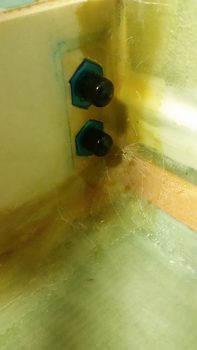
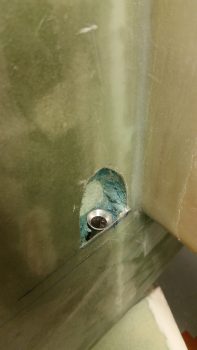
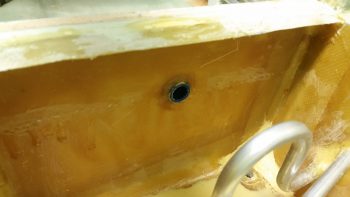
I then used the epoxy I just mixed to make up some flox to install the right low fuel sensor fitting into the front wall of the right sump tank. I placed each of the low fuel sensors in the center of each tank, both almost 2″ down to keep them from constantly ringing off with false alarms.
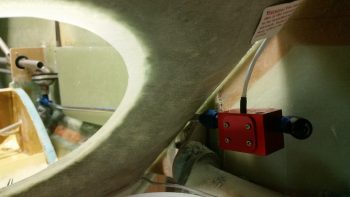
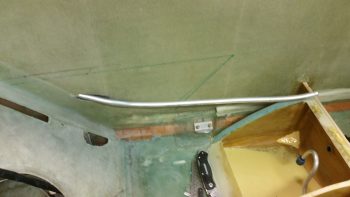
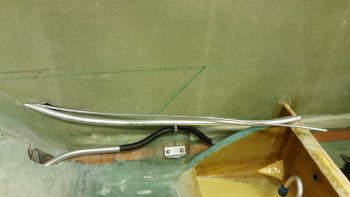
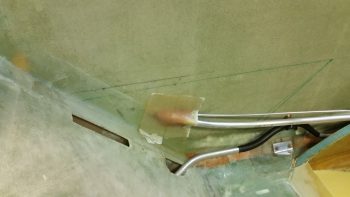
I then set the fuel pulsation damper in position and spent a bit of time dialing in the position and tube bend of the fuel line from the pulsation damper to the FT-60 Red Cube fuel flow sensor. In a perfect world the pulsation damper would be mounted immediately forward of the red cube, but I just couldn’t get both fitted into one spot with the space I have on hand. In other words, I couldn’t get them paired together neither where the pulsation damper is now, nor where the red cube is in the hell hole. For flow requirements for both, this was the best compromise and I believe the damper should still work well to smooth out any odd pulses generated by the system, and allow quicker recovery of fuel flow sensing after the fuel pump is turned off.
[NOTE: Electric fuel boost pumps are known culprits to cause the fuel flow readings to be off while the pump is on… the major drawback of mounting the red cube forward of the mechanical fuel pump, which itself doesn’t cause errant readings and is the preferred mounting (mandated) location of the manufacturer. I’m mounting it on the cold side of the firewall since it’s way easier, safer (IMO) and besides the jumpy readings only during fuel boost pump ops –which has very minor, negligible affects on overall fuel usage data– works fine according to a large number of our RV building/flying brethren].
Here’s a shot of the fuel line traversing through the back seat bulkhead and connecting to the FT-60 Red Cube. Mounting the fuel line through the seat bulkhead this way of course required me to flare and terminate the fitting on the aft side, then after drilling the hole I had to then ensure I bent the tubing just right to intersect & mount to the pulsation damper before flaring and terminating the fitting on the forward side of the seat bulkhead.
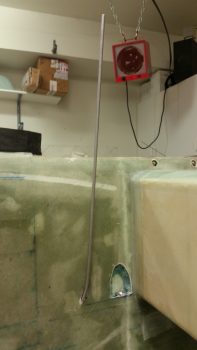
Here’s a shot of the FT-60 Red Cube fuel flow sensor. It’s hanging in space right now, but once I get a small order that I placed with ACS I’ll have the hardware to build & mount a bracket for it to attach to. I’ll note that one of the requirements for fuel flow OUT of the red cube is to have the fuel flow upwards (specifically, not “downwards”) to ensure no reading-deviating cavitation occurs. There should be 5-6″ of straight plumbing after the fuel exits the sensor, but many have reported that a 45° fitting has worked just fine. With this final location I may very well be able to use a straight fitting and obtain that desired 5-6″ straight line out. Either way, I think this configuration will be acceptable for good fuel flow sensor readings.
To prepare the left side sump accoutrements before proceeding with mounting the left armrest, I needed to mount the oil heat line reducer fittings in the fuel sump front wall left side extension. Since I may need to tweak or modify the oil heat configuration at some point in the future, I wanted these reducer fittings “hard” mounted, but not permanently, if you will. Thus, I used Silicone RTV to keep them in place, and slathered them up and set them in place in their respective mounting holes.
I then went to grab a bite to eat and run to the store while the RTV set up & cured.
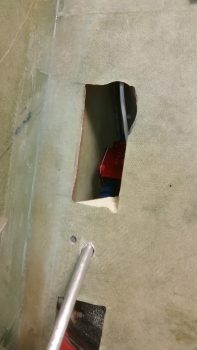
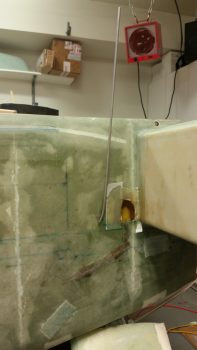
Upon returning home, I marked up the Vance Atkinson designed main tank fuel pickup port to be used in configurations where no external fuel sumps are employed. The other major design for this type of fuel pickup is from Ken Miller, who calls for a cigar tube shaped pickup that sticks out into the fuel tank right at the fuel tank floor level (both designs have the fuel tank floor foam removed in the immediate area of the fuel pickup port, with just glass-to-glass contact for better fuel flow into the pickup port). Since Ken’s design calls out for fittings to be used, I opted for the simpler and cleaner (again, IMO) design of Vance Atkinson’s — albeit, to be fair I could have used Ken’s design sans fittings, but obviously went the Atkinson route.
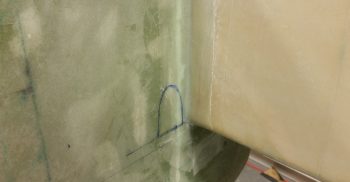
The design for the fuel pickup port, again, is pretty darn simple and straightforward. It calls for the glass and foam to be removed from the tank side into the sidewall until the interior fuselage glass is reached. Then a straight bottom “shelf” is created, with an “alcove” above it for fuel flow. I determined the top edge of the left fuel tank floor and then marked it. I then marked up the alcove portion of the left fuel inlet port.
I then spent a good 2 hours of sheer knuckle-busting, finger-slicing pain in getting the 1/2″ fuel line run from the internal side of fuselage up to the left fuel tank inlet/pickup port. I was then able to coax just enough of the fuel line out to flare it to create a nice pickup funnel affect.
Here’s the interior portion of the left main fuel tank to left fuel sump tank feed line.
I then went through a smaller version of the pain I experienced before to install the 1/4″ left fuel sump tank vent line from the main tank down to the sump.
Here’s a shot of the left 1/2″ main tank fuel feed to the left sump tank, the 1/4″ left fuel sump vent line, and the oil heat return line which I added a couple of layers of heat shrink to reduce any radiating heat affect.
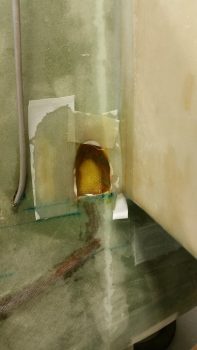
I sealed up the opening of the main fuel pickup tube at the main tank opening, then mixed up some more E-Z Poxy and made up some wet flox. Then, using a syringe, I slowly injected flox on all sides of the fuel pick up line. You can see the dark line where it filled in the spacing around the fuel feed tubing in the fuselage sidewall. BTW, this area will get covered with a ply of Kevlar to protect that fuel line from any sharp dings or blows to the external wall of the aircraft (as will the glass-to-glass bonds in the fuel pickup area of the main tank).
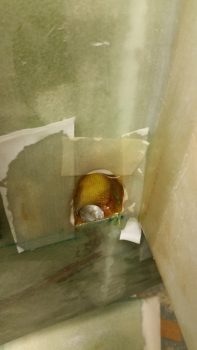
I then laid up 1 piece of Kevlar inside the alcove of the fuel pickup port, and then a ply of BID over the Kevlar, overlapping onto the fuselage (future fuel tank) sidewall. In the second pic you can see the fuel pickup tube after I floxed it in place and glassed the area in the alcove above it. I’m leaving the area around the fuel pickup tube raw flox for now since the exact elevation of the sidewall will need to be matched to the fuel pickup tube level. Moreover, in both pics you may note that I’ve placed the top of the fuel pickup tube around 0.25″ below the cutout line. This is to get the fuel pickup line close to what will be the level of the glass-to-glass floor of the main fuel tank.
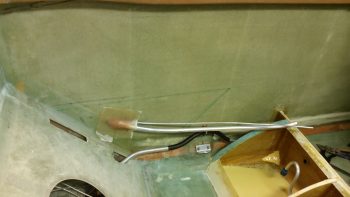
I then floxed around the inside entrance into the fuselage of the main left tank fuel feed and the sump fuel vent. After floxing these lines in place, I then laid up 1 ply of BID over the entrance hole.
Here’s a closer shot. I wanted to point out in the upper left of the pic that the external tank side fuel pickup port is just visible (note the yellowish area).
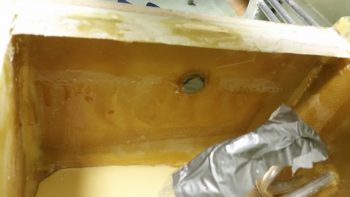
Finally, as the initial round of glassing on the left tank main fuel sump feed line & vent was complete, I then took a few minutes to pull the protective tape off the right low fuel sensor fitting that I floxed into the front wall of the right sump tank. I cleaned up the flox a bit before calling this fitting install good.
Tomorrow will be a light build day, especially with all the issues I had with getting this blog post actually on the books! I will be continuing working on the fuel sump and associated components until it’s pretty much completed.