
Today I started off by shutting off & pulling the heat lamps from the sump top interior layup post cure. I then slowly and carefully pulled all the weights off the top. I then carefully worked the top off of the lower sump walls and flipped it over to inspect it. All the glass was in good shape.
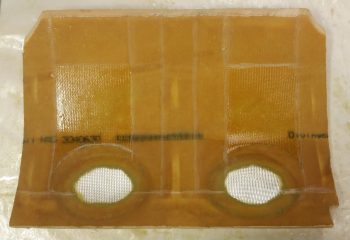
The only minor issue I had –unintended consequences– was that the BID that was securely in place in the “pockets” around each access hole separated off the foam surface slightly in a few areas. I’m thinking that in the depressions for each access hole, they probably pulled out just a hair in those few areas because I pulled the glass slightly taunt around the holes by weighing down the entire sump top foam plate with weights. No major worries. A bit more work and assessment, but still very workable.
I then proceeded the quite understated process of pulling peel ply, cleaning up the peel ply edges and trimming the glass overhanging the perimeter edges with the Fein saw. This entire endeavor took nearly an hour by itself! I left the glass in the access holes so that when I’m sanding and shaping the topside hole perimeters, the glass will serve as a “catch” to keep all the foam bits & dust from getting into the sump tanks.
After cleaning up the layup and trimming the overhanging edge glass, I then stuck the sump top back in place. I’m very pleased with the fit and all indications convey that it mates securely at every contact point along the top of each sump wall.
There is a slight unevenness to the top since the weight on the right side pushed the aft side of the right access hole down just a bit more than the left, maybe 1/8″. But with a bit of judicious sanding and when the top ply of Kevlar and BID are glassed into place, I think it will be barely noticeable, if at all. It certainly doesn’t have an operational impact on the sump.

Tomorrow I’ll continue my quest to get the sump top glassed into place, with the access ports’ nutplate rings floxed into place and the screw holes drilled out.