Unpacking Fuselage

Welcome to Germany!

Chapter 6 – Part Deux (… or zwei!)

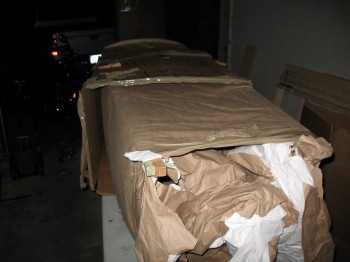
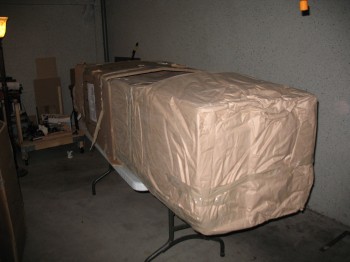
30 April 2012 —Today starts the actual unpacking of the boat, or shall I say, the fuselage.  Apparently my next door neighbors thought it would be cute to pull a fast one on me!  When talking in my garage/shop one day, they asked me what I was going identify this “thing” (said snidely) sitting in my garage that I was going to send over to Germany.   Well, a few weeks earlier I had seen on one of the blogs where a guy had shipped his fuselage as a “boat,” which I thought was pretty darn funny.  So I snarkily (it’s a habit of mine!) said, “a boat.”

Well, due to a scheduling SNAFU in Virginia, the movers had picked up my fuselage while I was at the firing range.  Luckily, my ‘trusty’ neighbors helped out with overseeing the movers pack my stuff.  Well, apparently they told the movers it was just, in fact, a boat.  What made it really funny was fast forward three months later in Germany when one of the guys unloading the truck asked me where I wanted my “boat.”  I thought his English was a little shaky!  After a few repeats, and a growingly impatient mover, I finally understood what he was saying and ran out to the moving truck to see them, in fact, lowering “a boat” out of the truck!  Well played my friends . . . well played!

The Fuselage BoatThe "Fragile Boat" :)

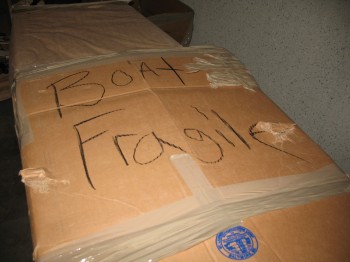
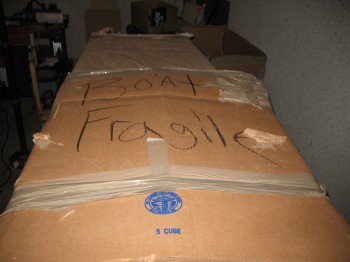
Pics of unpacking “the fragile boat”!!!

Unpacking the fuselage

Unpacking the fuselage (aka "boat")


Recent Posts

Project Update

Hey Guys,

I’m happy to report that I’m nearing the end of the final exhaust pipe configuration and installation: the left outboard (cylinder 3) exhaust pipe has been welded and I’ll now be rolling into trimming all the exhaust pipes to length.  Again, I’ll caveat the exhaust pipe effort with the fact that I may need some welding on the ends of these pipes to get them pointed in the right direction, but I’m of course hoping not.

The convergence of a few intertwined components I spoke of before is STILL slowly coming to fruition, which will set me up to be nearly done with the entire engine install, sans the firewall (at this time).  As the exhaust pipes saga nears its end, I’m also almost finished with laying up the CF engine inner baffles.  With these completed and installed, I can then finalize the aft lower side of the engine baffle install.  That will, in turn, allow me to identify where the bottom cowl cross rib baffle/stiffener needs to get glassed into place (got all that?! ha).

I’m still intent to focus solely on the plane for the next however long it takes to finish this bird… ASAP!  

  1. Chapter 23 – Inner baffles: final layups Leave a reply
  2. Chapter 23 – Exhaust pipes welded! Leave a reply
  3. Chapter 23 – Inner baffles… end is near! Leave a reply
  4. Chapter 23 – Cylinders 2 & 3 end baffles Leave a reply
  5. Chapter 23 – Inner baffles Round 3 Leave a reply
  6. Chapter 23 – Inner baffles Round 2 Leave a reply
  7. Chapter 23 – Final cowl clearance Leave a reply
  8. Chapter 23 – Inner Baffle Forms Leave a reply
  9. Chapter 23 – Right cowl wrap-up Leave a reply