
As the sump access ports’ floxed nutplate rings are still curing on the sump top, I figured it was time to get some other tasks completed in and around the GIB area. I started off in the sump itself by drilling a 1/4″ hole into the bed of micro in the left sump tank to mount a “roll-it-yourself” 4-40 countersunk stainless steel screw as a clickbond. This 4-40 screw post doesn’t have to be super strong and in many ways will serve as a guide to ensure proper Holley Hydramat positioning in the sump tank… if there actually is such a thing! I say this because with the hard mounted tubing, I don’t see the Hydramat straying off anywhere other than where it is supposed to be. But again, a 4-40 screw post will serve as a nice guide during the initial install and subsequent replacement of the Hydramats.
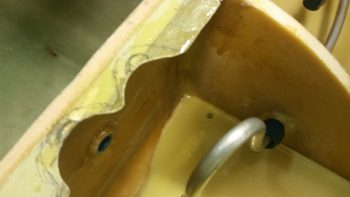
I then set the 4-40 countersunk stainless steel screw in place. It looked like a nice fit!

On the right side I couldn’t place the screw post (aka “clickbond”) near the center sump wall since the fuel line tubing going to the left sump is right over where it would need to go. I thought a few minutes about not putting in a screw post on the right side, but then figured if I put it near the drain valve, I doubt seriously if it’s going to block any water draining into that area.
However, since I wasn’t drilling down into the micro-contoured floor, the drain corner didn’t provide the depth I had counted on for the 3/4″ long screw. Standing on the bottom tank floor alone, it was just too tall. I punted and used a regular 1/2″ 4-40 stainless steel screw, but covered it with an upside down Tinnerman washer to help stabilize it once it was awash with wet flox and subsequently cured –along with a couple plies of BID over top of it.
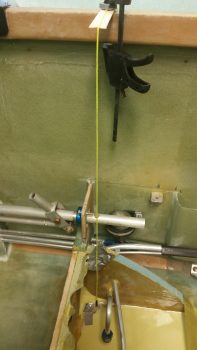
To get the normal screw to stand upright in space I simple taped it to a line, then clamped the line to a popsicle stick hanging off the top of the longeron like a diving board. I then 5-min glue the bottom of the screw, slightly adjusted the line where I wanted the screw and Voila! … the screw ended up exactly where I wanted it!
I then floxed in the 2 Holley Hydramat 4-40 corner screw posts, covered each one with some wet BID, and then peel plied them.
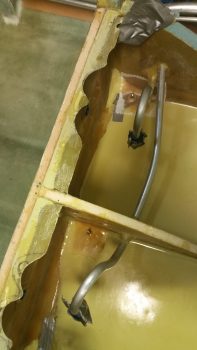
When I 5-min glued the 4-40 Hydramat screw post in the right sump tank, I also 5-min glued the remaining center area –top & bottom– of the piece of German “PVC” pipe that I’m using as my antenna channel cover.
After the 5-min glue cured, I then got to work mixing up some thick micro, slathered it on each side of the channel cover, and then laid up 1 ply of BID over top of that. Of course I peel plied it after I was done with the layup.
I then decided to take on one of the more challenging tasks on my list: the ram air inlet and expansion chamber for the oil heat system and fresh air intake. This ram air inlet will also serve to pressurize the cabin more to help offset the negative characteristic of Long-EZs to suck all the bad stuff (cold, rain, small reptiles, etc.) from the outside . . . as per Nick Ugolini who has compelling evidence that his findings work!
I made a bad assumption in thinking that the urethane foam I have on hand was 2.5″ thick, when in fact it is only 2″ thick. I had already confirmed with Nick that instead of a 3″ round diameter expansion chamber, that I would be making mine more oblong, or oval, shaped to save some room in the RHS baggage area. I had planned on making it 3.6″ high x 2.4″ wide. Well, I ended making the expansion chamber just a hair longer since that was the only dimension I could control with this foam, to still come up with approximately the same volume as I would have before.
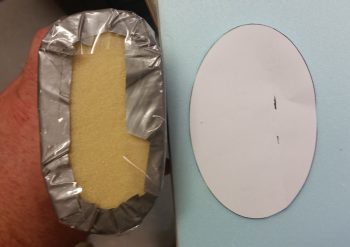
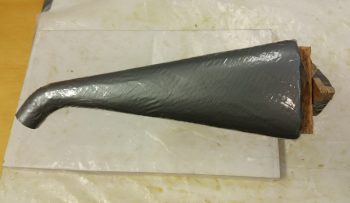
I then shaped the curved inlet and expansion chamber out of the urethane foam.

After finalizing its shape, I then covered it with duct tape first, then with clear packing tape.
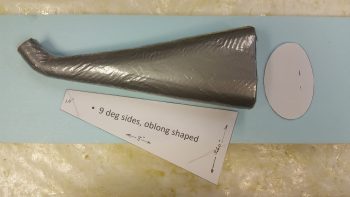
Here’s a general look at how it stacks up with my planned shape.
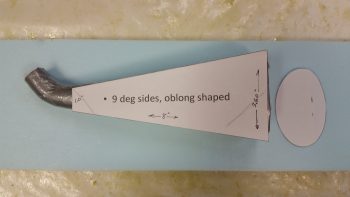
As you can see, the cross section turned out to be a bit more square than I had originally planned (Hmmm, I wonder if Burt ever had this thought cross his mind about the fuselage he designed . . . ha!). Again, to make up for some of the 0.4″ in width that I lost due to the urethane foam block width.
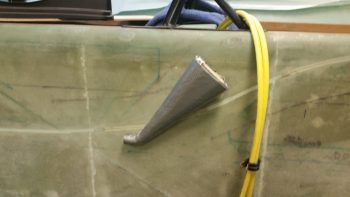
I then very quickly mocked it up on the sidewall to see how it looked.
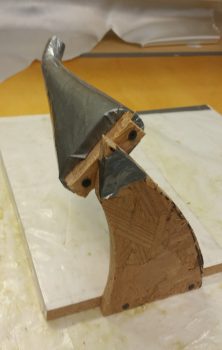
I then also quickly made up a glassing spit for the ram air inlet & expansion chamber.
Here’s a better shot of the glassing spit. If you’re thinking that I got really fancy with my upright (I know you’re not!), it might look familiar: it’s one of the sump test ribs that I cut out of OSB plywood.
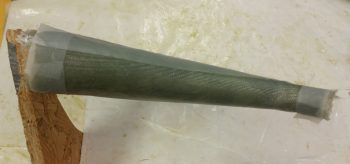
I have to admit I failed in my layup goal here. Except for a reinforcement ply of BID at the front and the back for interface strength with other upcoming duct pieces, I was going to use spare UNI for the entire layup since I have a ton of it laying around.
Ugh!
I couldn’t do it…. what a royal pain that stuff is trying to go around any smallish curves. I did got a couple of plies on, but the small front 1″ opening was going all wonky on me and after fighting off the attack of the killer strings for over half an hour, I finally threw up my hands and magically one of them landed on a piece of BID . . . A SIGN! ha!
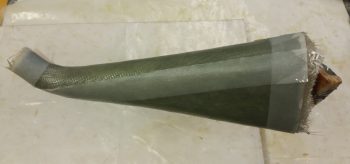
Ah, laying up a ply of BID after fighting UNI is like eating real butter! Smooth & silky! Anyway, I added a final ply of BID, peel plied the ends and the seam down the side and called it a night.
Mission complete. Tomorrow I won’t get much done. Out of town visitor flying through to fly out, then a birthday party after that . . . busy, busy! I will continue to work on both the sump and the GIB area stuff for a few days before heading north, or forward, to the pilot’s seat area.