Chapter 23 – Lord of the Mounts

Just a quick update.  Today I went back to my required items list for my engine and decided to finally pull the trigger on the Lord Engine Mounts/Vibration Isolators.   These are used in-between the actual motor attach points and the Dynafocal engine mount.  This specific model #J7402-24 is called out for Long-EZs and Cozy’s since it provides better vibration isolation at engine start-up and power down.

Chap 23 - Lord Engine Mount


Chapter 22 – ADS-B IN Receiver

I have to say that in addition to Insight, the company that makes the Strike Finder, I’m so far quite impressed with the folks at Radenna who offer a line of SkyRadar ADS-B Receivers.  Back in early January when I purchased their latest ADS-B receiver, the SkyRadar-DX, they stated they would be shipping on March 20th, and they did exactly that!

The DX model is different from the previous SkyRadar ADS-B receiver models in that it offers WiFi (Apple, Windows & Android compatible) with attitude indicator (PFD) information displayed over the WiFi channel.  Of course the standard ADS-B info, traffic and NEXRAD weather, is transmitted to wireless devices as well.  Like the SkyRadar-D, one nice thing about this unit is that it receives both 978 and 1090 MHz signals.

The wireless is a bonus since the primary operation of this system will be via a USB connection between the ADS-B receiver and the GRT EFIS, so all ADS-B info will be available on the EFIS screen.

Also, remember that the ADS-B receiver is only one half of the ADS-B equation, in that to fully utilize all that ADS-B has to offer a Mode-S transponder must be used as well.  I’ll be using Trig’s TT-22 mode-S transponder that will be remotely mounted behind the panel and controlled through either of my GRT displays.

So without further ado, here are some pics of my new ADS-B Receiver.

Chap 22 - SkyRadar-DX ADS-B ReceiverChap 22 - Radenna Dual-channel ADS-B ReceiverChap 22 - SkyRadar-DX ADS-B ReceiverChap 22 - SkyRadar ADS-B Antennas & GPS PuckChap 22 - SkyRadar ADS-B Antennas & GPS Puck

To watch a short YouTube video showing the setup of the SkyRadar-DX ADS-B Receiver click here.
For a longer 10 min video showing the moving map & traffic features click here.
To see the SkyRadar NEXRAD weather in action check out the short video below:


Chapter 22 – Fuel Fume Detector

I got the idea for installing a fuel fume detector from the RV guys over on the VAF forums. It makes sense to me especially in a plastic airplane like the Long-EZ where almost the entire fuel system resides in or around the cockpit.  I definitely want to know if I have any hint of a fuel leak as soon as absolutely possible.

There doesn’t seem to be many fuel vapor sensors out there on the market, and a few of the RV flyers swore by the Xintex Fireboy Fuel Fume Detector.  Now, these are actually sensors used in the boating community to sense any problems in their engine compartments.  So I bought one off a guy who recently installed it in his boat, but then decided to swap his boat engine out with a diesel motor.  Thus, I was able to get it much cheaper than what they sell for at the normal boat supply retailers.

The pics below show the control head face, the vapor sensor and the connecting cable between the two:

Chap 22 - Xintex Fuel Fume Detector

Chap 22 - Fuel Fume Detector SensorChap 22 - Fuel Fume Detector CableYou’ve probably noticed this on my instrument panel pictures.  I’m not sure if I’ll actually mount it on the actual panel or not, but I normally mock it up to see if I will have space for it if I do decide to panel mount it.


Chapter 22 – Strike Finder Update

I received the Strike Finder system back from Insight after they upgraded the display to a bright LED one.  Quite a contrast (literally) from the old style plasma display.  They also did a complete checkout of the system, including both the control head and the sensor.  In addition, I had them throw in a new cable that links the control head to the sensor.

Chap 22 - Strike Finder

Note in the picture below all the re-certification documents for the individual components.

Chap 22 - Strike Finder

I have to say that the folks at Insight are a great group of people that are both extremely pleasant and very helpful to work with.  They explained everything in depth, laying out all my options in a very clear and detailed manner.   I am very impressed with this company.


Chapter 22 – More Instrument Panel

Thought I’d show a couple more of my Instrument Panel machinations.  The first one below shows the real deal with the iPad Mini fired up with FlyQ EFB from AOPA, and my Android phone with the GRT app showing the Bluetooth wireless COM radio control function.

Chap 22 - Instrument PanelThe next picture shows my throwing the big 10.4″ HXr screen PFD back onto the panel to assess how it will fit.  A number of other items are on the panel to see if they fit, not necessarily in the location they’ll end up.  I also swapped out the Garmin GNS430W with the Garmin GTN650 (my actual panel is about 0.7″ higher than this one at the top middle, so even thought it looks like I’ve run out room, there still some more wiggle room left up along the top curve).

Chap 22 - Instrument Panel


Chapter 22 – Instrument Panel

Along with my recent acquisition of the Insight Strike Finder, I threw together a quick updated mockup of my instrument panel.  I realize it looks a little busy, and I think that’s at least due in part to both my Android phone (Left side of panel) and iPad Mini (Lower center panel) screens not showing aviation related info.  The Android phone will connect to the GRT system via Bluetooth and will display engine instrument data.  The iPad Mini will display an electronic flight book like Foreflight or FlyQ EFB.  Also, the switches are displayed with white strips of paper for spacing, when of course they will be mounted in normal fashion with standard aircraft style labels.

So, with that, here is the latest version of my instrument panel:

Chap 22 - Instrument Panel


Chapter 22 – Strike Finder

After reviewing my intended mission profile and realizing that using the Long-EZ’s range in traversing the US–meaning midwest thunderstorms–as well as flying up and down the mid-Atlantic region with its inherent summer thunderstorms, for safety and increased comfort factor I wanted some form of real-time lightning detection capability… above and beyond NEXRAD weather.  I researched out the various lightning detection systems, and decided that I would like to install either a Stormscope or an Insight Strike Finder.

Chap 22 - Strike Finder

I found an older Strike Finder on eBay and decided it was worth purchasing.  Although it was an older model, I had pre-coordinated with Insight Avionics to check out and upgrade the unit to an Ultra Bright LED display.  This upgrade replaces the face of the instrument so that not only is the display much more readable and reliable, but the the entire instrument face is brand new.

Chap 22 - Strike Finder Sensor

I was able to buy both the control head and the sensor unit (antenna) as well.  I shipped the control head and sensor off to Insight where they provided a sensor cable, and checked out the unit.  After the control head & sensor units checked out fine, the Insight techs upgraded the display to the Ultra Bright LED.

Here’s the actual unit (before upgrade) shown below:

Chap 22 - Strike FinderChap 22 - Strike Finder

Here’s a description of Strike Finder’s capabilities from the Aircraft Spruce site:

The STRIKE FINDER® Digital Weather Avoidance System detects and analyzes the electrical activity emanating from thunderstorms within a 200 nautical mile (nm) radius of the aircraft. A unique graphic display plots an accurate, reliable and easily-interpreted picture of electrical activity that you can use to circumnavigate the hazards associated with thunderstorms.

The STRIKE FINDER® System analyzes the individual strike signal properties to determine the bearing, range and severity of the activity. Strike data is plotted on the display as single orange dots by range and azimuth, in relation to the aircraft symbol (“heads up”). As the number of lightning strikes increase, so does the number of plotted strike dots. Cells start to form indicating increased lightning activity.


Chapter 23 – Cold Air Induction Sump

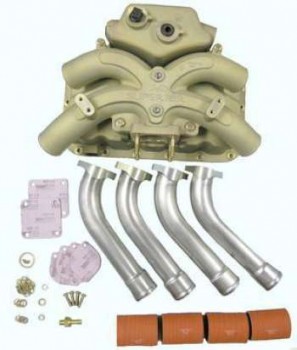
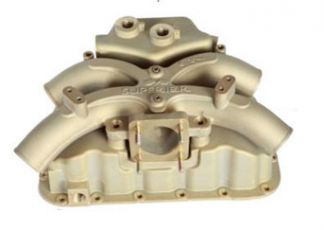
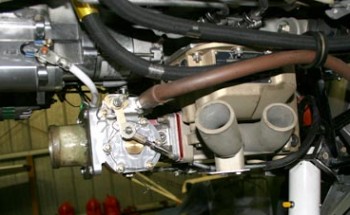
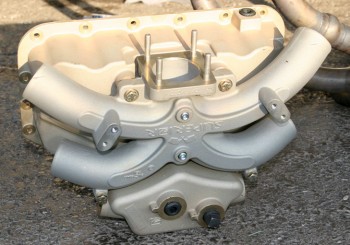
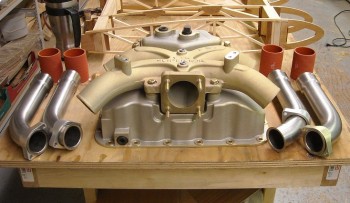
Today I sent a check off to my engine builder, Tom Schwietz, at Aero Engines for a Superior Cold Air Induction Sump Kit.  I have been doing a ton of research on my cold air induction system over the past few weeks, and finally decided to go with Superior over the Sky Dynamics cold air induction system [Note: None of the pics below are of my particular set-up, but merely included as representative of the Superior cold air sump system].

Chap 23 - Superior Cold Air Sump

Why Superior?  Cost and size.  Ok, there’s no doubt, in my mind at least, that Sky Dynamics’ cold air sump is the best cold air sump for a Lycoming that money can buy. This makes sense, since the Red Bull Air Racing team uses this system on their race planes.  But although the Sky Dynamics is the best that money can buy (again, my opinion), it takes a whole lot more money to acquire this system than it does the Superior cold air system.  The Superior system works well enough for what I need it to (more on that below) and is about $2000 cheaper, which of course is money that can be used to acquire other cool airplane stuff.  Also, even though Superior is about 3 lbs heavier than the Sky Dynamics, it is still about 6-7 lbs lighter than the original Lycoming vertical oil sump.

Now, why not ECi’s cold air induction?  ECi makes a great, lightweight magnesium cold air induction sump, but the two main issues with the ECi have to do with shape and configuration.  First, the shape of the oil sump is much like the original Lycoming cold air induction sump in that it has “wings” that stick out on both the right & left side of the oil sump.  These “wings” probably aren’t an issue in a normal downdraft cooled tractor airplane like an RV or Glastar, but for an updraft cooled pusher I want as much unimpeded airflow up through the cylinders as possible.  Unfortunately, ECi’s oil sump “wings” sit in the path of cylinder cooling airflow.  Next, the configuration of the cold air plenum sits farther forward on a tractor configuration than both the Sky Dynamics and Superior cold air sumps.  On a pusher canard, this of course means the cold air intake plenum, and thus the fuel injection servo, are situated farther aft… and in such a tight cowling as on the Long-EZ, space is a premium.  Especially when I’m going to have to do a near 180° U-turn on my intake ducting to bring air into the rear-facing fuel injection servo. So above are the primary reasons that I eliminated ECi from consideration.

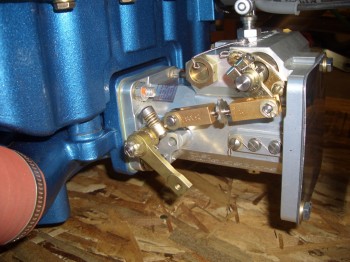
As for the positioning of the fuel injection servo as it’s mounted to the cold air plenum, the Superior has the best (farthest forward in a pusher configuration) of the cold air induction systems I assessed.  As you can see in the pics below, on the Superior the fuel injection servo is pretty much mounted in line parallel with the aft edge of the oil sump, unlike either the ECi or Sky Dynamics sumps.  As I mentioned above, this provides more room in the aft end of the cowling for not only routing the intake air duct, but clearance between the fuel injection servo and both the alternator and starter.

Chap 23 - Superior Cold Air Sump

Chap 23 - Superior Cold Air SumpChap 23 - Superior Cold Air Sump

Now the intake plenum on the Superior is significantly smaller than both the ECi and Sky Dynamics plenums, but still, the reviews on the Superior Cold Air Sump are pretty darn good.

Chap 23 - Superior Cold Air Sump

One other distinguishing feature on the Superior sump is the robustness of the fuel injection servo mount.  The Sky Dynamics requires extra mounting brackets to secure the servo since the cantilevered weight of the servo would prove too much for the mounting interface.

Chap 23 - Superior Induction Sump

Finally, after reading some discussions on the advantages of cold air induction–or lack thereof–from R. Mahlon and Rod Bower, I seriously considered giving up my goal on cold air induction and simply going with the standard Lycoming vertical oil sump.  The problem with a regular oil sump though is weight.  Going with a cold air induction sump actually saves a good amount of weight, if nothing else.  Moreover, the normally accepted value for increase in horsepower using cold air induction vs. a vertical oil sump is 5-7 HP.  If I can gain even half of that while saving weight, I’ll still be happy with the system.

Chap 23 - Superior Cold Air Sump Kit