Engine Jack

I picked up an engine jack from Harbor Freight on sale and have had it assembled for a couple of months now.  I haven’t stored it away since I noticed when I first jacked up the crane arm that after returning a few hours later it was not in the up position but was actually resting in the down position touching the garage floor.

Engine Jack

Since the past week I’ve been focused on finalizing the organization of the garage shop, and set about to figure out what was going on with my engine crane.  The plan is once I get the engine crane working correctly I can fold it up and get it stowed out of the way.  I pulled the user manual out and watched a couple of videos to figure out the fix actions.

I bought a bottle of hydraulic oil to add to the hydraulic jack after multiple attempts to bleed out all the excess air clearly didn’t work.  Apparently, the jack was dry since I dumped an entire bottle of hydraulic oil into it.

Engine Jack Juice

So, now I’m able to jack up a significantly heavy load with a very, very slow crane arm descent rate.  After a couple more times of bleeding out air, if the crane arm doesn’t hold its elevation, then I’ll add some more “Jack Juice.”

Engine Jack Level

Getting there . . . parts depot

Well, while I’m sure reading about what seems to be perpetual shop prep is not  overly exciting, believe me it’s a long slog to stay motivated to get this shop prepped.  But I’m very close to getting to the point where I can start building.

I realized that I needed two things to be able to work effectively in this shop: a storage shelf for EZ specific parts and an epoxy mixing station.

So I picked up some shelves at Lowe’s and installed them.  Since I had some white lettering I couldn’t resist labeling my “parts depot” late in the evening after putting the shelves together.

More Storage

Once I had the shelving unit in place, I assembled the epoxy mixing station, cut the shelves for it (since I dumped/burned all my wood pieces in Germany) and put it into position.

Epoxy Station

While I was organizing all my building materials, over the last few days I’ve also accomplished a near 100% inventory of parts, pieces, components and hardware.  It’s been literally years since I’ve had all my building stuff in one place, so I spent hours consolidating my hardware and electrical components into their appropriate storage bins (which I also mounted).

Parts Storage

More power!!!

With cold winter weather continuing and temps consistently dipping down into the 20’s (F) I clearly needed to heat the garage before I could start building again.  I did some research and ended up buying two heaters from Northern Tools.

The first heater is a 120 volt ceiling mounted heater that I positioned towards the large door side of the garage.  I quickly realized that with such a hot heat source blazing away at the front corner of the garage, that I had to have some type of cutoff switch to keep the garage door from being able to be opened . . .  lest I end up with a scorched garage door as it would sit–when opened–just a foot or so below a very hot heater.

I installed a box to the side of the garage door opener with plugs for both the heater and the garage door, and an either/or switch that allows only the heater or the garage door to be powered at any one time.  This solved the potential issue of frying my garage door paint and/or a possible fire.

Heater Switch

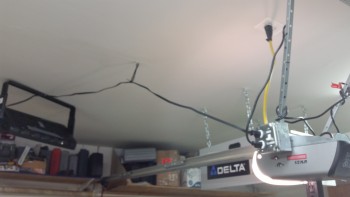
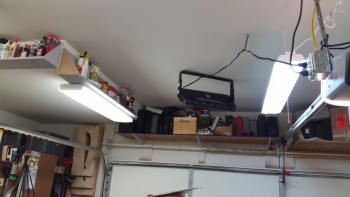
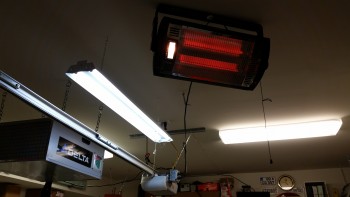
While I had the ladder positioned to install the heater and switch, I went ahead and installed a hanging light bar to add some much needed light to the front of the garage.

Shop Heater

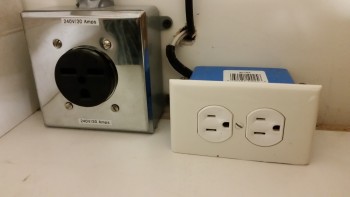
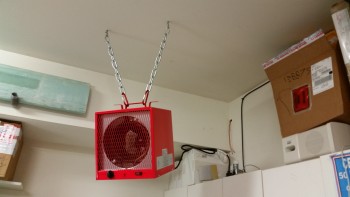
After the front of the garage heater was installed, I turned my sights on the second mo-jamma heater I received from Northern Tools: Big Red!  The issue with Big Red was power since it required a 240 volt / 30 amp circuit, which I didn’t have in the garage. Behind the back wall of the garage sits an HVAC/utility room and a half bathroom.  Behind that is a billiards room, with the electrical junction box on the back wall in the corner.

Thus, to use “Big Red” I needed to run a heavy 10 ga cable from the electrical box to the back wall of the garage.  I should add that this new cable run would allow me to use the 240V/30Amp plug for my TIG & MIG welders in addition to “Big Red.”

I decided the best way to run the cable from the electrical box to the garage was behind the crown molding that I had put up in the pool room.  Since I will pull this circuit when I eventually sell this house, I’m not concerned about someone discovering this cable run by accident.  So, I started by pulling down a piece of crown molding to get access to both run the wire cable forward to the garage and down behind the wall into the electrical box.

Wire Run

It was quite a pain to run the line behind the crown molding, but through trial, error, blood, sweat, tears and some cussing, I eventually got it.  While I was running the 10 ga cable I went ahead and ran a 14 ga 120V/15amp line as well to have a plug on top of my cabinets.

Added Power

Here’s a pic of Big Red installed!

Big Shop Heater

After I got Big Red installed, I grabbed a light bar from my old shop at the other house to add the final light coverage I could really use at the front of the garage.  Here’s a pic of the installed light bar (on the left) below.

More Light

Dritz Electric Scissors

I’ve been working on my Dritz electric scissors over the past week along with everything else.  I charged the battery as soon as I unpacked the kit, but when I installed the battery and tested out the scissor the blades were jammed & not moving.  They were definitely trying, but clearly something was restraining the scissor action.  Well, after disassembling the nose of the scissor, which requires taking apart the entire handle, I found a whole lot of corrosion inside the nose on the scissor blade assemblies.

I sprayed it down with WD-40 and hit it with a soft wire brush, and repeated this every couple of days for about a week. Finally, I was able to remove all the corrosion and get the scissor set back together.  When I tested the scissors, they worked as well as the first time I pulled them out of the box and used them!

Dritz Scissors

Epoxy Hot Box

I finally finished the epoxy hot box.  I wired the two heating lights through a regular light switch that plugs into the wall.  Also, I finished hot wire cutting the Styrofoam insulation tiles & installing them.

Epoxy Hot Box

After finishing the hot box, I installed a 75 watt light bulb in the bottom bay and a 40 watt bulb in the top bay.  After firing it up, I quickly realized that the insulation was working as advertised… it may have been working a little too well.  The hot box quickly shot up over 125° F.

Over the last few days, I tweaked the bulb strength to dial in the temp between ~90-100° F.  The box is so well insulated, that I finally ended up with ONE 7.5 watt bulb in the bottom bay and the box stays right around 100° F.