Chapter 22 – Instrument panel finished

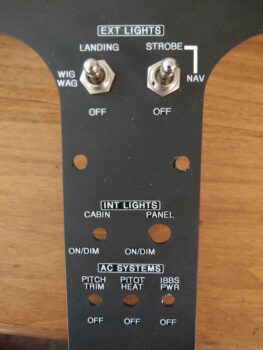
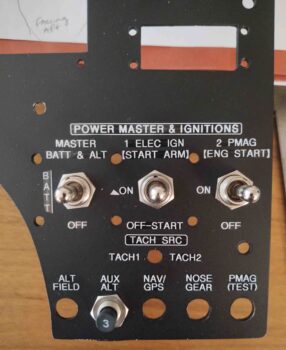
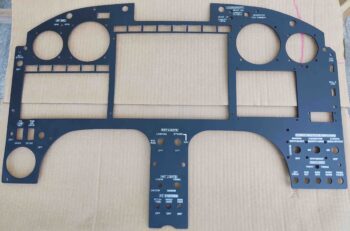
Today I spent a good number of hours, up until late afternoon, in finishing up the labeling of the instrument panel.

I then did a final clean and check of both panel and labels before clear coating it.

I started by “misting” the panel, specifically the labels, to get them prepared to receive a normal medium application of clear coat.  After a couple of rounds of misting, with about 10-15 wait time in between each coat, I then hit it with 2 medium coats of clear.

I waited a good 6-7 hours until the clear coat had cured to the point it could be handled normally, and then installed it into the panel.  I then spent nearly another 3 hours populating the panel with switches, avionics, components, etc.

Again, the labeling isn’t perfect, but I’m very happy with it and it definitely supports my “Industrial Chic” aircraft interior design . . . ha!

Tomorrow I plan on making a video covering both the just-completed instrument panel and the just-completed aft nose/avionics cover, which includes the finished elevator fairings.

Chapter 11/13/22 – Fairings complete

Today I started off pulling the peel ply and razor trimming the glass on the elevator fairings outboard face 1-ply BID layups.

I then test fitted the elevator fairings –as part of the aft nose/avionics cover– in place.  The right inboard TE of the canard needed just a bit of trimming for the cover to fit back into place, but after 30 seconds of judicious sanding it all fit.

I have to say I’m extremely pleased with the appearance and fit of these elevator fairings.  Obviously it’s a big relief to have these off the To-Do list!


Here’s a shot of the underside of the elevators and fairings.


It may seem like much, but I then spent the rest of the day and most of the evening painstakingly working on labeling on the instrument panel.  Although I use masking tape to align and level my labels, it really does take quite a bit of time to get all these labels aligned, straight, even, etc. so they don’t look too heinous.

Although I did spend an amazing number of hours applying these labels, I think I would have also spent a lot of time ginning all this up into CAD if I had someone else create some type of peel ‘n stick sheets, or silkscreened it, etc.  And as I mentioned before, although I want my panel to look as professional and nice as possible I really am shooting for the functional 80-90% solution here.

Tomorrow I plan on finishing up labeling the panel, and then I’ll clear coat it.

Chapter 11/13 – Fairings final glass

I started off today by shaping and prepping the front edges of the elevator fairings for glass.  This required a fair amount of edge work to create the flox corners, which in large measure is honestly what mostly holds these fairings together.

I then whipped up some flox and slathered it into the flox corners.  I waited a good hour for it to firm up before laying up 2 plies of BID on each respective front face.  I then peel plied the layups.

Previously I added 2 plies of BID to the left elevator fairing securing nub –which I subsequently trimmed and re-drilled the hole– and on the right side I added 3 plies of BID.  Both these glass additions were to better seat the CAMLOC stud.

I trimmed the glass on the right side, except I did not re-drill the hole.  I needed to move the entire hole outboard about 1/16″ so I scuffed up the glass on the bottom of the hole with a scribe and then filled it with flox.  I then peel plied it and left it to cure.

I had some epoxy left over, and hate to waste it, so I added a reinforcement ply of BID to the back side of the over-HXr row of Korey lights. These mounting holes need as much reinforcement as they can get, so I thought this would be a good addition.  I then peel plied the layup.

While all my composite tasks cured, I then went outside and finished up building my fuselage dolly (#2) for supporting the plane while its inverted… for the bottom strake glassing, etc.

Later in the evening I marked and re-drilled the hole in the right elevator fairing securing nub, although I think my larger bits tended to track back into the original hole.  So instead of getting my desired 1/16″ shift outboard, I think I got more like 1/32″… oh, well.

Although I failed to grab pics of it, I then laid up a ply of BID on the outboard face of the elevator fairings, replete with flox corners and peel ply.  I’ll grab a shot of those of course tomorrow.