Chap 8 – Headrest

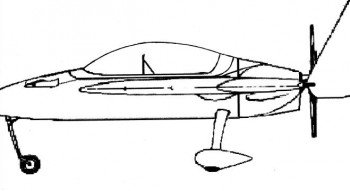
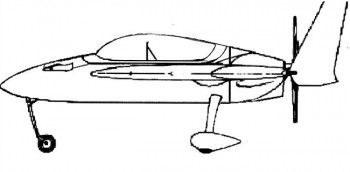
Ok, I of course could have simply titled this “rollover assembly,” but the fact is I will have both: a rollover assembly for safety, which is essentially a 4130 steel roll bar, and also a headrest akin to the plan’s style headrest of years yore.  However, the distinct difference is that my headrest will be as minimal as possible and allow as much clearance for the GIB’s unabated view as possible.

Why a headrest?  There are 3 primary reasons I’m looking to incorporate a headrest into my rollover design scheme.  I would say that the following list is actually in reverse order of importance:

1) Obviously the name: headrest.  Not that I’ll be pulling so many excessive G’s so often that I’ll need a headrest, but I think it’s good to have one… especially when you need/want one.

2) Storage.  In a small plane like the Long-EZ, you need all the storage you can get.  Think of this headrest as a narrow tall box that is hinged at the top.  In it will go the many things required for preflight and ground ops like a fuel sampler, rags, tie-down lines, mini-chocks, flight control gust locks/pins, etc.

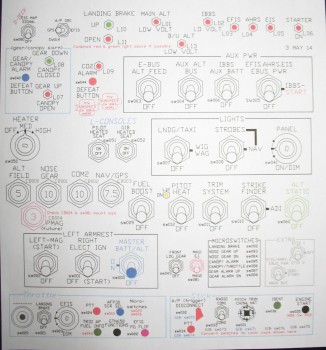
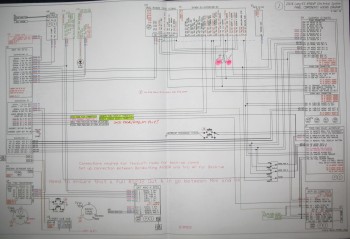
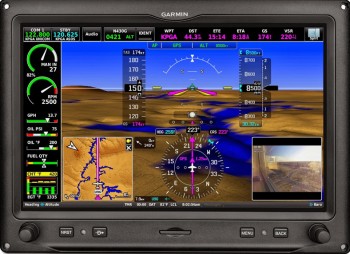
3) The Garmin GTN650 WAAS GPS stand.  If you’ve happened to have installed a Garmin GTN650 recently, or simply read the installation manual, you will have noted that to reach the appropriate resistance (1.5-6 ohms) on the coax cable connecting the GPS antenna to the GTN650 head unit requires a cable length of 6.5 feet.  Well, interestingly enough a cable run of 6.5 feet is spot on between the back of the GTN650 and the top of my headrest tower.  In addition, the farther away it is from any electrical devices, the better.

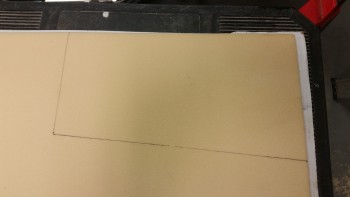
A week or so back I measured the distance between the top of the longerons and the inside top of the canopy in the general position that I’ll have the canopy.  With over 17″ of clearance for a rollbar, I figured I would go no higher than 15″, so I drew up a quick diagram noting all this.

Fast forward to this afternoon when I pulled out the Plans and discovered that Burt’s original triangular composite rollover assembly is 12.7 inches tall.  I took note of this since in order to save space, and maximize the view of the GIB, I really want to be in the general ballbark of the height of the plan’s rollover.  For safety I of course want it taller than my noggin, but only as tall as it has to be, no more.

With the plan’s rollover assembly dimensions in hand, I started designing my version of the headrest.  One set of dimensions that I knew right off the top was those for the WAAS GPS Antenna: approx 4-3/4″ x 3″.  This clearly is no compact antenna.

I had two simple overarching goals for the headrest:  shorter & narrower then the plan’s version.  I succeeded in meeting those goals …. sort of.  My headrest tower is definitely shorter, but the top is clearly bigger since there’s a robust GPS antenna living up there. The base is significantly narrower, and even tapers narrower moving aft.  With that being said, since I had 15″ of clearance, I started with an orginal height of 13-1/2″, about 3/4″ taller than the plan’s version.  Of course I suspected I would shorten the model, but I wanted to see how it looked… and it’s always easier to remove material than to add.

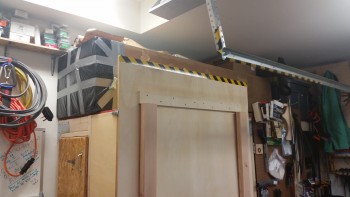
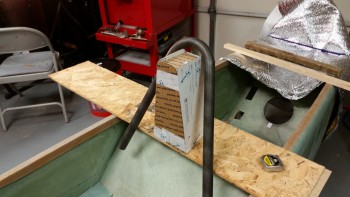
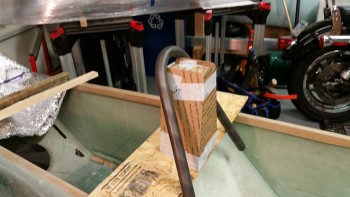
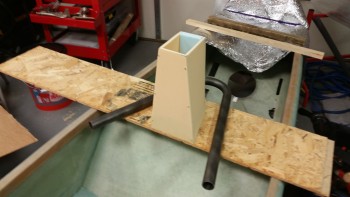
Here’s the initial cardboard mock-up of my headrest.

Headrest Mod

Headrest Mod

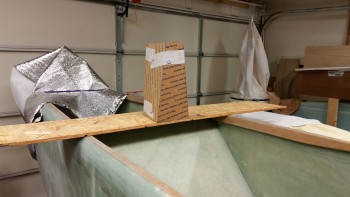
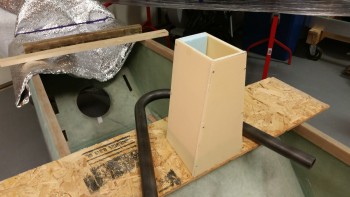
Without reference it looked rather tall.  I eventually whittled it down to about 11″, but then realized I needed to judge its height with it under canopy.  So I put the canopy over the 11-inch version if the headrest.

Headrest Mod

Moreover, I thought it might be a good idea that before I start glassing I should see how it relates TO MY HEAD.  Since it will be, in fact, a headrest.  The grand payback when incorporating any mod is of course time . . .  and pain.  So, using some simple risk management and avoid me toppling over inside the fuselage 3′ in the air, I needed to put it on the ground.  Thus, half an hour later I climbed inside to see how big my noggin really is! ha!

Headrest design

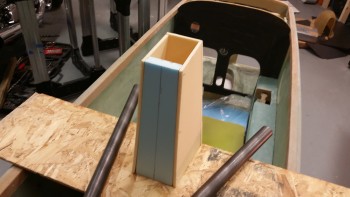
After messing about and playing the “I’m this tall” game with my hand against the top of my head going backwards (yes, I put the foam seat pad in place) I concluded that 11″ was just a tad too short [probably the perfect height would 12.7″… eh?!] and decided to add another 0.8″.  Thus, my final height for the headrest is 11.8″ tall (0.9″ shorter than stock, but wider at the top), and 5.8″ wide at the base (vs 8.4″ wide stock) and 5.8″ deep (vs 4.5″ deep stock).

To really get an idea of the height, I Googled some pictures of the Long-EZ’s rollover assembly and watched a few YouTube videos to get a good mental baseline picture before I went final with the dimensions.

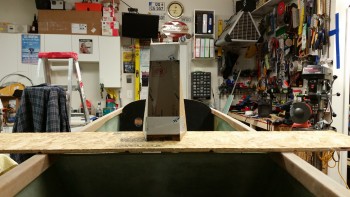
Also, to check out the very general appearance of my aft-leaning rollover bar that will encircle the rear top edge of the headrest, I balanced the rollover bar on the headrest mock-up.

General fitGeneral Fit

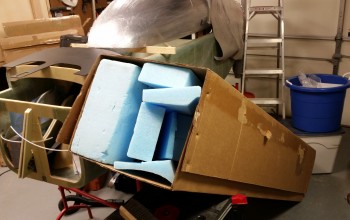
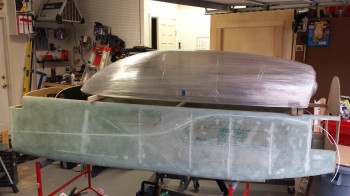
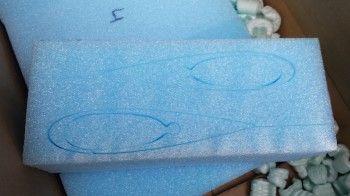
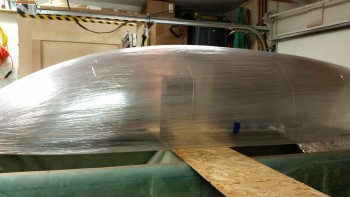
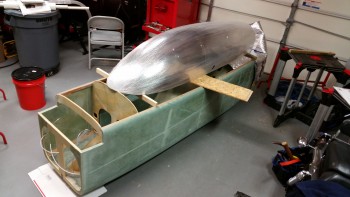
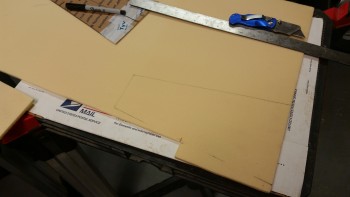
Satisfied, I then started cutting out the foam for the headrest.  The front & sides will be 1/4″ thick foam while the rear will be 3/4″ foam, so that I can have much larger radiused corners at the back for a more “flowing” look:

Headrest FoamHeadrest foamHeadrest Foam

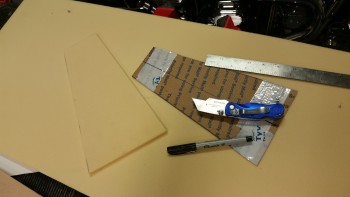
And here’s how the foam pieces looked when I pinned all the bits together with small nails:

Headrest foam mock-upHeadrest foam mock-upHeadrest foam mock-up

And lest we not forgot one of the main reasons for this exercise:

GTN650 WAAS GPS Antenna

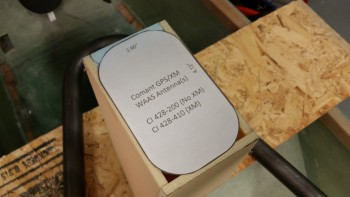
A tight fit, yes, but I wanted to keep the top as narrow & small as possible.

I’m pretty happy with this headrest.  It will get the WAAS GPS antenna up where it needs to be, provide much needed storage and with the taper I have set I have a great view of the fuel site gauges and it it minimizes the view obstruction for the GIB.


Back to it … baby steps!

Sorry, but I don’t have any pics to load just yet, but I quickly knocked out a few items on my list that I thought were important to complete in order to establish some data points:

#1 – Elevator weigh-in.  As Canardians and canard builders know, elevator weight and balance is critical.  I established a baseline weight for both my elevators since when I followed the plans method of glassing them, the heat of the curing bondo used to hold the bottom of the elevators in place caused glass-foam delaminations exactly where each blob of bondo was placed.  There’s a great work-around using aluminum duct tape that’s spelled out in a CSA newsletter, but unfortunately the issue with that helpful tidbit came out well AFTER I built my elevators. Besides getting a general idea of each elevator’s weight, the baseline will let me know how much epoxy weight was added after I inject each delam area with epoxy.  If too heavy, I may end up having to rebuild new elevators.

#2 – Fuselage straight & true.  Another issue I wanted to get the skinny on was exactly how straight and true my fuselage is, since I know that I didn’t get it exactly right when I glassed the bulkheads into the fuselage sides.  I still  have to diagram it all out, but although not ecstatic that it was off to any degree, I was relieved to find out that no measurements were off by more than a 1/10th of an inch.  Not great, but definitely workable.

#3 – Landing & Taxi Light Test.  I also grabbed my LED landing and taxi lights, and quickly connected them up to a 12V battery to ensure that they all worked, first off, and to also get a good idea of the light strength and beam pattern of each respective light.  I have to say that I was quite impressed with the lights and I will definitely move forward with my designed electrical plan for the landing and taxi lights.

Final Shop Prep

I am very close to the point where everything is organized, functional and operational to begin building.  The major issue I have is storage.  As I mentioned before, my other townhouse in Virginia has a 10’x10′ bumpout in the downstairs area that I used as extra storage, and what really helped was that I also built a large shed in the back yard that held a ton of tools and equipment.

Ok, back to here.  I have a pool table in a room just beyond the garage, which until tonight was covered in a myriad of pieces of blue wing foam, all different shapes and sizes.  Well, I consolidated as much of the pieces that are less likely to be used in the immediate upcoming steps that require blue foam (i.e. canard tips & nose construction) and stuffed them into the box that I just received the new canopy in from Todd Silver.

Blue Foam Storage

The foam I was able to cram into the repurposed canopy box is about half of the blue wing foam that I have, and since this stuff is not cheap to buy, and especially not cheap to ship, then I will keep as much of it as I can on hand until I’m done building this bird.

Once I got it all situated, I covered the end of the box with a doubled up garbage bag, and taped ‘er up.  Then this gargantuan box went up on the top shelf over the epoxy box & glass storage cabinet.

Blue Foam Box

I still  have some room in front and top of the box to store stuff as well.  The rest of the blue foam went into the garage closet that is situated about 4′ in front of the epoxy hot box, so off to the left in the pic above.

Also, to get ready for glassing I wanted to clean up the respirator masks that I use when working the MGS hardener and mixing up batches of epoxy.  Last night I dumped the respirators into the sink in some hot soapy water to let them soak overnight.  Luckily I had two sets of new filters on hand so I swapped those out and now my masks are ready to go! Let’s get some epoxy flowing!!!

Respirators

New Canopy Arrives!

Today I went down to a freight terminal 40 miles south of my house to pick up my new canopy that Todd Silver sent out last week.  Todd had shipped out the canopy in hopes of getting a look at the canopy mocked up on my fuselage when he stopped through town as part of a multi-state canopy install tour that he was on.  Unfortunately, Todd stopped by last night (Tuesday evening), but since I had originally received an estimated delivery for Wednesday (today), that’s when I picked up the canopy.

New Canopy

Canopy - SecuredCanopy - with plate!Canopy Overhead Shot

Here’s a shot of the new canopy that Todd had hoped to see!

New Canopy Profile

As you can see by the pic above, the new canopy’s profile is excellent and the dimensions are spot on.  I am VERY happy with this canopy!


Main Landing Gear Fairings

Today I received my Main Landing Gear Fairings from Steve at Eureka CNC.  Although I got a delivery confirmation from FedEX an hour before I got home, the box was nowhere to be found.  Apparently FedEx delivered them to the wrong house, requiring me to go on a 45-minute goose chase for my box.  My neighbors let me know that was a common occurrence so I eventually found them at the house at the end of the street!

These gear fairings are often called “Wortmann” gear fairings, and as I’m sure most of you know they solve a big drag problem on the Long-EZ by streamlining the main gear in two ways:  First, it takes the oval shape of the main gear and converts it into an airfoil shape, which is exponentially more aerodynamic than virtually any other shape.  Second, it twists the  gear’s angle of incidence so that it meets the oncoming air straight on and fixes the stock gear’s offset profile (read “dirty”) which creates a lot of drag.

After the delivery drama was over I opened the box to find some very precisely (of course!) hot-wired gear fairings!

Gear Fairings

Eureka CNC Gear Fairings

I can’t wait to get these babies glassed onto the main gear.  Thanks Steve!


New Canopy

I’ve been talking with Todd Silver for a number of months now on getting a new canopy.

Why?  Well, here’s the story:
The first canopy I got from Todd was one that I went down and picked up out of his shop in Ft. Lauderdale in early 2013 while I was deployed to Tampa, FL.  I had wanted a little bit larger/longer canopy so that I wouldn’t have the windscreen up so close to my face, and a little bit taller to have just a little bit more “cabin” space.  However, I should have analyzed the shape of the canopy more thoroughly before throwing it in the back of my vehicle and hauling it back up to Tampa.

Fast-forward to late 2013, once I was settled into my job in Qatar, where I had more time to ponder various build aspects since I wasn’t actually making layups or sniffing epoxy fumes.  I took my pics of the canopy, traced them out (poor man’s CAD) and then overlaid them onto an outline of a close depiction of my fuselage.  I checked this out a number of times from as many angles as I could find.  The main depiction of what I found is here:

Old CanopyThe canopy profile is very close to a true section of a circle on a standard curve. What this meant is the highest point of the canopy sat behind the rollover structure and really wasn’t adding any usable space, but was most certainly adding drag.  Now, to be clear I picked this canopy out of a lineup and the result of my dissatisfaction with it was my fault, not Todd’s.  Todd was nothing but exceptionally helpful as I was looking at his canopies.  In addition, the shape of the canopy also meant a fairly flat and low profile directly in front of the pilot’s seat, and a sharper curve aft where the canopy met the firewall structure.  To be clear on another point: this canopy is beautiful.  It just happened to have the wrong characteristics that I was looking for.

Now, I confirmed my misgivings with the canopy when I came back to the states for a couple of weeks from Qatar in March 2014.  I hauled the canopy down to my buddy Marco’s shop (since my project–but obviously not my canopy–was in storage) and we trial fitted it on his fuselage.  Now, I widened my fuselage 1.4 inches at the pilot seat, but the rest of the fuselage is widened at the same ratio as the original plans fuselage (except my firewall).  Being more of a maverick, Marco chose to widen his fuselage 2 inches the entire length.  When we put the canopy on his fuselage it displayed and confirmed the characteristics I was concerned about (see pic above), but it also proved to me that the dimensions were just too big, since the canopy was close to being oversized even for Marco’s bigger fuselage.

With confirmation in hand, I approached Todd and let him know my concerns.  I sent him the pic above along with this pic below depicting more of the shape I was looking for (BTW, I used Steve Volovsek’s canopy as a style reference).

Desired Canopy

As you can see, the most “bubbly”part of the canopy is directly over the pilot as it flattens out behind the pilot for a good intersection angle with the firewall.

Thus began a conversation over the next few months about the size, shape, etc. of the canopy I was wanting.  Since I wasn’t in a hurry to get a new canopy until after I returned from overseas and settled in, Todd and I waited until I got back to finalize my choice of a new canopy.  Well once back, Todd of course delivered in spades.  He sent me a lineup of pics of a few different canopies (I think knowing full well which one I’d pick) that were all very close to what I wanted, with one being spot on:

New Canopy

Compared to my existing canopy on-hand:

My CanopyTodd was a champ and gave me a great deal even though I was the one who initially picked the “wrong” canopy.  Once I picked out my new canopy he shipped it out the same day.


Need MORE build space . . .

Ok, while it’s nice to have all my tools back on hand and available to use, my garage work shop is much more crowded than it was in my other house in Virginia.  The simple cause for my work space woes is that at my old house I had a nice 10×10 ft shed that I kept all my woodworking saws and tools in.  At this house I have no shed, yet.  The issue here is that the HOA folks won’t allow me to put in a normal sized shed.  Soooo, after a bit of research I decided to install a plastic slide top storage unit and build a smaller shed out of leftover materials that I ironically pulled out of my shed located at my other house (which is currently rented out).

Thus, my shed projects begin… all to allow build space for the Long-EZ!

The first order of business for the plastic shed was to build a stable base on uneven ground.  Luckily I had plenty of 5/4 board for the top, but I had to buy a few pressure treated 2×6’s for the base.  After those were on hand I set to work building the base:

Tool Storage Shed Base I finished right about 8 pm, the bewitching hour that I prefer not to arouse the neighbors’ ire with saws buzzing and nail guns blasting.  Here’s the finished base:

Plastic storage shed base

Once that was completed, I was now at the EZ part which actually putting the shed together… this took all of about 30 minutes.

Tool Storage Shed

Finally, I spent another good 5 days off and on building the smaller, yet taller, shed underneath the deck.  Here’s a shot of it before the final paint went on:

Shed

Huzzah!  Now I finally have places for my woodworking tools and space in my garage to build the Long-EZ.


Qatar Build … Signing Off

The movers are coming today to pick up my stuff to haul back to the states as I head for my new digs back in DC.  That means I’ll be without my desktop computer, my 11×17 inch printer and a number of my build binders for a while.

CAD station

Of course I’ve spent a fair amount of time backing up all my build files, CAD drawings, etc. to ensure I have them with me and nothing gets lost.  I’ve also printed out hard copies of my electrical system diagrams and sent those via snail mail back to the states as well.

Below is another shot of my “CAD/website development station” that I’ve used for the past year to build this web site and work as much of the project as I could since I of course didn’t have access to the physical airplane pieces parts.

Workstation

For those of you who may think that I might just be exaggerating a bit about the space that I’ve been working out of for the past year, and that I probably really could have slid in a few glass layups in here or there, check out the digs that I’ve managed with for the past year.

Planning CellMad Scientists LairAnd I thought the 1-car garage in Germany was small!  … sheesh!


Chapter 22 – Electrical System Diagrams

I have been working on my Electrical System since September of 2012.  More recently, over the last 6 months, I’ve been trying to get it as close to finalized as possible before I head back to the States… and commence to start building in earnest.  One goal that I had while being separated from snorting epoxy fumes and getting touchy-feely with itchy fiberglass for the past year of this build was to complete my electrical system wiring book. I want a solid plan to follow once I get to the point of wiring up this bird, and I don’t want to be in a position of trying to design my wiring system as I install it, or worse, take precious time away from actually wiring the plane to research out what I’m supposed to do, or how to do it.  Of course, my overall goal is to have a very optimized, efficient and as Bob Nuckolls would put it, “elegant” electrical system (all that equaling ‘safe’ too!).

Pic below shows Switch page (L side) and Z13-8 Main Electrical System diagram (Lower L) along with five other electrical subsystem diagrams.

Chap 22 - Electrical System

Of course another reason for me to document my electrical system & wiring, and the foundational research that goes into all that, is to have reference documents to go back to in case something just ain’t working right!

So a couple of months ago I felt my electrical system was to the point where I should start diagraming out the electrical subsystems. Thus, over the past couple of months I’ve started in on the individual pages–one for each subsystem–of the Wiring Book.  Below is the ever-expanding and ever-morphing list of subsystem diagram pages for the Wiring Book (Green denotes completed or mature, yellow is currently being worked):

Z.  Z-13/8 Electrical System
–    Switch Configuration
1.  Panel Components
2.  Radio & audio system
3.  Main Bus
4.  Batt Bus
5.  E-Bus
6.  Nose Gear
7.  Pitch & Roll Trim Systems
8.  Lights: LDG, TAXI, NAV, STROBE
9.  Engine Info Management
10. Fuel System
11. Cockpit Lighting
12. Landing Brake
13. Throttle Switches
14. Control Stick Wiring
15. Integrated Back-up Battery System
16. Alarm & Warning Systems
17. Charging & Starting Systems
18. Heater System
19. Electronic Ignition
20. P-Mag Ignition

The wiring pages for the individual busses (#s 3-5) will be created last after all the minutia is flushed out and sorted through for each subsystem.  It’s amazing the amount of research, emails, and phone calls, etc. that goes into creating each subsystem diagram. Of course, it’s an understandable dynamic that more companies producing components for homebuilts gear them towards the RV crowd, simply because that’s arguably the most often built experimental in el mundo.  Unfortunately, this can create issues for us Canardians as we fervently try to cram RV-oriented electrowhizzies into our prized EZs. Also, it’s simply a matter that a lot of these smaller companies just haven’t got around to engineering a solution between their and other products that can work in our canards.

A good example of this is when I had to contact both TCW and Trio to figure out how to get the Trio A/P AutoTrim function to work with TCW’s SafetyTrim Pitch Trim Controller.   Both companies were of course fantastic, but it took a good day and a half to work out and confirm a solution.  And that’s for just a few wire connections between two devices. Clearly most of us have a fair number of electrowhizzies in our birds, and luckily most of this stuff is figured out ahead of time . . . but definitely not all the time!

Below is a shot of my main wiring diagram for the Z-13/8 electrical system architecture that was developed by Bob Nuckolls from The AeroElectric Connection fame.  I have of course taken the basic diagram and modified it countless times for my purposes.  If you are building an airplane and don’t have this book, get it!  I seriously don’t know how you could wire an experimental airplane without it.

Chap 22 - Electrical SystemHere below is a shot of my switches, circuit breakers, and LED lights diagram.  Notice that each device is numbered with a specific code.  These codes are depicted wherever the device shows up on any given wiring diagram.  They’re also annotated on a spreadsheet that I keep all these device codes in, and will be incorporated into a wiring identification schema which will be labeled on each wire.  Once the labels are on the wires, I’ll be able to look at any wire and its associated 12-digit code, tell exactly what device the wire is coming from and from what area (nose, engine compartment, etc) of the aircraft, what device and area it’s going to, and its function.

Chap 22 - Electrical System

Below is a working copy of my panel wiring diagram.  I spent nearly a week working off & on to upgrade the diagram so it depicted the Garmin GTN650 pinouts vs the Garmin GNS430W.

Chap 22 - Electrical System

And finally, here’s a shot of the Pitch & Roll Trim Systems wiring diagram:

Chap 22 - Electrical System


Chapter 22 – Instrument Panel Ongoings

Chap 22 - Garmin G3X Touch

After squawking about the new Garmin G3X Touch being too expansive for my wee panel, I decided that I should thoroughly investigate it to ensure I wasn’t missing anything important.  So this past weekend I again built a matrix to compare all my EFIS options to ensure that I’m getting the best capabilities, cost benefits, and of course weight efficiency out of my EFIS that I possibly can.  Thus, I did a runoff betwixt the new Garmin G3X Touch, threw the close-sized GRT HXr 10.4 back into the mix, the GRT HX 8.4, and GRT HX 6.5.

Chap 22 - GRT HXr 10.4 EFISChap 22 - GRT HX EFIS

I then began to tally up all the weight, cost & current draw of all the components required to give me the capabilities I’m looking for in an EFIS system.  Something to note that in all of these configurations is that the second-screen MFD and back-up PFD is the GRT Mini-X.

Chap 22 - GRT Mini-X EFIS

I was surprised as I tallied up the prices that the cost difference between the Garmin G3X Touch and the GRT HXr was less than a grand.  As I trudged along in looking up component weights, and with things still looking comparable between the two systems (of course giving a slight performance edge in touchscreen simplicity to the Garmin), I hit a fairly significant snag.  It appears that Garmin’s remote transponder is a robust bubba, weighing in at over 3.4 pounds with an installation depth of over 11 inches. The weight on this one transponder helped get me back to reality, realizing that I was comparing the big heavy guys, when once again I was getting plenty of capability with the smaller, very capable “little guy” EFISs that were much lighter and offered much more panel space … and thus configuration options.  So once again, although tempted by cool colors and touchscreens, I dumped the big EFISs to return to smaller, lighter and more efficient.

One thing that came out of my EFIS comparison, was that I took a hard look at my allowable space BEHIND the instrument panel.  I pulled out the plan’s A-pages to measure out clearances and I had a true Doh! moment.  Albeit initially (Fall 2012) I had been verifying clearances behind the panel with cardboard mockups, since then I had been rearranging, adding, removing and modifying my avionics/instruments with apparent reckless abandon!  The result was that I was placing components in position on the front panel with assumed clearance behind the panel.

To remedy my ways, I gathered the physical data for the displays, avionics, instruments and components all going into the panel.  I clearly needed to deconflict my behind-the- panel space requirements to match what I could have on the front of the panel.  I will say that I attribute this epiphany in part to Nick Ugolini since I found while reviewing his blog that he had run into this snag while redoing his instrument panel.

A significant focus in this effort is of course the area immediately behind the lower right side panel, since the elevator control rod must have free reign in its movements.  I had stacked up my GNS430W/GTN650 over on the right side, having failed to verify it’s clearance with the elevator control rod, and then even added a couple of other rather deep instruments to boot.  I’m glad I found it now, but I admit it was not the most optimized planning on my part.

The result of all this was a trip back to the proverbial drawing board.  I got out my cardboard cutouts and begin putting all the “new” puzzle pieces in place.  The result is something along the lines of this:

Chap 22 - Instrument PanelAgain, I will make note that this is still a work in progress, but at least now I am very cautious about my specific clearances behind the panel.  In the back of my mind I thought I was doing this, but pulling out the actual plans verified and confirmed how little space there actually is behind our panels in these birds.  And of course we all know what assumptions get us!

Build on!